Horizontal Boring Machine Accuracy and Quality Control
Here's a long, detailed thread with photos about how to ensure accurate drilling and doweling in door manufacture with a simple horizontal boring machine. November 3, 2010
Question
The shop I work in produces about 200 doors a year. We currently use a Bridgewood horizontal boring machine-two hole. I feel this machine is a weak link in the shop. Ninety percent of our doors are solid 1 3/4" sipo or sapele, cope and stick, and 3/4"x4" dowel construction. I cut rails to length, bore for dowels then cope. On stiles I profile first, mark centers and bore. The problem is alignment issues and often spacing between rails needs to be adjusted. Please limit comments to boring machine methods and equipment. I am not the owner of the shop and will not be changing construction style.
Forum Responses
(Solid Wood Machining Forum)
From contributor E:
I can't quite understand what kind of issues you're having. Go into a little more detail about what's going wrong. I too build doors the same way, except I use a single spindle horizontal boring machine to drill my dowel holes and don't seem to have too many issues. When you say alignment problems, where are they occurring?
From contributor Y:
You might try to drill for dowels before you profile. The drill bits and brad point might need better control and location. Longer bits usually have more run-out. Drill bushings closer to the work have been used to control run-out.
From contributor O:
From experience with poor boring machines I would say it is equipment. If you can eliminate marking for the holes and use a stop or fence instead you might gain a little accuracy. With two spindles you probably need four or more holes on some parts; this becomes a nightmare to position. On machines with poor fencing and stops you can eliminate some problems by taking the time to center the holes and work from one side stop. It is possible to drill into profiles with short or large drills but as Larry mentioned it�s usually better to drill before profiling.
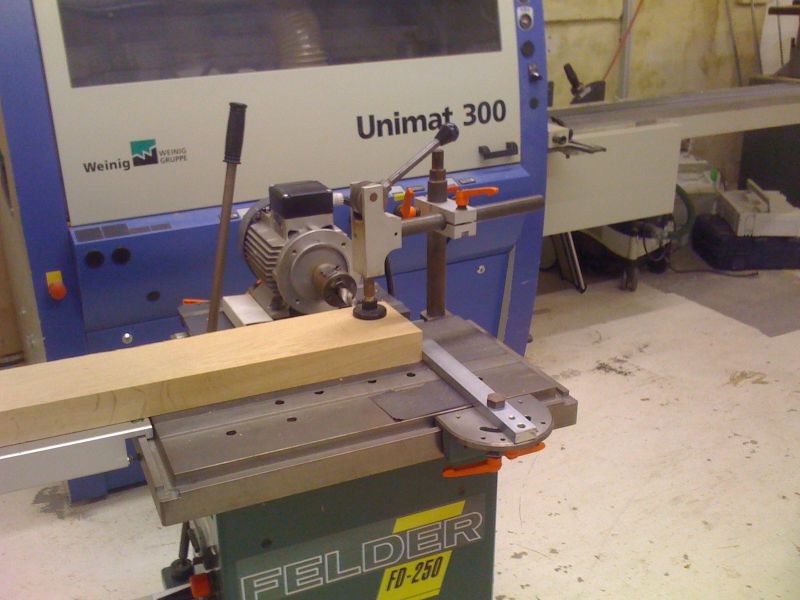
Contributor E uses a single drill Felder machine to drill his holes. The trick with European machines of this design is the head moves horizontally in accurately spaced increments for multiple holes in rails. We have a Hoffmann Bore System for frames and it is accurate to .3mm for outside corners and inside mullions with no measuring or marking necessary. This machine is at its best for small lot custom production.
For non CNC drilling - Felder, Griggio, Panhans and some others have drill-mortisers that are accurate. I had a Kolle (similar to Panhans) that was pretty good. A step above these are quick setup frame drills from Gannomat, Stegherr and Hoffmann (now owned by Gottizinger) that bring the accuracy for inside mullion and rail drilling to a higher level.
From contributor E:
I always drill before profiling. Not that it can't be done after the fact, but with my system I like having the edges square so when I set up for intermediate drilling, such as for lock rails and so on, I can better see my centerline marks better. You have to have some kind of fence system with stops to reference off of. Pencil marks won't work for any kind of accuracy, if in fact that is where your errors are occurring.
If the alignment errors are up/down in regards to the pieces flushing up with each other, then you might want to take a look at the drills you're drilling with. I use 3/4 x 4" dowels myself. I've always been searching for the magic bullet that would eliminate any kind of wandering of the drill, and the closest thing I could come up with after talking with both Fuller and Morris Wood Tool were two different drills. One ground for the end grain boring, the other being just a regular brad point drill. Sounds like a hassle, but with the Felder it's not that big of deal to switch bits around. I hope this helps a little and can help you start to figure out what the issues are.
From the original questioner:
Thanks for the responses. First I will try boring stiles before running profile to see if that helps.
I have a couple follow up questions. What size dowels are your shops using for "man doors" (we are using 3/4"x4" spiral groove)? Second, how do all of your stop systems work for boring stiles? Most doors would need two stops, some would need more.
To contributor E: We must of been posting messages at the same time. You already answered some of the questions I had. Currently I make a story pole for boring center lines on stiles. I mark these points on the stile and then line them up on a center line on the boring machine. I do not have a stop system. My issues are measurements between rails not height. Before drilling a batch of doors I always check the center line on the boring machine with blocks. Any more information on how your stop system works would be great.
From contributor E:
I hope I can explain this as I'm away from the shop and can't take any pictures. I set my machine up so it's absolutely centered. That way I can flip my stiles end for end and reference off a fixed stop on the table for drilling for both the top and bottom rails. The same stop is also used to do the end grain boring for the top and bottom rails also, so everything is aligned there just fine. I also bore any intermediate rails referencing off the same stop. The edge that references off of the stop I drill so the centerline of the hole is 3/4". This makes laying out for later drilling in the stiles much easier.
For the sake of discussion let�s say our stiles are 5". The fence I use is a long extrusion that I would clamp down to my table 5 1/2" back from the front edge. From there I can put a stop on it and slide my stiles down to the stop and then drill for lock rails and so on. I can do this because everything is centered in height so I can drill both the left and right hand stiles from the same set up. Any further drilling is done the same way. Whether it's one door or ten doors, that's how I do it.
From the original questioner:
Thank you for the previous responses. I tried your method of one stop for top, bottom rail and both ends of the stiles. It worked great. I am having a harder time figuring out how you do intermediate rail locations. I was also wondering if you oversize top and bottom rail and stiles and then cut door down to finish size. I really appreciate your input on this subject. When I took over the management of this shop I inherited the tools and its methods. I am always looking for ways to improve and this forum is a great resource.
From contributor M:
Are your dowels net size? We use a slightly undersized dowel, with no compromise to strength. You can either order undersized dowels or an oversized bit. On a side note, I bought several used Tiger stops at auction years ago. Using our two spindle Ritter boring machine I flipped it around and put the motors and spindles on what was the adjustable table and created a fixed height table with a tiger stop. This is a boring fool with great accuracy. The key here is we need to be dead center for height because we bore everything coming from one side. I believe Ritter now produces something like this commercially.
From contributor E:
First, no I don't run any of my parts oversize and come back and trim. That's one of the strengths of dowels. Those pieces fit together right where they should be. I'll try my best when I'm in my shop tomorrow to remember to take a picture of the stop system I use when drilling for intermediate parts. It's nothing elaborate like contributor M's system, but it works for me.
From contributor L:
I have run across an oversize bit on a used boring machine. What is the point on the undersized dowel? Glue?
From contributor J:
This may sound a little archaic, but it�s how I do it and it works well. I only make a couple dozen doors a year, but 200 is not that many either. I also bore before profiling. Instead of the boring machine, I made a boring template with long, hardened bushings that fits around my stile or rail, perfectly centering my 5/8" x 5" dowels. I clamp it on, get out the big Milwaukee drill and bore away. I have to make one mark on each stile for center line on intermediate rails. They come together with great and I don't have to do a lot of measuring.
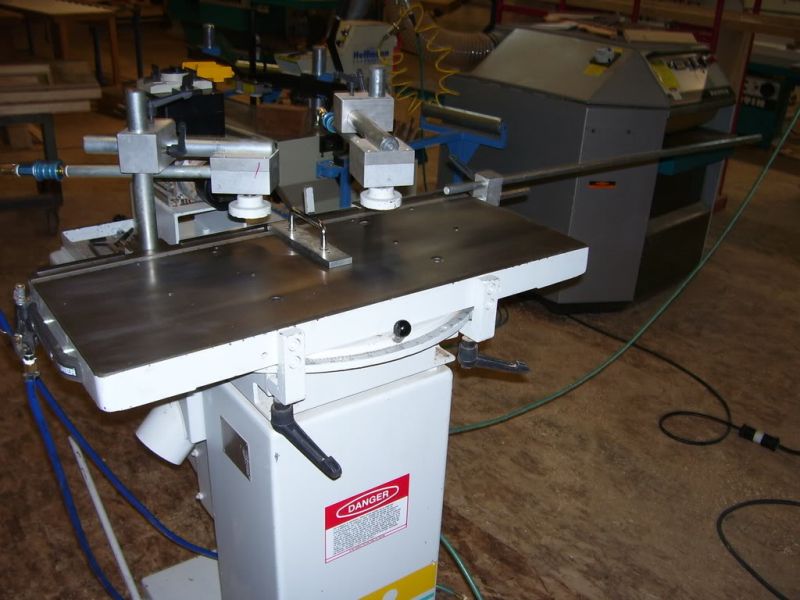
From contributor E:
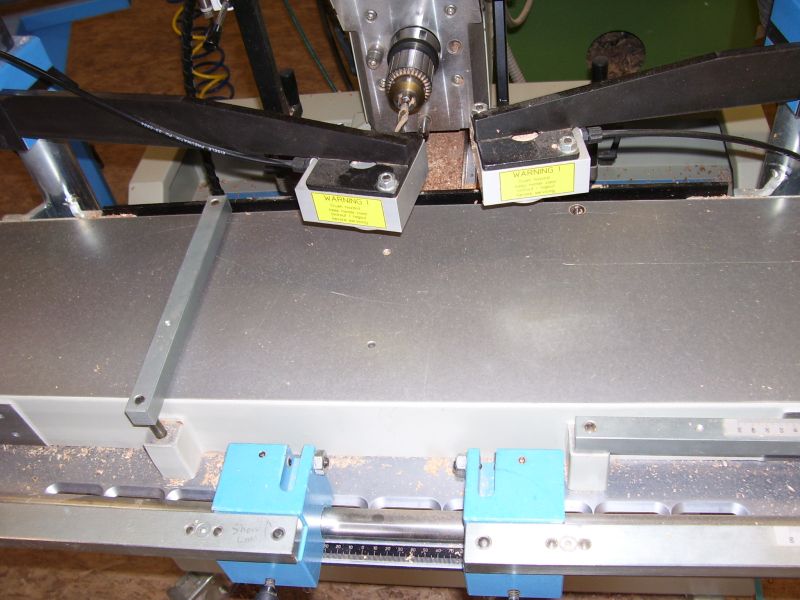
This first image below one is somewhat obvious. This is the stop I bump against. The top and bottom of the stiles are drilled by referencing off of this stop. Rails are referenced off of the same stop only rotated 90 degrees.
Click here for higher quality, full size image
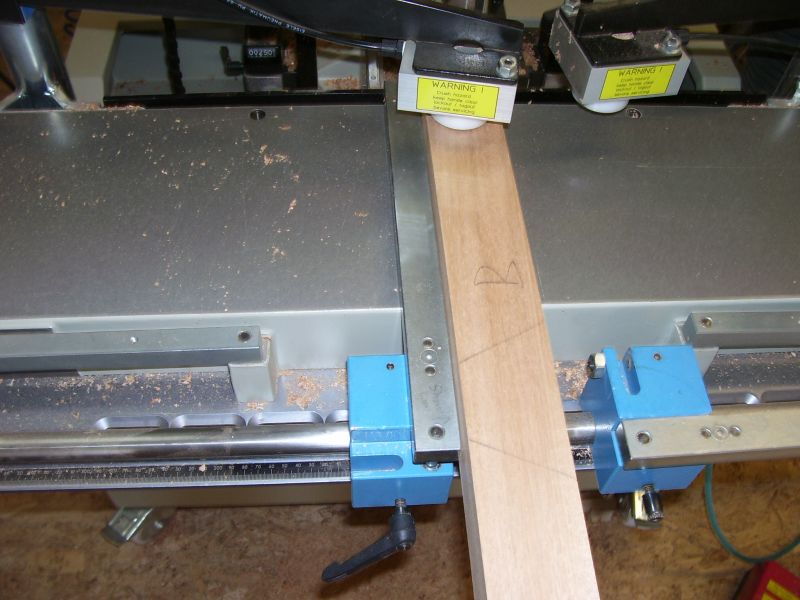
This is how I drill for the intermediate rails. I set this fence up behind my Stile with a stop on it that I reference off of and then drill for lock rails or any other pieces that have to be drilled for. This isn't as fancy as what Contributor M said he's got, but it works for me. Hope these pictures give you some ideas to work from. With dowelling, accuracy is very important. You have to be dead nuts centered with the height of your drill or all bets are off. You are drilling both left and right hand parts off the same settings.

Click here for higher quality, full size image
From the original questioner:
Great! Thank you. I think I am going to try some kind of aftermarket flip stop (manual) like the kind on a panel saw.
From contributor O:
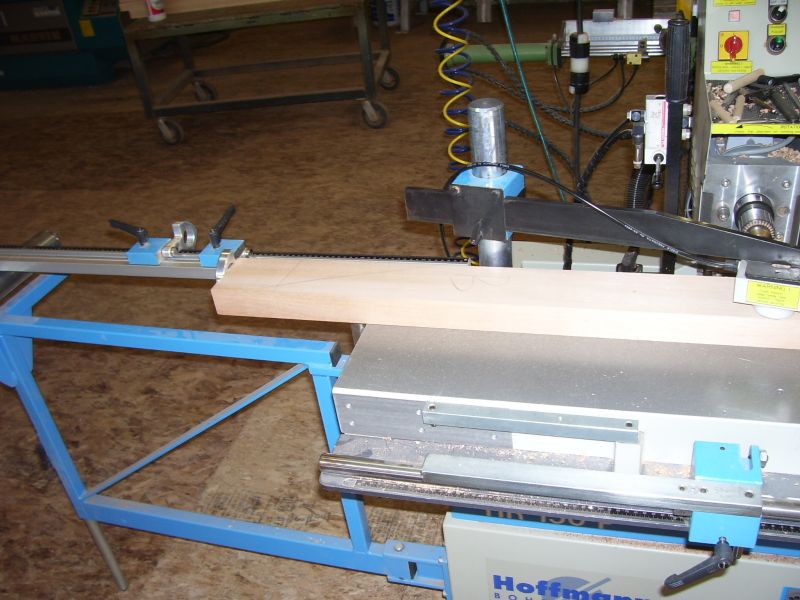
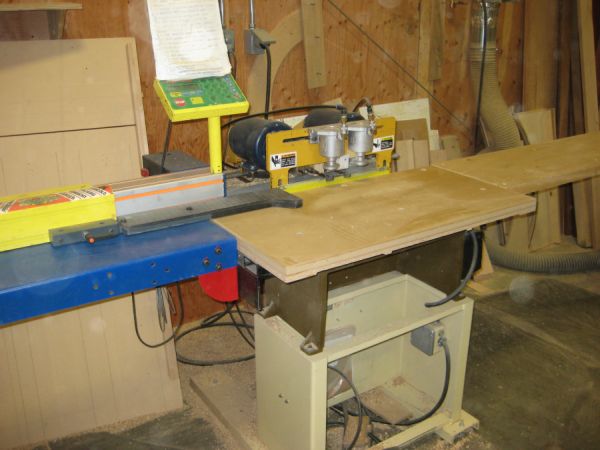
I put a couple screen doors together in the shop yesterday and took some pictures to give more ideas for your fence. The problem with flip fences on a horizontal drill is getting in close for narrow mullion drilling. The Euro machines all move sideways and that presents more of a problem. Mike should post a picture of his tiger fence on a boring machine. I am trying to come up with a fence for a Maka and may go that route.
The Hoffman has two fixed fences that come from the operator side of the table and two adjustable fences. The fixed fences are used for outside corner drilling and the adjustable ones for mullion or inner rail drilling. Where the table ends there is a long graduated fence that plugs into the table for inner stile drilling. The fixed and mullion fences swing and tuck under the table when not in use so you don�t lose your settings if you need to come back to them. Its real easy to set for example if you have a 140mm rail just set the fence on 70 and drill as many holes as needed then set the back fence to the center of rail from either the top or bottom of door and drill it. We don�t worry about centering the bit for thickness because the machine is accurate left to right. It centers digitally if needed and can work on 2 height levels via air operated head movement.
The first picture is the fixed fence for outside corner drilling. Notice the right side stop and mullion stops are tucked under the table.
Click here for higher quality, full size image
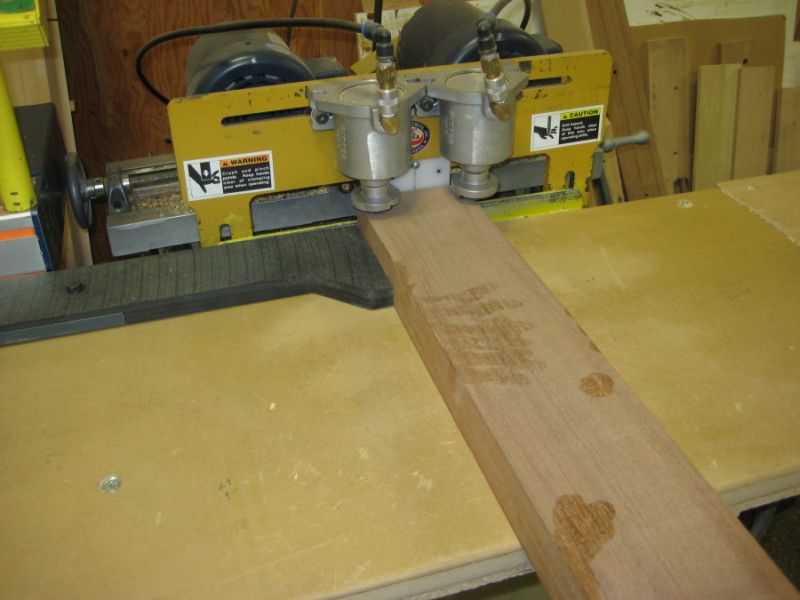
This picture shows an inner rail getting drilled. Since the bit centers easy in the width of the rail we usually just flip the piece and may use the other fence for a different width rail.
Click here for higher quality, full size image
This image shows the stile drilling for the rail using the long back fence.
Click here for higher quality, full size image
Here is a picture of the Kolle we used to have. We used it pretty much the way Contributor E uses his Felder. One thing different is the table stop that plugs into the different holes you see in the cast table. It was pretty accurate side to side once we figured out the adjustment. Hope this gives some ideas.
Click here for higher quality, full size image
From contributor A:
Are those hold-downs on the Hoffmann stock to the machine or did you have those fabricated? Looks like a nice machine.
From contributor O:
They are stock. They also have a lot other clamps, accessories and multi drill heads for these. For safety the newer Euro pneumatic clamps have a short throw; 12mm and a large head above to keep fingers from getting pinched. I got my fingers under the Kolle clamps once and it smarts.
For manual machine the Hoffmann is extremely well designed. They were a small company and in addition to drills made fence systems for other companies like Festo and the tenoning fences for Martin shapers. The owner retired and Gotzinger (also a small company) that makes door and window machinery bought the production rights. Martin is their US dealer.
From contributor M:
Here are a few of the tiger fence set up. As I mention we turned the machine around and put the motors and spindles on the adjustable table so we change the door thickness by moving the motors up and down, and the table is fixed for height and bolted rigid. The pusher we fabricated so it will handle our rails as well as pushing the stiles, wide bottom rails it bores, shifts, bores again then retracts, we flip end for end and repeat. The tiger stop cycles automatically so as you bore a pair of holes it advances to the next set pushing your material through, then as it completes the last one retracts to load the next one. We have tons of layouts pre- programmed and listed on the papers you see on the clip board. As you notice there is also a center mark between spindles for the odd single we can just layout the old fashion way with pencil marks. Of course you can just put in any dimension you want and the fence will move to it.
Click here for higher quality, full size image
I just put a piece of material up there for an example.
Click here for higher quality, full size image
From contributor I:
Make sure you do not align just using marks. While this may be possible, you can almost count on inaccuracy or failure to align if you use marks instead of mechanical stops. Use stops or a jig at every step with every piece at the final dimension after machining, and check for possible warp from humidity or temperature. If the stock has been sitting for even a couple of days, you can get quite a bit of deformation.