Wing Back Chair Show and Tell
A carpenter learning as he goes on a set of wing-back chairs shows his work, and gets feedback from a tough crowd. October 19, 2013
Question (WOODWEB Member) :
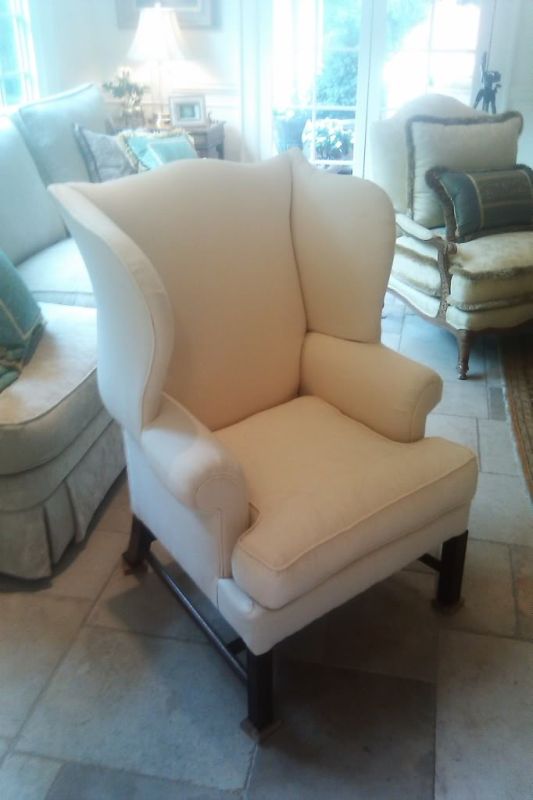
I browse WOODWEB quire often and was drawn out of the shadows by a project I am facing - the wingback chair. I am a finish carpenter in Portland, OR and I have been at it for some time. I began working with a designer in the nice part of town (West Hills) and remodeled his historical home. It took two years for me to do all the finish work. Afterward, I continued working and building kitchens for clients with him (at $750 plus a foot for paint grade cabinets, we are lucky to have work like we do).
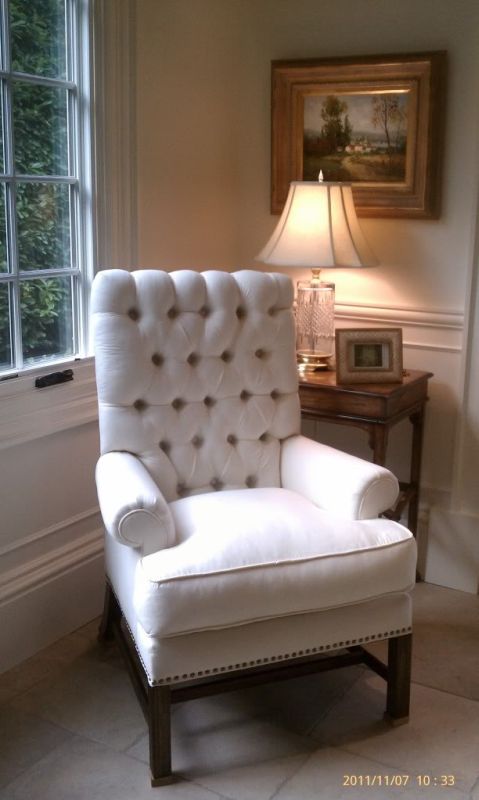
Anyway, I went to cabinets and now he wants me to build a wingback chair. I could find nothing online to what I needed. The plans available were simple and not at all like the chair he gave me, which he wanted me to duplicate without dis-assembly. I have been at it for a while now I think I have it. I just wanted to share the chair picture as it is quite involved, even for an upholstered chair. I also wanted to see if anyone has seen one quite like this, I need a little help!
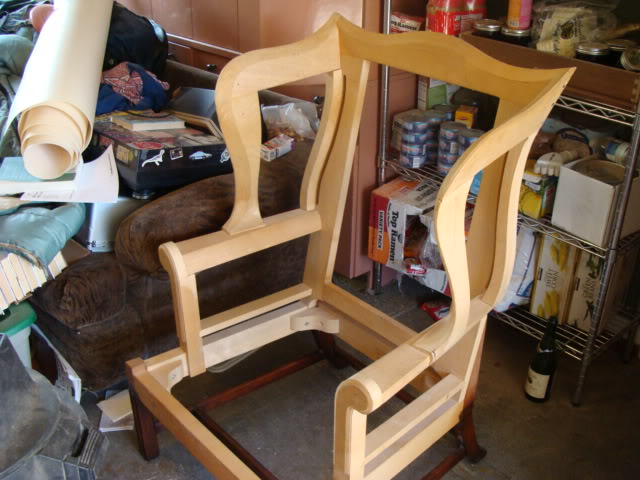
Click here for higher quality, full size image
Forum Responses
(Furniture Making Forum)
From contributor P:
I have made a bunch of wing chairs along those lines. The form will vary based on where (city) and when it was made. What do you need help with? If you have the chair in the photo assembled in your shop it should all be self-explanatory and no need for drawings/plans. It�s all mortise and tenon joinery(or should be). Build it from the floor up, so assemble the base seat, then the large back frame, and then the wings. The upper portion of the wing is probably coming off the back at a different angle than the lower horizontal arm portion. There is a pile of work in these, don�t give it away.
From contributor S:
Floating tenons are your friend for chair joinery. Putting a mortise in anything with a flat face is easy. If you don't have a nice bandsaw now is the time to get one. I hope you�re getting a few grand for each of these. At least for the first since figuring out how to make a chair takes time. Duplicates are a bit easier once you know what you�re doing. At that point you will have all the jigs and templates made.
From the original questioner:
To answer a couple of comments: I now have two duplicates ready and assembled, and I am now working on the mahogany bases. I assumed this was the best bet since everything was glued and screwed. (Just a few screws to attach the wing to the back and the armrest. Since they used them on the original I took advantage!) After the glue dried I was able to attach the base, one dowel at a time, and made sure it was straight and level on the floor.
I told the designer that it would be expensive, but I never told him how much. The first chair I made about two grand on. I agreed to take a slight pay cut for "exploratory work." (Fifty dollars an hour - not horrible, but less than I am used to).
Now this guy has made me a hundred grand in the last couple of years with jobs, so I was willing to cater to him a little. He has the first two sold for $3,500 apiece, given he still has to pay to have them upholstered � he�ll make out great I am sure.
Anyhow, I was able to dry fit one chair, then make three sets with the template pieces. One thing I have learned about this kind of work is to make 1/4" plywood templates, then transfer that to full size pieces, and then keep a set! It pays off to have a visual aid when there are so many angles. This one happened to be mostly six degree and 20 degree cuts. It took about 20 hours to make a good set of pieces, but then I made three more in the same time. So while I would love to get a few grand a piece, it�s unlikely.
So what is a fair price? Another question: I was hired to make the chairs and paid to make the templates and samples, rough fitting, and etc. If one day the designer asks me for a set of templates, should I give him one? Or would it be mine by right? (That is more of a moral question I suppose.)
Anyhow, I pumped out three of them in 40 hours (one not assembled yet) so should I charge a flat rate? He wants to make a hundred more over time (he says). I was thinking a grand a piece for my labor. Sounds reasonable I think?
From the original questioner:
Oh and about the bandsaw comment - that's funny. As soon as I saw the chair I told him "I am going to have to buy a bandsaw for this". So that day I found a circa 1985 ram floor model in perfect condition for $90! As it turned out the guy was about 75, retired, and finished with woodworking so for $170 I took home the bandsaw, five blades, a 16" belt sander, an electric brad nailer, a router mounted on a router table with some bits, a chainsaw, and finally (he wanted $40) a Davis Wells cast iron jointer (heavy as heavy is)! It is on casters so at least I can roll it, but the bandsaw and jointer were the last two tools I really "needed" for my shop, and I scored a great deal. He says he has a lathe for $100 too, so we will see. The bandsaw was the gold egg. It is going to cost more for the two guide brackets that are broken than I paid for the whole saw!
From Contributor U:
Forty hours is really impressive wow!
From the original questioner:
My secret is this: I work alone! I have dealt with too many slow co-workers over the years and there is a fine balance between quality and speed. Actually, I stated I built two and one is in pieces still for templates. It took me around five hours to get a stable template set, transferred it to full size pieces, and after that what else is there? At that point, it's all about how fast I can cut and retool as needed. I am a one man shop, from my garage. I have none of the fancy lathes or $5,000 table saws (not for lack of want) but I get the job done.
There are a total of 22 pieces on each chair, so it is a matter of how long it takes to cut them, piece them together, and glue them up. The only thing that gets me is the mahogany bases; I have to stain and varnish them myself before delivery, or the designer might try and do it himself again. I expect if this chair was not getting upholstered that the tolerances would be much tighter and time would slowly tick by. Really there's not much to it. It's like comparing paint grade work to fine woodwork. A 1/16" gap where the arm meets the wing is not a huge deal at all, although I prefer tight joints.
Here they are after 20 hours.
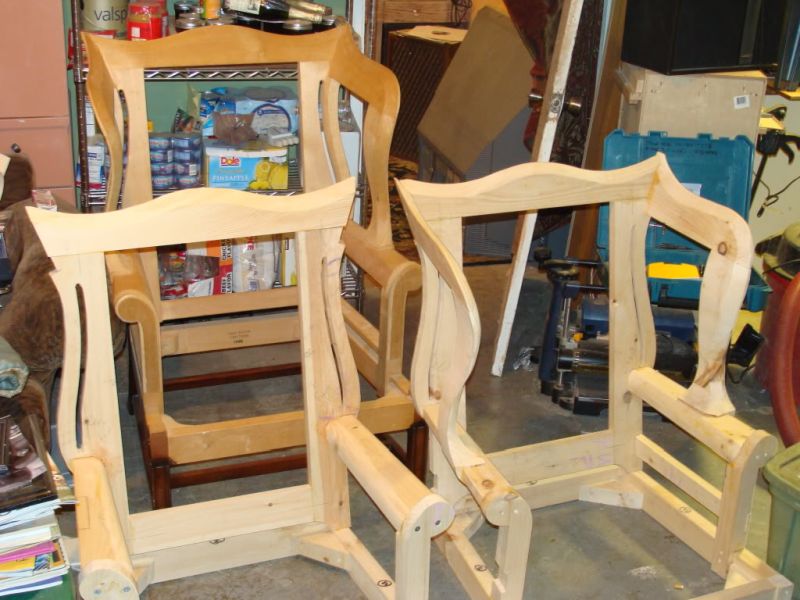
Click here for higher quality, full size image
Here they are before stain and lacquer. It took about 45 hours and a lot of patience. I guess he has an order for a dozen of them, so here we go again! I am pleased to have the opportunity to do projects like this.
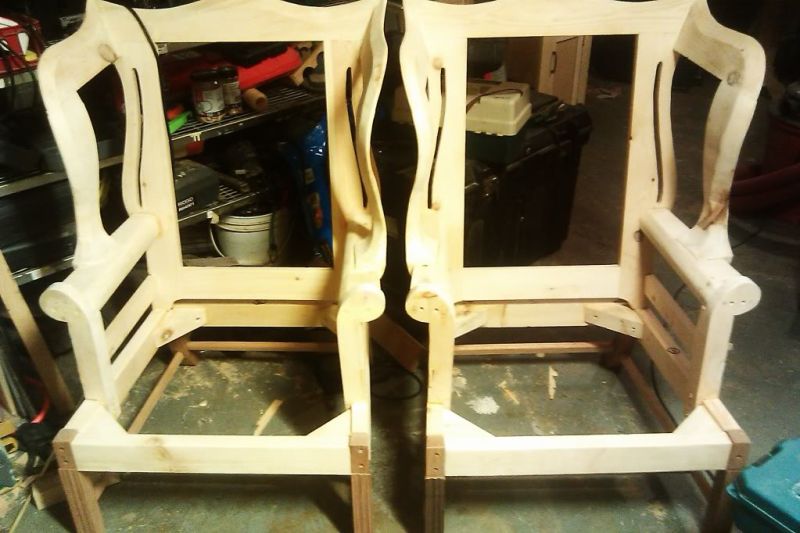
Click here for higher quality, full size image
From Contributor U:
Is that pine?
From the original questioner:
Yes, it is furniture grade pine. Is there any reason why I would not want to use it?
From contributor P:
I would have used soft maple or maybe ash. I have used poplar on a few. Pine does not hold the upholstery tacks well.
From Contributor U:
As Contributor P said, soft maple or ash would be the usual wood of choice. Pine is good for Windsor chair seats, but not much else in chair making. Chair making is a bit of a specialty and demands a specialized skill set and knowledge base. You're to be admired for delving into a very challenging area of woodworking, but if this is your first chair making project, and you're drawing on carpentry skills, or even cabinetry skills as a reference, you may be in for problems.
From the original questioner:
Thanks for the words of wisdom. I am definitely a novice. At $2.25 a BF for furniture grade wood, I was willing to make my first couple out of pine to make sure I got the design right. I will make my next ones out of ash. I had a hard time finding any 8/4 stock of anything else. I suppose more research is needed on my part. I hope they hold okay for the first two, I suppose I will find out. I do realize it is a totally different trade than my others. I want to do it right, and I want a quality product. As for the two I already made, do you think it would be a mistake to let them get upholstered? I would hope the tacks would hold for a good while. I don't want to put an inferior product out there.
From contributor G:
We make our chairs out of select alder, oak, maple, walnut, and cherry. We also do the upholstery so it helps to understand how the upholstery webbing and fabric works in your design. I would stay away from so many screws and use dowels instead. We use screws only on the corner blocks. Nice first effort but it will take a bit of usage to see if you have weak areas.
From the original questioner:
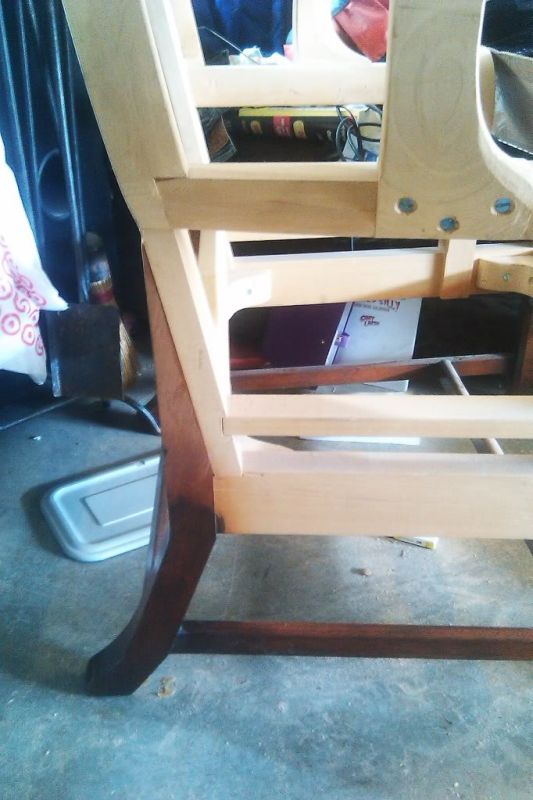
Thank you for your advice. It really helps that people aren't giving me grief for my first efforts! I only used three screws where the wing meets the back (there is a rabbet, but not much glue area. The original had them, so I figured there was a reason) and where the arm meets the wing - same situation and I did use many dowels. Tenons were iffy because I wasn't sure how it would fit together. A few angle changes and the like, and my next ones will be perfect. I decided after research to use floating tenons from now on with everything. As stated above, bringing my skills to the table help, but chairs are a different world altogether. He wants me to make a few that have no wings, with the same design. I am wondering if the armrest is sufficient to hold the back up. The back is mortised into the base, but the wings are an integral part of the chair. Since the base is separate from the back, I wonder if I should even try this, or just get a new plan altogether - any ideas?
As far as wood species, which of the above stated is the easiest to work with on the band saw? There are a lot of deep cuts, which is why I went with a softer wood for my experiment. Also, all said and done, the two chairs took me about 55 hours to build the frame, leg design, install base, and stain and lacquer. Not bad for the first two, plus I have all my templates.
From contributor G:
The back legs run all the way to the top of the chair and use two or three very tight dowels and the chair will last. It�s important to allow plenty of drying time for the glue between steps. If the back is attached to the base instead of a continuous back leg then it will not last through much use. We have been making chairs for thirty years and have never had one fail.
From Contributor U:
Traditional framed chair construction uses a one piece back post/rear leg with the front, rear, side, and crest rails joined to the front legs and rear post with mortise and tenon joinery.
Dowels and floating tenons may work, but integral tenons are best because of the compound angles involved in chair geometry. The frame is almost like a post and beam barn frame without any square corners, and should be very strong. The arms can be mortised (preferably) or lapped and screwed to the frame, and the wings likewise. The materials for a chair should be chosen for their function, not by how easy they are to machine or work with. I've built chairs for nearly 20 years, and my gut tells me that if it only took you 55 hours to build and finish two wingbacks, there are likely some serious flaws. I'm not trying to discourage you, in fact I think you have a natural aptitude for chairs. I'm just afraid you may get some grief about these pieces, although I could be wrong. Again, I encourage you to read some of the excellent books on chair making rather than just trying intuitively to understand how chairs should be built.
From the original questioner:
I am still curious why 55 hours seems like too little time. I sell myself on quality, and sometimes spend too much time on the details. As the mahogany base is the only part that has to be stained and finished, it took a while to get it right. But to cut and assemble 22 pieces of wood and end with a quality product, I don't see why this amount of time is too little. I know (we all know) there are varying speeds in each of us. I am one of the guys who works hard, doesn�t take breaks, and seldom makes bad cuts. I am very focused, even a little OCD when it comes to my work. If this chair was to be solid without upholstery I can see the point, but I made two sets at a time (both at once). So cutting them I didn't have to do much re-tooling and switching machines, getting confused, and the like. I guarantee there are flaws, as they are my first two. I bought the wood not because it was easy to work with, but because it was furniture grade. Easy to work with was just a bonus.
I thought that would be okay, but I guess I was wrong. That's why I posted this thread. I am glad to have folks give me tips, it is much appreciated. I want a quality product, and my next ones will be even better. Around 30 hours for a wingback, with templates? Any carpenter who couldn't do that in my book is a little slow, or using hand tools. Either way, they look great to me. I can't imagine what flaws might appear, but I suppose I have been wrong in the past. There isn't much to them once the pieces are ready - just a puzzle.
I am not trying to sound cocky with those statements. I am just a different breed of carpenter than those I have worked with. I can multitask, have great math skills, and bust my butt. I expect to hone my skills so I can be even more proficient. The designer wants me to make a matching ottoman, and some cocktail tables too, so I guess I am in for some experiments.
I am diving in head first I know, but my dream was to run a furniture shop from home one day. I just never knew it would happen so fast. My designer has more faith in me than I do I think! Recently his home was featured in a Portland magazine and before he had the tour he wanted me to build a solid walnut bed frame and headboard. I had never done that either, but I researched it, purchased the right hardware, and it was awesome when I was done. I was overwhelmed but made it happen. That is the only way to make it; take chances! Lucky for me the designer eats the cost when my experiments go wrong. Something a lot of guys would kill for. It allows me to learn new trades without going broke or having a customer kick my rear end!
From the original questioner:
An update for everyone: when I posted about the first wing chairs I was asked what type of wood I had used (white pine) for the frame. Hemlock, alder, etc. were recommended. I got worried about the two I had made, but we upholstered them and they are great. I was also worried because I used dowels and rabbets instead of tenons.
Question: I bought a book on antique furniture reproductions and there was a wing chair in it. The recommended procedure for the fully upholstered chair was to use rabbets, dowels and (of course) soft white pine for the frame! I am confused, as I want it to be the best product possible. I am now using alder for the frames, but I wonder who is right here? The furniture grade pine saves me 25% on material cost, so I would prefer to use it if I can.
From contributor K:
I think alder would be way too soft for chairs also. Why not use soft maple? The problem with the soft wood and dowel joinery instead of mortise and tenon won�t show up until after the chairs are used for a while. Chairs receive a lot of abuse.
From contributor Z:
I am not a chair maker, but I do know that softwood is never recommended by any reputable maker. If you strive to do great work, don't skimp on the materials. What good is 25% on materials (most of the cost of a good chair is labor), if what you just spent the time making falls apart?
From the original questioner:
I am aware that chairs do get a lot of abuse. On those lines, wing chairs are usually more decorative items. Since they are fully upholstered (except for the short legs), I see no reason not to use furniture grade lumber. While maple would be great, it is much harder to work with, not to mention more expensive. The particular chairs I am making require a lot of band saw work (see my original posting for a picture), especially the wings which require me to use 4x6" material to get both curves in one piece. Hence the softer wood, as I am cutting very deeply. The harder the wood the more broken blades and frustration so I�ve heard.
I was also told that the upholstery doesn't hold well to it, which is ridiculous, because it is sold as furniture grade material. The upholsterer said it was fine so I am confused. I just need a real reason not to use it, other than it might give me problems later. There has to be a better reason because the benefits at this point outweigh the risks. I have since then switched to alder, but if my research shows me that the other wood is fine, I will be switching back. Of course that depends on how well the alder fares on the band saw. It is about 30% more money, and cost is always a factor.
From the original questioner:
That is a good point - most of the money is labor so 25% is really nothing. I will stick with alder, unless I find something better!
From contributor K:
To the original questioner: You stated, "I just need a real "reason" not to use it, other than it "might" give me problems later." Don't you think problems in the future are a "real" reason? Actually it is not the materials you are using but your joinery that would concern me. The pine would be just as good as alder. Use the correct blades and feed speed and techniques and the maple should band saw fine. In your picture posted below can you not see the difference in the original chair and your reproductions? You talked of these chairs selling for $3,500 each, should they not have the best frames possible?
I have had people bring me expensive furniture to repair that had rolled cardboard to form the arms. Is this justified as a cost cutting method? Use the best materials you can find and the best joinery for the job. Build something you can be proud of and it will never come back to haunt you.
Click here for higher quality, full size image
From contributor O:
Are you familiar with yellow or tulip poplar? It is a useful secondary wood for furniture and framing.
From the original questioner:
The reason I said "might" give me problems later is because someone had stated that. I was just asking for a specific reason. I have been in construction a long time and had dozens of people tell me "that way isn't the right way" not because it is wrong, but because they are used to doing something a certain way.
But no, I really don't see the difference, other than wood type of my reproductions and the original. In fact, I believe mine are stronger because I used more dowels. I reproduced it exactly like the original. Of course in the picture they are not yet sanded and finished. What, other than wood type, is the difference? I am not stubborn, I am asking for real opinions, but what in the picture makes it look like the original was any better than mine? I suppose it is irrelevant anyway. Thanks again to all.
From contributor G:
We use alder for sofa and lounge chair frames but most manufacturers use poplar. Both are good for the application. For wood framed dining and side chairs we use alder or other harder woods. We have been building thousands of chairs for the last 30 years and have never had a failure. I do think pine is too soft. I buy framing alder for $1.20 per BF and select alder for $2.50 BF. How many BF would you use in your chair? I view lumber cost as a small part of the process. Labor is the killer.
From contributor B:
I would guess that pine was used and mentioned in the book perhaps because of the region the chairs or book was originally in or written or made in. There is no alder locally available in the East to my knowledge (assuming they were made in the Eastern U.S.) so the secondary species that were used changed with the regions and may have been local species.
The first set of pictures you showed of the first couple chairs had a rather large knot right in the front rail of the pine and just looked like a possible future problem. The cell structure of pine and its softness probably don't make it the best choice for these chairs as pine lacks structural integrity. By the way - great work you should be proud.
From the original questioner:
Thanks Contributor B � I am proud! Sorry to all if I sounded a bit snappy, I'm still working on being humble and taking criticism on my work. Perhaps I have been spoiled in my endeavors; I am very comfortable with carpentry, and do really detailed work, so when I get into something I am not familiar with I get frustrated. I have a system now and it is a lot easier. Cabinet grade alder seems to be the best choice as of yet. I have never done any mortise and tenon work really, other than
cabinet doors and the like.
I watched a video on a lateral mortising machine, setting a router table on its side basically and mounting a two way sliding table and it works fantastic! The trick is the back legs. Since they have so many curves it is hard to use a router so I am marking and drilling them out the old fashioned way for accuracy. I purchased the books a poster recommended, but there was no wingback like that in it. It's easy to find plans, but hard to find assembly instructions.
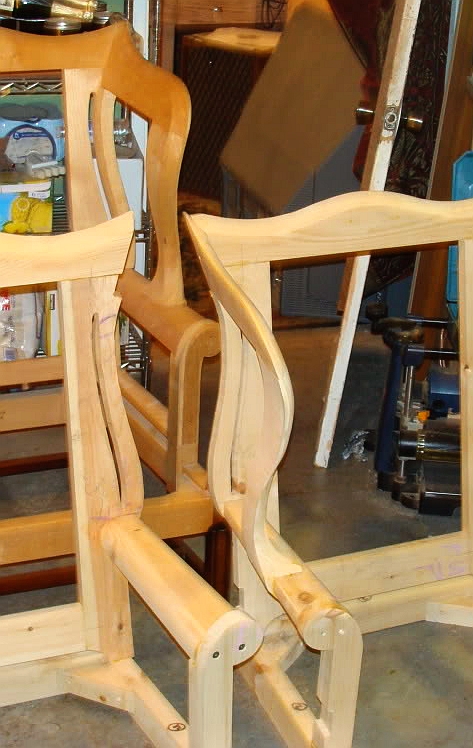
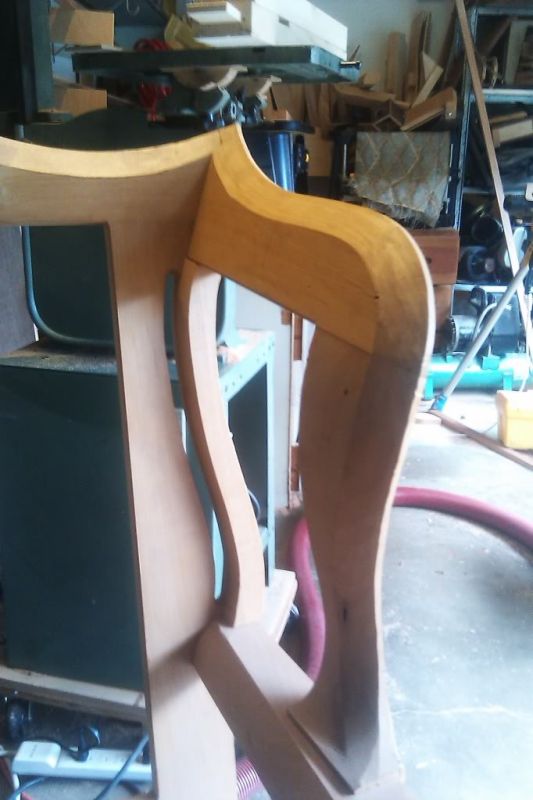
Common sense did prevail though. I make the base first (eight pieces) then build the back separate (four pieces) as well as the armrests and supports (two pieces each). Since the back legs have a long angled point it gives the proper angle to rest the back in.
If I can master these I am moving on to a set of cafe chairs for my kitchen! (The chair in the picture is the one that I was given to duplicate). Note in the pictures: the rear legs are an integral part of the back, so they help to set the back in the notches and give proper lean. Then I can attach the arms, then wings. The order of operations I have found essential: the first two were kind of tough. I decided to use floating tenons on the base pieces and then dowels for the arms.
Click here for higher quality, full size image
Click here for higher quality, full size image
From contributor P:
Nice job for your first set of wing chairs. My take: If you are setting up shop to make furniture I think you need to make some big decisions in regards to equipment. Will you dowel everything, or mortise and tenon? There is a big difference in quality in my opinion. Also, if you are going to make reproductions study the originals in museums. There is a difference in look, often subtle but sometimes not. Many chairs that are mass produced today do not have the same look as the old chairs.
From contributor S:
I would try to eliminate screws and dowels from the structural joinery of the chair. Screws are still fine for secondary joinery such as corner blocks, or for the attachment of a seat, etc. I am not a fan of dowels personally. In fact I would rather trust a screw. Dowels perform well in the strength tests but this is misleading since wood movement will eventually overcome the minimal glue surface they offer. If I have to use dowels I prefer threaded rod and epoxy. I would go out and buy a horizontal mortiser. You can probably get one for the cost of one of these chairs. It is very easy to put a mortise in two mating faces. You can probably do it in less time that it would take to mess with a dowel jig. Mill up some stock for floating tendons and you�re good to go.
From contributor P:
I have never understood the floating tenon method of construction. You are mortising two holes plus making a tenon, etc. There are three plus steps for that joinery. With a traditional mortise and tenon you cut one mortise with vertical mortisers or horizontal. Then you can either have a dedicated single end tenoner or a shaper set up to cut the tenon in one pass. Two processes and you�re done. I guess I just learned the traditional method first and would have a hard time switching to a floating tenon method of construction.
From the original questioner:
Well the trade-off using floating tenons is obvious; you only need one jig, and there is no need to add extra when measuring. This is especially helpful when I am experimenting as I can fit the pieces then add mortises. I honestly don't know why anyone would want to do it the old way if the integrity is the same.
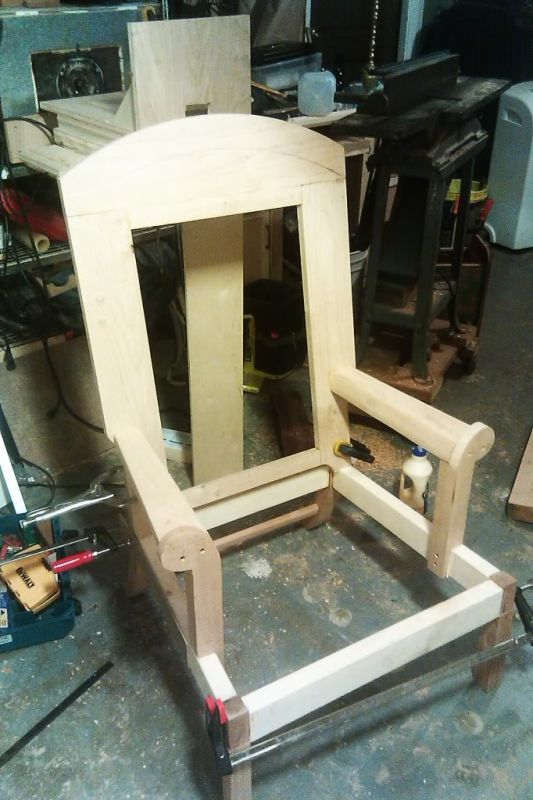
Contributor S's comment hit it on the nose as that is exactly what I have made - a horizontal mortising machine. It is perfect for my uses, has two tables that slide both ways, and stop blocks. I can mortise the entire chair in no time at all. Then for the 1" stock I use a router table, tall fence, and a 1/4" spiral bit with stops. It works better than I could have imagined. Here is a copy of the first wing chair padded and ready for upholstery.
Click here for higher quality, full size image
From the original questioner:
I left the wings off this one as an experiment and rounded the camel top. It looks pretty sharp. In the end I actually cut 3" off the top and rounded the corners with a 3" radius.
Click here for higher quality, full size image
From contributor F:
I�ve read that hackberry is a good wood for upholstered furniture frames. I just sawed up some hackberry that was so white and had such unique grain that I kept some for myself as and plan on kiln-drying it this spring in my solar dry kiln. I also have a huge stack of soft maple that has been air-drying for over a year in my open shed. It's sawed to 7/8" thickness so it's good for glue-ups, I guess. I think that you're not going to go wrong with any of the above-mentioned species as long as you're mindful of knots. With white pine you always are going to have those weak sections every 4-5 feet or so where the knot rings are. I just sawed up a bunch of that too. Weak sections or not, it makes great structural lumber for shed building! Good luck with the furniture. It all looks good to me.
From contributor R:
Just a note on the wood issue: You have three distinct issues on an upholstered chair. First is the basic frame and visible wood, which in my opinion should always be strong to reduce long-term racking and dowel failure (I don�t use dowels, but that is another discussion). I usually use soft maple for the frame with mahogany or whatever show-wood I am using for the visible parts.
Second is the parts that end up getting tacks driven into them. On a completely upholstered chair this includes a lot of the wood, but the places of maximum stress on the tacks I use white ash. It is very tough and solid and holds tacks very well. It�s much better than soft maple and much better than white pine. I always use ash for slip seats.
The third wood is for the curved and shaped parts, and for this I think that pine is fine, if that is what you like. Poplar or alder is ok too and the tacks will hold better. Traditionally it would have depended on the area of the country, but generally maple, ash, and pine.
From the original questioner:
Thanks again to all of you! Alder seems to be the most readily available. I may try ash but the dimensions are harder to find in 8/4. I have completed three chairs and I have a set method. I just finished my first sofa, which was a bit intimidating at first but I am getting the hang of this stuff. It's hard to tool up for everything, then change up for cabinets, then back to on-site finish work. It keeps me busy and I�m never bored of the same thing day in and day out. I wouldn't want to do production furniture; but it is a nice change of pace from driving to work!
From the original questioner:
Just a little follow up on the chair I posted above without the wings. I cut the arch off the top and softened the edges. Here is the result!
Click here for higher quality, full size image