Question
Here's a new one for me. In cramped NYC bathroom renovations, an architect is requesting that I build cabinets which will double as a substrate for a build-up of cement-board, thin-set, and ceramic tile for a shower stall!?! Every fiber in me screams against doing it, but the architect is a very good client and I want to give it every shot that is reasonable (if there are any), or if not, give good reasons why not.
The reasons against include:
1) Flex in substrate (cabinet side!) will lead to grout cracks, moisture penetration... Even if I use Extira, not a happy detail.
2) Cabinet side will be extremely unbalanced, creating more movement, more cracking.
3) As a shower stall, and the side that will be sprayed upon, it will be exposed to all kinds of hydraulic effects, as well as repeated high humidity.
Some remotely possible precautions:
1) A thin impermeable moisture barrier?
2) Steel angle reinforcing for rigidity?
3) A "spoil wall" of an Extira panel, which the cabinet then slides against, fastened for some rigidity?
Has anyone dealt with any related condition before? Has anyone invented a round thing called a wheel?
Forum Responses
(Cabinetmaking Forum)
The tile installer can use a moisture and isolation membrane underneath his Hardee board or Duroc or whatever you use up thataway. That plus a good silicone caulking will pretty much take care of any leakage I would think.
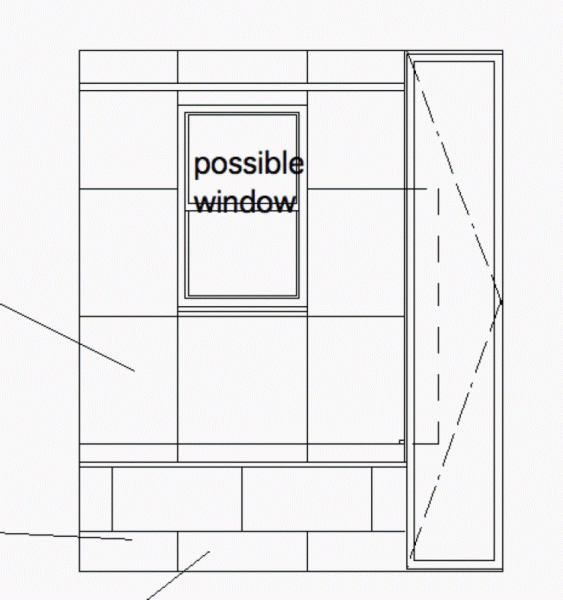
Below is a section. As you see, there is the added complication of a niche.

Plan... obviously full height.

These panels would be ideal. However, you've got one small project. If I were in your boat (shower stall), I would build the cabinet side or wall (if you can put another sheet good on the inside of the cabinet) out of 3/4" marine grade plywood. Then I would skin the outside of the plywood (under the cement board) with one layer of 10 oz fiberglass cloth with epoxy resin. Wrap the cloth right under the bulkhead where it will land on the floor.
This whole procedure might take an hour at best, cost $25, and be totally waterproof. I would encourage the tile guy to bond the cement board to the bulkhead with a waterproof construction adhesive. I would sleep soundly at night with the glass/epoxy method.
Comment from contributor G:
I've been working on my own shower that is in or near wood. Kerdi is a basis for things.
I did a couple of tests, one with PL Premium (a polyurethane construction adhesive) and one with a contact adhesive meant for outdoor carpet and Kerdi. It was especially challenging since the material I was gluing the Kerdi to was aluminum sheet.
In a small test swatch, both seemed to work fine. The PL Premium took at least three days to cure, as the two covering surfaces didn't contain water and were not porous.
In a larger application, it became apparent the solvents in the contact adhesive were swelling the Kerdi. I would not recommend using Kerdi with contact adhesives for this reason. Since I didn't want to replace the section in question, I ironed the Kerdi smooth (using an old cotton sweat shirt to protect the iron). Since I am going to be applying T&G cedar (impregnated with epoxy (CPES actually)), I don't think the few weaker bonding sections are going to be a problem.
The PL Premium was used on one corner strip (from the Kerdi shower kit), and it seems to work fine. I also used it for the interior corners which come with the kit.
On the Kerdi side of things, I think the instructions are not quite in the correct order, and are a little vague. But that isn't a wood thing.
I am going to route a "pool" in a 10 foot 2x6 so that I can partially immerse the 8 foot cedar T&G that I am impregnating. I am using Smith's warm weather formula at slightly lower than recommended/expected temperatures so that I get longer curing time. Being cedar, I am told I need 2 applications (at least) to work properly. Once in place, I am going to clear coat with something. No UV, so I don't need to protect the epoxy from that.