Reprinted with permission from Custom Woodworking Business.
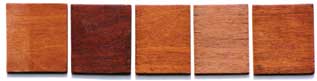
This technique for enhancing grain can be used to make one species look like another or bring out the natural beauty of various woods.
By Mac Simmons
One of the most challenging tasks a wood finisher may be asked to do is to try making one species of wood look like another. This article is about grain enhancement, which is one of the many finishing techniques that may be used to achieve that finishing challenge.
The grain-enhancing technique I will describe works when a natural finished look is selected and only clear coatings will be used. This technique brings out the wood's character by emphasizing its grains and markings. It enriches the finish by leaving the wood looking natural and darkening the grains, thereby adding contrast.
This technique primarily is used on species where the wood and grain are the same color and there is no contrast to bring out the wood's beauty. Sometimes, even when stains, toners or shading stains are used, it makes no difference because they do not add any contrast to the grain. In certain instances, this grain-enhancing technique can be used instead of a paste wood filler, which fills the grain so that fewer clear coats are needed.
The grain-enhancing technique I use is only for adding color to the grain, it is not intended to fill the grain. It is not difficult to do, considering it brings out the wood's beauty, and it is far less time-consuming and laborious than pasting wood fill in the wood.
One word of caution: This enhancing technique does not work unless there are some grain patterns in the wood; the more grain, the better it works. On species where there is no grain, there are no crevices for the colorants to enter, so this technique does not work.
Here is a short list of species for which this technique is appropriate: aspen, avodire, beech, white birch, holly, harewood, sapele, sycamore, limba (korina), prima vera, white maple, bird�s-eye maple, striped maple, poplar, red oak and European white oak.
The process starts with a prepared pigmented wood stain, which you can buy from most finishing suppliers or at paint and home supply centers. (Do not use dye stains.)
You also can purchase the materials needed for making up your own stain. Select any of these pigmented paste colorants to make up your own stain: Universal colors, Japan colors or oil colors. You can add naptha or mineral spirits � either one of these solvents will put the paste colorants into solution.
It takes about 4 to 6 ounces of colorant to 28 to 30 ounces of solvent to make one quart of stain. The most common colorant used for closing the grain is Van Dyke Brown. Other colors can be used if you wanted to do some of the decorative finishes, where different colors are added to the grain for contrast.
Thoroughly mix the pigmented colorant and the solvent until the colorant breaks down and becomes a solution of stain. I call this a "graining stain." Keep this stain well mixed, as the colored pigments will settle to the bottom of the container. Keep the container tightly closed when you are not using it.
This stain can be wiped, brushed or sprayed. I recommend that gloves be worn whenever you are wiping any stain.
To begin the actual grain-enhancing process, always start with clean and well-sanded wood. I suggest you first apply a couple of thinned-out coats of sealer or wash coats of shellac to the wood. This leaves the graining stain on top of the sealer coats and not in the wood, which will make the stain easier to remove.
If you will be staining your work, you can then apply the sealer coats, followed by the grain stain. You can use the graining technique before or after you apply the stain, as long as you sealed the woods or the stain. If a pigmented toner is to be used, you must apply the sealer coats over the tinting toner, so the toner's color will not be altered by the grain/staining technique.
This type of stain can be wiped, brushed or sprayed on. Just be sure you stain the entire surface and then, using a clean cloth, wipe the stain and remove any excess by wiping the stain dry. Always end by wiping with the grain of the wood. Then allow the stain to dry thoroughly.
Now, it's time to sand off the graining stain. Use a sharp scraper, sanding block, electric or pneumatic sander with non-loading sandpaper to lightly scrape or sand the dried graining stain off the top surface of the woods.
After sanding, the stain will remain only in the grains of the wood and will give it a natural look. If the wood was stained or toned-out, the grain will be emphasized with the stain's color. That remains inside the grain or any other marking in the wood.
After sanding is complete, wipe or blow off any remaining sanding dust, then apply another sealer coat to lock-in the grains. Then allow the coating to dry again.
Once the coating is dry, you are ready to complete the finish by using stains, glazes, shading stains, sealers and clear coats. Be sure all your other finishing materials are compatible.
As with all new finishing materials and techniques, I suggest you always make up complete grain-enhancing samples, so you become familiar with the process before trying it on a project.
To recap: The wood must be cleaned and sanded, and then apply a seal coat. Allow it to dry, then mix up the stain, stain the entire surface, wipe the stain dry and allow it to dry thoroughly. Sand off the stain from the surface of the wood, leaving the color in the grain. Clean off any sanding dust, apply a seal coat and then complete your finishing process.
Now you can add grains with stains to your repertoire of finishing techniques.
Reprinted with permission from Custom Woodworking Business.