A Strong Miter Joint in an Exterior Teak Railing
Pre-soaking in epoxy, and half-lapping if possible, are recommended to strenthen an exterior miter joint. November 23, 2012
Question
I�m doing my first teak extention railing job here in Malibu (So Cal) and it is right on the beach. I need to make to 90 degree turns and we are mimicking an adjacent railing close by so it has to be a 45 degree mitered joint. The railing is 3.5" w x 2.25 h with large radiused edges.
What is a proven method/joinery technique for a long lasting tite joint? I was planning on using System Three epoxy for the glue after an acetone wipe. Also, time and cost are not a factor. Thanks for any input. Hopefully someone who has actually this or something very similar can elaborate.
Forum Responses
(Architectural Woodworking Forum)
From contributor A:
I have a ten year example of s similar project sitting outside my house. It's a Meranti picnic table with a band around the top 3/4" x 3 1/2. The 90 degree miters were cut and soaked with epoxy for about 20 minutes. The end grain soaked it up. Then I added the biscuits with more straight epoxy resin. I believe if you looked under a microscope the epoxy penetrated deeply into the wood so the joint is more composite than wood. I expected them to fail; however, ten years have proven me wrong. I believe the "soak in" really helps.
From contributor D:
If you look at railings on boats, they look the same as you describe. Splines are usually added for extra gluing surface. Epoxy, as mentioned on here many times, likes loose joints. Many end grain to end grain joints benefit from a two step approach, soaking, as Contributor A mentioned, followed by a coating with thickened epoxy - thick enough not to run out of the joints. The epoxy bond is mechanical and works better with roughened surfaces for a better bite. Don't be afraid to experiment on a few scraps. Often by mixing a lighter colored sawdust (like alder) to thicken you can get a nearly invisible joint. Teak dust to thicken in a teak joint will leave a dark line.
From contributor B:
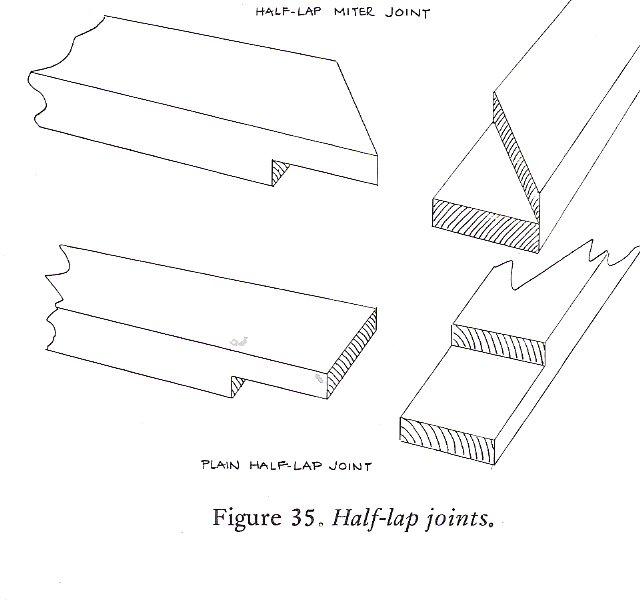
Every connecting joint in a marine environment is either lapped, mortised, splined, or doweled (with dowels often run through the lap). A half-lap joint is not too difficult if you have both a radial arm and table saw, otherwise you'll have to improvise. If you're going to use a straight glued miter, then I would at least run recessed deck screws (the long ones) through the joint (like regular nailing) and plug the holes. Everything in an exterior (marine) environment needs to be both glued and screwed (and the screws need to be non-ferrous).
Click here for higher quality, full size image
From contributor D:
One extra tip to get nearly invisible plugs (bungs, technically). Take an offcut of the same stock used for the rail oriented the same way to the drill press to cut the bungs, controlling depth so as not to go all the way through. Then use masking tape to cover the top of your cuts, to hold them in place. Flip your stock 90 degrees and rip them free, either on the tablesaw, or for wide rails the bandsaw. You end up with a sheet of masking tape with bungs oriented on it the exact same way they should be placed when plugging your countersinks. The advantage is, they will shrink and swell the same way as the rail, remaining tight year around.
From contributor W:
I'd have to agree with the above posts, plenty of soaking and rough cut epoxy applications should do the trick.