Accurate Cuts on Crown Molding
Trim carpentry pros discuss saw stops, cutting methods, and measuring techniques for getting perfect miter cuts and joint bevels. March 18, 2006
Question
I have a hard time holding the crown at the right angle while trying to measure, hold the tape etc. Does anyone have a suggestion of a fence and stop that would be easy to take to the site, or any other suggestion for a device to keep the crown at the proper angle?
Forum Responses
(Cabinet and Millwork Installation Forum)
From contributor A:
I don�t know if this will help, but unless the piece of crown has an inside corner cut on both ends, I cut the mating miter for the last piece that was nailed up, and then I hold that miter together by hand while I make a pencil mark at the other end for the next cut. Of course this is difficult on really long pieces buy I always find a way. I don�t understand why you feel you need to hold the crown at any certain angle while you measure and mark it. If I can�t mark the molding in place and need to use a tape measure as in the case of an inside corner to an inside corner, I lay the crown on a convenient surface and orient it so that the surface of the crown that must be marked is exposed. Then I reel out my tape measure to a longer measurement and lock it. I then burn an inch and make my mark. Some times propping up the tape measure housing with a scrap of wood is the ticket to getting the piece marked.
From the original questioner:
What I meant was holding against the fence without it slipping. I don't use the compound miter so I'm not laying it flat. I just set the saw at a 45 left or right depending on which cut I'm making, but it just seems like there should a better way. Long pieces are difficult, and then some of the miters need to be cut where the mark isn't.
From contributor C:
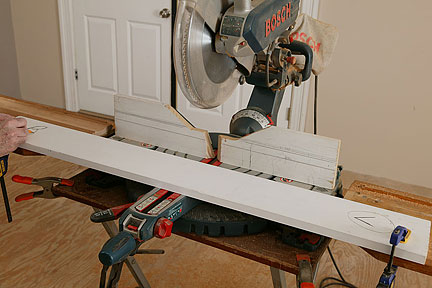
You can build a box that is screwed to the saw fence. Using 3/4" material make an L-shaped piece with the vertical attached to fence and the horizontal laying on the table. Set a piece of scrap crown upside down against the fence and tack another thinner piece to the horizontal one at the appropriate distance out from the fence. With no moulding in this fixture, cut slots at 45 left, 0, and 45 right, but don't go all the way through. Now it is very easy to line up your pencil mark with a kerf in the fixture. Very simple!
From contributor A:
Now I understand. I am guessing that you are trying to put the crown molding on your chop saw oriented the same way it will be when it is nailed in place. That is the incorrect way to do it. What you need to do is, rest the flat of the crown that will be on the top of the crown in its installed position on the bed of the chop saw. At the same time, rest or position the flat of the crown molding that would be against the wall or cabinet in its installed position against the fence of your chop saw. The two flat spots form a 90 degree angle in relation to each other and so do the table and fence of your chop saw.
To be clear about this, the position of the crown molding on your chop saw as you make the cuts will be exactly opposite or upside down from the position it will be in as you nail it in place. Once you understand this concept it will become obvious where the pencil marks should be to make your cuts. They will be on the bottom of the crown molding which will be facing up in your chop saw. There is no way you can hold the molding steady in the upright position with just the bottom flat spot against the fence and make the cuts. If you read and reread my two posts, all the information on how to measure, mark, and cut a typical crown molding is there.
If I was wrong in assuming that you were trying to miter your crown in an upright position, I will just say that I have mitered miles of the stuff and all you need to hold it steady and in the correct position is your left hand, your right hand, and a chop saw with a blade that is sharp enough to cut your wood. Do what contributor C said, and make an L-shaped auxiliary fence for your chop saw that will help you know where the saw blade will enter your molding.
Also, you said you had trouble with long pieces of molding. Of course you need to provide some means of supporting the end of long pieces of molding as you cut them to length.
From contributor D:
I have cut crown flat, upside down, backwards, coped, and uncoped. Upside down and backwards with crown stops seems to be the best way I have found to get accurate repeatable results. I know some guys like doing it differently and there is more than one way to cut crown, and using a jig does not make you unprofessional. I found that it sped up the process while giving me 100% better results.
From contributor E:
I use a 12"
Dewalt Miter saw.
Dewalt sells crown stops made specifically for their miter saws. They do a very nice job of staying in place and the crown doesn't move at all when I run the blade through it. More often than not I have to adjust my cut slightly by pushing the crown up or down just a fuzz. So I haven't used the miter stops in a few years. I install crown on plastered walls, not cabinets, so I am always dealing with imperfections that require adjusted miters. I would think that the miter stops would be a real time saver with crown installs on cabinets though.
From the original questioner:
I tried what contributor C suggested and that works pretty well.
From contributor A:
I use the
Dewalt 12" for large molding and smaller saws for small moldings and I never had any trouble getting good repeatable results while just holding the molding in place by hand and eye. I almost always use an L-shaped auxiliary fence to speed up aligning the pencil mark to the line of cut and also to prevent splintering on the back side. I just like to keep processes as basic as I can while still doing extremely accurate work.
From contributor D:
I agree with that part about sharpening. I've always done that by eye and feel. As for crown, I never used an auxiliary fence so perhaps the aluminum table creates a more slippery situation. I just hate it when I line up the miters and one piece ends up being a 1/16th longer than the other because I didn't have both pieces in the exact same spot on the saw.
From contributor F:
I always cut my crown upside down as has been suggested. I have found that if my miters don�t line up, most of the time it is because my blade was dull and the extra friction would pull the piece so I couldn�t get a straight cut. To fix this I either change blades or squeeze the crown against the fence so that it will not move while cutting. This movement can be hard to detect while cutting. I sometimes set the piece of crown right up against the blade to check if this is happening.
From contributor A:
That�s an excellent point contributor F makes about the need to have a sharp blade on the saw to prevent creeping. That might be a good sales point on the crown stops if they enable you to still get good results while using a dull blade.
From contributor G:
On long pieces of crown I was taught to drive a 10d finish nail into a stud at the far end to hold that 16' up while I mark my measurement or nail it up. When you are dealing with 6-8" crown it either takes two guys or one who knows his way around gravity.
From contributor H:
Contact cementing a strip of vinyl flooring to the vertical surface of the crown stops eliminates any chance of moulding drift as well as protects the finish. When cutting two outside corners I cut the first 45, turn the crown face down, set your saw at 90 and make a small kerf cut on the bevel with the edge of the kerf right at the flat to hook your tape on. You don�t have to try to hold on an inch and get to the other end.
From the original questioner:
To contributor H: Good idea. It's hard trying to run the tape out 6� or 7' with one hand to make a mark.
From Gary Katz, forum technical advisor:
In case you're still interested in a little improvement, you might try using a continuous crown stop. It�s just a sacrificial board clamped to your miter saw extension wings. I hope you've got continuous wings � it�s tough to do repetitive work, and work on different lengths of material without continuous wings. A continuous crown stop makes it a lot easier to cut long and short pieces, and still get miters that are of equal length, so all the profiles line up well. Once you have the stop clamped or screwed in place (be sure it's absolutely parallel to the saw fence), write a big L on the right side and a big R on the left side, so you won't be confused about which end you're cutting.
From Gary Katz, forum technical advisor:
One other word of advice: Never burn an inch, not if you can help it. Burning an inch isn't nearly as accurate because the tape can move, and many times you'll forget that you burned the inch and you won't add for it when you make your measurement mark.
For inside corners on baseboard and crown, you can hook the long point of the miter. It's always against the fence for an inside corner.
For outside corners on baseboard and crown, flush the short point of the miter (it's always against the fence for outside corners) with the edge of your miter saw fence, and then hook your tape measure on that edge. That's one reason I always install a wooden auxiliary fence on my miter saw. The crown stop helps make measuring easier too, because it holds the material in position, so measuring crown is even easier than baseboard, which can fall down.
From contributor L:
Flushing short points to a reference then hooking the reference saves an enormous amount of time while improving accuracy. If this is applied to short pieces, like pilaster wraps etc., and used in conjunction with an adhesive backed tape measure stuck to the reference, you can again cut a lot of time. I still use an old Hitachi 15 with adjustable crown stop on the bed, so I don't need a stop on the fence. But I do screw a straight board to my auxiliary fence so that the bottom of the crown is exactly even with it when it's at the correct spring angle. Then I hook my fingers over the bottom of the crown and the top of my board when cutting. I find it easier and safer holding the crown in position that way, and I can more easily feel if the crown is moving as I cut. Additionally, it allows me to rock to crown out of the correct position when I need to, which is fairly common when wrapping cabinets in old houses with sagging floors upstairs.
From Gary Katz, forum technical advisor:
To contributor L: Right on about matching old ceilings, especially with new euro cabinets where the crown is 1/8 in. above the doors and the ceiling falls or climbs. I've found it's more accurate to use the stop when I'm changing spring angles on the fly, even if I have to adjust the clamps each time. When I'm doing a kitchen and the crown is just above the doors, I slow way down.
From contributor L:
To Gary Katz, forum technical advisor: Exactly! The faster I go in that situation, the quicker I lose money.
From contributor I:
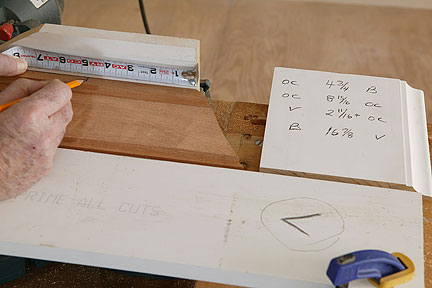
Before I start running crown, I cut two short pieces of the crown I am applying in that particular space, 20" to 24", no shorter than that. I then cut inside corner miters on the two pieces to for a test or story corner. On the other end I will cut outside miters. Now you�re ready to set the stage for getting your measurements.
Take your two short pieces of crown to all your corners and test fit them. When you get them to fit, draw a pencil line on the bottom edge of both pieces. This is the line you will get your measurements from. Now connect all those pencil lines with blue chalk. By doing this it eliminates the guesswork or rocking dilemma. I double cope my crown for speed reasons. For example, in a room with four inside corners, only two runs of crown are coped and the other two are straight cut, about 1/8� shy of the full wall to wall measurement. Never nail closer than 2' from a corner until your crown joint is watertight. Pine crown with the cove ogee profile is one of the easiest to run. I have been doing this 30 years and this is the best system I've found. I've never used crown stops but there are a lot of guys who do.
From contributor K:
I would like to add something to this to the thread about burning an inch. I used to do that and sometimes forgot and it would cost me a whole piece since it was an inch short. But now I always burn 10" instead since it will be more obvious and instead of adding one, you add 10 so the last digit is the same. Instead of 51 being 52, now it is 61. Also, most importantly, whenever I install crown I always bring a small size spring clamp to clamp my tape measure to the wood so it doesn't move when I am adding 10". It holds very tight.
The comments below were added after this Forum discussion was archived as a Knowledge Base article (add your comment).
Comment from contributor J:
I did crown molding in some rooms in my 1940's block and beam cottage (extremely out of square walls), using a mitre saw that was probably as old as my house. I tried the upside-down placement and building a box to hold the molding.
The problems I found were with stabilizing the far end of the molding. If the far end of the molding dips just a slight bit, it will bend and tend to flex the end you are cutting up ever so slightly, but enough to make the cuts off. Also, don't assume the floor of your work area is level. If your work area floor is an inch or two sloped (common in old houses and/or garages), over a long molding length, that can make a difference. So you have to make sure your crown molding is supported every few feet along the way, and is level with the mitre saw bed.
Another problem I had with the supported end of the crown molding was that it would want to lay flat and that would torque the end I was cutting, making it just about impossible to get a good cut. So the crown molding also has to be supported vertically as well along its length to keep from laying down.