Achieving the "Fumed" Look on White Oak
A discussion of workable finish schedules to approximate a "fumed" finish. February 18, 2006
Question
I am considering the following finish schedule to achieve a fumed look on quartersawn white oak. The piece will be a hall table and mirror for a client. Comments and advice would be appreciated.
1. Aniline dye (50% light oak 50% mission Brown trans fast dyes)
2. Seal with blonde shellac
3. Fill grain with Bartleys Walnut gel stain
4. Seal with blonde shellac
5. Topcoat with Target Coatings pre cat
Forum Responses
(Finishing Forum)
From contributor A:
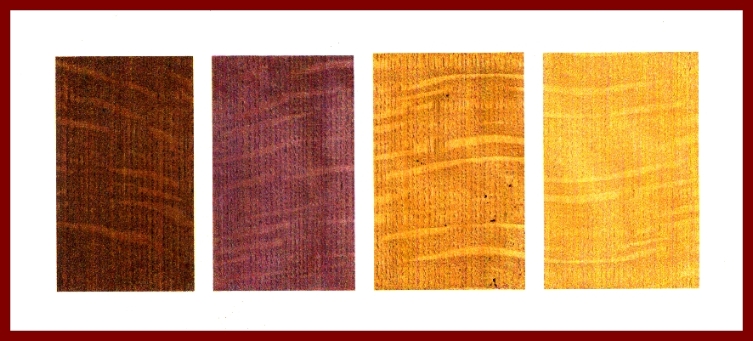
Trust your start to finish samples. Jeff Jewitt has a nice article on duplicating fumed oak with dyes. The article is on the internet and you can find it if you do a search. Also, you can color the Oak with pigmented colorants (wipe on-wipe off) to give you the fumed colors.
1. A Red and Black combination.
2. A Burnt Umber and Black combination.
3. A Raw Sienna and Burnt Umber combination.
4. A Raw Sienna and Burnt Umber combination.
This is how I did them - if you play with the colors, you can produce many other fumed colors.

Click here for full size image
From contributor B:
Your schedule looks similar to the one I recently used. I use Zinsser Bullseye 2 lb cut wax free shellac after the dye coat and after the gel stain coat. I have had great success with the transtint dyes sold also at Target. I recently completed some mission side tables for a client and used 50% Honey amber transtint dye and 50% medium brown. I also used a Walnut gel stain. I created over thirty test samples using various transtint dye combinations, varying the colors from a light oak to the dark mission color. The possibilities of colors and shades are endless. And I think they all looked great on 1/4 sawn white oak. As contributor A stated, trust your samples. I finished mine with 3 coats of a satin pre-cat lacquer.
From contributor C:
I question using the shellac before the gel stain. I believe Bartley's has a poly binder and I don't think you would get good penetration or color as much of the gel stain will wipe off. I recently used a waterbased dye; sprayed on and dried. I then applied the Bartley's (two coats I think) and allowed that to dry several days then sprayed shellac (Sealcoat) then waterbased topcoats. The gel stain doesn't affect the waterbased dye at all so there was no need to seal between.
From Paul Snyder, forum technical advisor:
Richard has an interesting point. But there is a reason to either use, or not use, the washcoat between the dye and glaze. Without the washcoat, the gel stain will have a more uniform effect on all of the wood and can even overpower the dye. With the washcoat, the gel stain behaves like a glaze and accentuates the pores and grain of the wood with less effect on the surface as a whole. The thickness of the washcoat varies the effect. I have an article on this subject coming out in the January edition of Fine Woodworking.
From contributor A:
Another point about wash coats - the wash coat is used to protect the color of the wood, stain, or toner. Without a wash coat the finish may change colors from the gel stain. In some finishes this may not matter, in others it will.
From the original questioner:
The intent of the gel stain is to accentuate the open grain. That is my reasoning for using shellac underneath. I have done something similar to this to achieve the look of Chestnut. I use Ash, stain with a cherry stain, seal with amber shellac, and fill the grain with a dark gel stain. This works well for me.
From contributor A:
I know what youíre trying to do, and itís normally done using paste wood filler. Another way to accentuate the open grains is to do it with a pigmented stain. Finishing is all about the final finish, and there is more than one way of finishing.
