Attaching Trim to a Cabinet Top
Other Versions
Spanish
Cabinetmakers and finish carpenters discuss how to provide good nailing for large trim pieces at the top of a cabinet. June 11, 2014
Question
(WOODWEB Member):
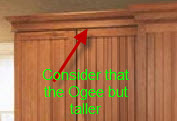
My client has decided they do not want a space between the top of their cabinets and the ceiling. They chose to go with an ogee/crown look. I'm not quite sure how to go about this installation so I would appreciate any guidance.
The height is 7 - 7 1/2" depending on ceiling variations. The ogee is 4 1/4 inch. The crown is 4".
I'm sure I'll have to build some sort of brace on the top of the cabinet to hold the ogee in place. The ogee will sit on the face of the cabinet at the top by just an 1/8" since I believe there is only 1/4" between the top of the doors and the top of the cabinet.
Forum Responses
(Cabinet and Millwork Installation Forum)
From contributor R:
You will need to install a nailer on the top of the cabinets to give you something to attach the ogee moulding to. Preferably high enough so that the crown will conceal any nail holes. If possible, and this will make it easier, install your nailer on the cabinets before you hang them. Make the nailer so it is short of the ceiling so it doesn't affect your install.
From Gary Katz, forum technical advisor:
What's that drawing supposed to represent? Ogee refers to a molding profile, not a 4" piece of trim. Where does the crown go on that piece of trim? I'm confused.
From the original questioner:
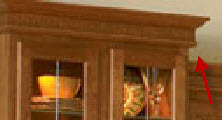
Well that's what the cabinet company calls it. That piece of molding goes against the face of the cabinet (flip that upside down so the profile points down) and secured in some fashion. The crown sits against the face of that molding and the ceiling. But how to secure them is the issue. A few pictures to show what's needed, but this install goes to the ceiling.
From contributor R:
What I was saying about installing a nailer would be to make an L shaped piece that runs the length of the cabinet. Screw it down to the top of the cabinet and if need be, put a backer on it that is perpendicular to the face to keep it square. Then you will be able to nail your ogee molding on, then the crown over that. Doing it this way, you can keep the nails on the ogee high enough so that the crown will conceal them, thus having fewer nail holes to fill.
From contributor M:
That "ogee" is actually called "furniture toe kick." We use it that way a lot. Like contributor R said, put up a nailer on the top of the cabinets, and then put up the furniture toe kick. Then you can nail the crown to it. When you put up the furniture toe kick, drop it down 1/8"-1/4" from the top of cabinets to hide the seam.
From Gary Katz, forum technical advisor:
If the cabinets are already installed, it's easier to make a plywood top and slide that up on top of the cabinets and throw a couple fasteners through the inside of the cabinet to secure the backing. Just make the plywood 3/4" smaller all the way around the cabinet, then use 3/4" material for the nailers. I'd throw some additional backing behind the nailers on any long runs. Put the whole thing together and then slide it up on top of the cabinets and secure with a few screws.

Click here for higher quality, full size image
From the original questioner:
Thanks for the replies. The face and sides of the cabinets are about an inch higher than the top of the cabinet. Forgive the crude drawing but it represents a side view. The gray is the face and top of the cabinet. Maybe this is too much and the angled piece is not needed.
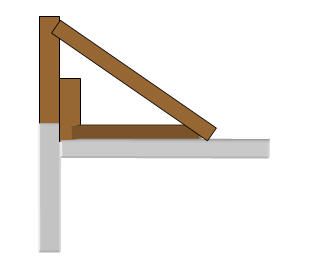
From Gary Katz, forum technical advisor:
You're on the right track. You only need the braces on long runs.
From the original questioner:
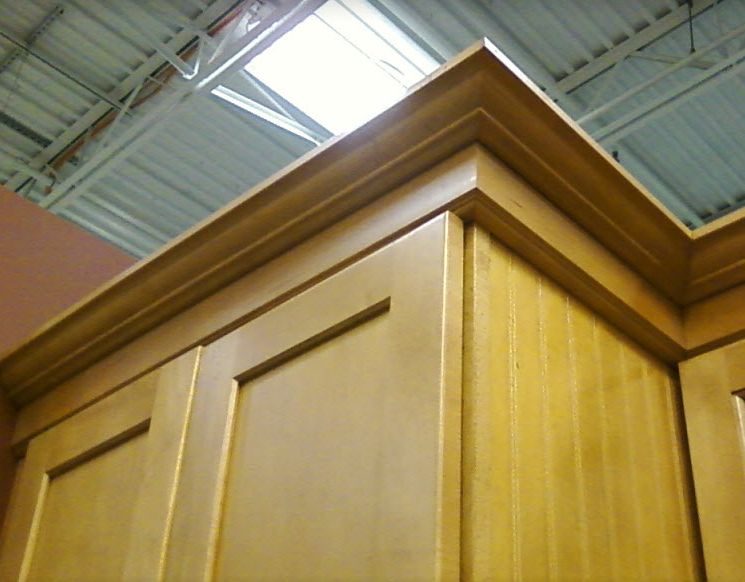
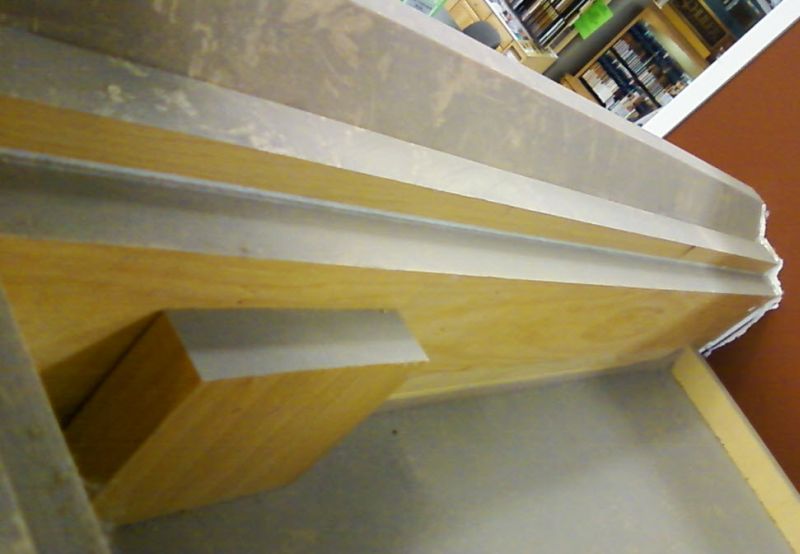
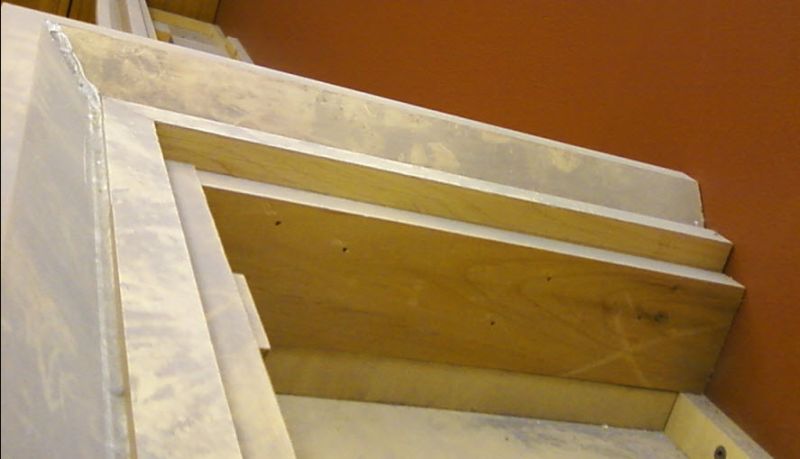
At Lowes buying some Durock, I happened along the kitchen section and they have the exact same setup I need to install. I've got a good idea from all your input. They of course were able to secure the nailer to the back of the ogee (one of my hopeful thoughts) because they had unlimited space above the cabinets. I don't have that luxury.
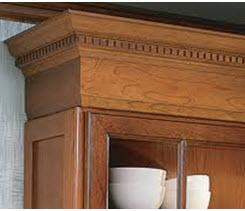
Click here for higher quality, full size image
Click here for higher quality, full size image
Click here for higher quality, full size image
From contributor Q:
I would call the board that you are needing to install to bridge the gap from the cabs to the ceiling a frieze board. This may not be the correct terminology but seems like everyone likes it when I call it that.
From contributor N:
I have always heard that called sub-crown. I don't know if that is right but the customer understands when that is what you call it.
From Gary Katz, forum technical advisor:
It's really a fascia or frieze board. Any vertical flat surface is either a frieze or a corona, but a corona has to hang down past a soffit, so this would be a frieze.
From contributor U:
I think "ogee" is simply the description of the profile shape of an S. Curves one way and then curves the other, like an S. The most standard crown you see consists of a large ogee curve at its top and a small cove (concave) at the bottom (every Home Depot has 3 sizes of it).
As for the nailers or sub crown or cleats or substrate or support structure - whatever we call it - I make 5 small blocks or cleats from 2X material (one at each corner and one halfway along the front). You can even attach them on site (if the cabs are already installed) by gluing and screwing down to the cab's ceiling (from inside). Either notch the cleats to allow a portion to come flush with the face frame or place them behind the face, then simply glue and pin-nail any piece of 3/4 material to the cleat to get a surface flush with the cab's front. It only has to be strong enough to allow you to pin that piece of base molding that is being installed upside-down against the ceiling to act as the lower part of a 2-part crown assembly. This has been a very easy way for me to create (very serviceable) support structures in the past (and only when the distance to the ceiling wasn't accounted for from the beginning, but... sh*t happens).
I like knowing the correct terms for these physical descriptions we talk about all the time. When a reader doesn't know the word, he'll google it and then appreciate exactly what the writer was describing.
From contributor K:
I just finished refacing some old farm cabinets. Just as in this case, the upper area was open. These were used as storage, but everything was greasy from years of cooking.
Per my suggestion, and with urging from his girlfriend, the customer agreed to allow me to enclose the area, but keep it as storage. The idea was to make it look more like soffit than storage.
I added simple face frames using pocket holes. The corners were mitered and splined for strength. Since some of the cabinets were under a suspended ceiling, I couldn't use the ceiling to secure some of the frames. The mitered corners added support strength, which would be necessary to support very long doors.
Once done, I built doors (e.g., up to 86" long) and hung them using hidden hinges. To avoid making the already small openings smaller, the bottom rails were attached to the backs of the doors and lifted up with the doors.
From contributor G:
Did you go to the tool department at Lowe's and get a ladder to drag down to the cabinet department to take those photos of the cabinet top? Or did you just tape your camera on a pole?
From the original questioner:
Nope... just jumped up on the counter.
Thanks for everyone's help!
From contributor W:
We do something similar to your drawing (the one where you note that the diagonal piece may not be needed) but instead we use triangular wedges, with the two perpendicular portions of the triangle against the top of the cabinet and back of the face frame. The triangular wedge extends above the face frame and the riser attaches to this extended portion. So, assuming that the riser is the same thickness as your face frame, you then have the flush surface to attach to. I hope your ceiling is flat and level.