Beaded Face Frame Fabrication
Other Versions
Spanish
There's more than one way to bead a frame, as this discussion proves. January 24, 2005
Question
I need to build some beaded face frame cabinets with flush doors and drawers. After some trial, I ended up using a miter saw to "dog ear" the tenon/rail piece and also to "jack miter" the bead on the mortise/stile piece. I then dado between the two jack miters. This is very time-consuming and there's a large margin for error since each joint must be sawn out perfectly and one stile may require several joints. Does anyone have a better way - maybe a jig or fairly low-cost machine to run this type of frame joinery?
Forum Responses
From contributor J:
We had a custom ground bit made that was 45 degrees with a 7/8 flat on top. Made a slide table to clamp stiles and rails. We use 1" rails. You can bead your frames, then mortise and tenon them and then cut your miters in this fashion. Works great. If you plan on this a lot, it's worth investing in some air clamps and putting some thought to the slide table.
From contributor R:
If you don't want to invest in the machines to do this, then why not make your frames and then add the bead inside the opening? This is the way I have done it.
From contributor W:
We rip our bead material at 5/16 wide (4/4 stock) on the table saw, then run it through the router table set up with a beading bit. Then after the face frames are on the boxes, we miter cut the bead moulding to fit in the frame exactly. I mark each cut with a fine .007 mm pencil and I cut the moulding a strong 32nd long so you literally have to bend it a little to get a very tight fit. You don't even need glue. You just pop in the 3/4" brads and move on. It takes about 20 minutes worth of ripping and about 45 minutes to one hour worth of the router table time to make enough moulding for an entire kitchen and baths. It works really well and has a great look when finished.
From contributor P:
We do a combination of the above. First you rout a bead on the rails only and "dog ear", as you describe above. The stiles are normal with no bead. Assemble the frame and then apply the loose bead material to the stiles.
From contributor B:
If you do any amount of beaded face frames, look into the Morso notcher. Really slick. And you don't have that hair-line gap between the ff and bead, all those nails to set and fill, the funky miters, the wood that doesn't match, and the routing and slicing. If you had one of those, you'd be done by now. Only about $4,600.
From contributor D:
Another alternative would be to have a door company like Walzcraft make the face frames and also the inset doors and drawer fronts and ship to you ready to attach to the boxes. That would eliminate the potential for clearance problems if you outsource your doors. If you make the doors in-house, then it wouldn't matter.
From contributor O:
A stop block and a tilted table saw blade are all you need to cut the 45 degree miters for the beading (which is called "mitered sticking", by the way). Then use a dado blade to knock off the waste from the 45 degree cut to the ends. Do the tenons, dado the groove for the panel and assemble. Simple, easy and fast, without special tooling or other stuff.
From contributor T:
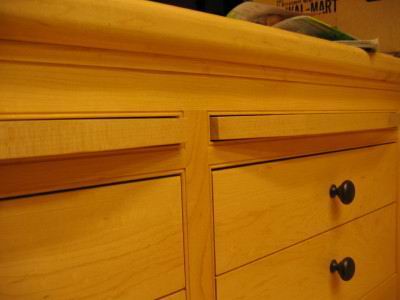
Some time back, a cabinetmaker posted his method, which involved grinding the bearing post off a 45 degree bevel router cutter and using it in a jig. I used his method and modified his jig a bit. I also used a silicon carbide grinding wheel to relieve the bottom cutting edge. This gives you the notch. The mitre cut on the corner I do with a sled I built for the table saw. It has very accurate marks for getting the cuts just right. Here's a sample of what I made with this setup.
From contributor M:
I may be the one contributor T is referring to, having the bearing removed from the router bit. I have been using a JDS Multirouter to not only machine the slot mortises but to accurately cut the 45 degree haunches that the rails fit into. After the haunching is done I use the shaper to cut the bead into the edges of the stiles and rails. Having a router bit made with a flat bottom ground to fit the finished end of the stiles or rails would be ideal but I haven't done that yet. The Multirouter is a good machine and designed to allow you to oscillate the work piece back and forth to make up the width difference when the bit can't. The Multirouter is not cheap, but very versatile and has been well worth my money! I like this system because I never liked cutting all of those strips of bead stock and fitting them to the openings. The Morso system is the best, but I believe to get it set up to do what you want, you'll need special knives, etc., and all this will run a lot more than $4,600.00. And you still need a joint method, i.e. dowels, mortise and tenon, etc.
From contributor B:
Just one more thing on the Morso. I did buy a smaller knife set, but have not needed it. It's ready to go right out of the box. After you clean off 10 pounds of grease. And it's a snap to do mirror sides quickly.
For joining, I use my PC pocket screw machine. It's all quick and very accurate and repeatable. But, it's $4,600. Foot operated, so you don't need air or A/C.
I think beaded face frames are popular and when I have to do face frames, I try to sell them on the bead. I can get a good up-charge to help pay for that hunk of iron.
From contributor S:
Here is the one I built a while ago.
Jig For Beaded Face Frames
From contributor T:
Here's the jig I used to make the beaded face frames. Not as fancy as contributor S's.
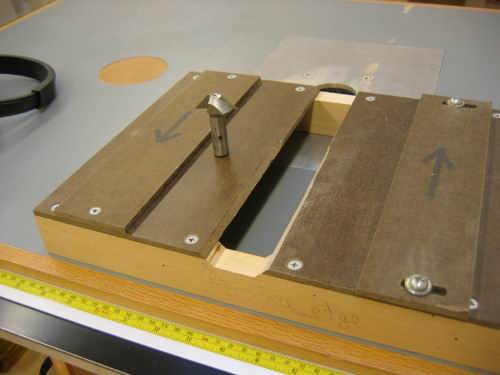
Click here for full size image
This sled is for cutting off the corners of the mating piece.
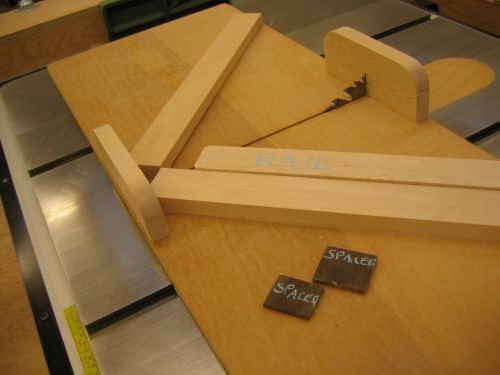
Click here for full size image
From contributor E:
WalzCraft sells beading that can be applied. Look under face frames.