Building A Raised Laminate Countertop
Other Versions
Spanish
Building a raised 'breakfast bar' on existing cabinets. January 15, 2004
Question
I have been building cabinets for several years now, mostly for apartments and starter homes. I have recently taken on a larger job but I am not sure how to build the raised bar countertop. The wall ends and cabinets extend 48 inches, then corner cabinet, then 24" cabinet. This area looks into the living area and calls for a raised "breakfast bar." How do you build this raised area? The cabinets are already built (not installed) so if I construct this raised area on top of cabs, I will lose counter space.
Forum Responses
(Cabinetmaking Forum)
From contributor A:
Who built these cabinets? If the cabinets are already built, then what's the question? Are they from Home Depot? Why were cabinets ordered without a design? I'm a bit lost in this one.
From the original questioner:
Sorry I didn't make this more clear. I already built the cabinets and am planning to install next week. We make all of our laminate countertops in house. The builder has made the design change. He is paying for the change and additional work.
This is a basic 90 degree corner with a laminate counter top. The corner cab is an angled back. What I need to know is how to build the raised bar (approximately 8") and attach to cabinets or countertop. The owner and I went to look at his "inspiration" kitchen and the bar was actually a knee wall (42" high) with a lam top on it. The base cabinets installed as usual with a backsplash. He doesn't want to have to build the wall if we can somehow attach the raised bar to the new cabinets. I have drawn a plan for this but it will take 4" from the lower countertop. Any ideas will help.
From contributor B:
What you need to do is basically easy. Build the pony wall or knee wall yourself. You can build this wall out of 2x4 lumber or use what I like - 3/4 particleboard ripped into 3.5 or 4" widths and framed up a 40 1/2" high wall with studs at 12 or 16" OC. Then you attach this wall to the back of your cabinets and either sheath the exposed sides of your framed pony wall with veneer plywood that matches your cabinetry or, if this is a little higher end job, build a deco-panel and attach it to your framing. Then it is a simple matter of building a 12 to 16" countertop that will sit atop this pony/knee wall with corbels at appropriate intervals. With careful planning and accurate field measurements, this job can be completely fabricated in your shop. You attach this wall to your cabinets by screwing through your cabinet backs into the wall. This is very common in office/transaction counters.
From the original questioner:
Thanks for your response. That was just what I was looking for.
From contributor C:
Not sure if you can follow this or not, but I would put a piece of 3/4" veneered ply cut to 42" up against the back of the cabinet. I don't do a knee wall. Edgeband this plywood up the sides, and screw to the back of the cabinets from inside the cabinets. Screw the corbels from the "cabinet side" of the plywood, and place your bar countertop on. If you then place a ripping of laminate splash to the "cabinet side" of that plywood, you're done. Any piece of 3/4" plywood the width of the cabinet is plenty rigid to support the top and make it strong. If it turns a corner, it will be plenty strong enough.
From contributor D:
I agree - you don't need a stub wall unless you need electrical boxes in that run. I would check the code to make sure. Here in California you need an outlet every 48". I have also seen guys double up the 3/4 panels to make a 1 1/2 thick wall and with corbels it can be very rigid.
From contributor E:
If you want to get creative, and the customer is willing to pay for it, you could also convert the wall into a shelving area, or closed shallow cabinet, so it is not wasted space. Something like this...
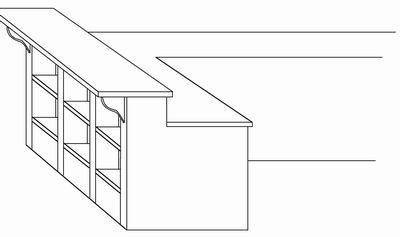
As others have said, by doing this, outlets could also be added on the main deck, and may be required.
From the original questioner:
The shelves were my first idea. The owner didn't want them because of kids sitting at the bar.
I just talked with the owner and he wants an outlet so now I have to build the wall.
From contributor E:
No problem, then add doors and the space is not wasted, and will look more high-end than just a panel.
From contributor C:
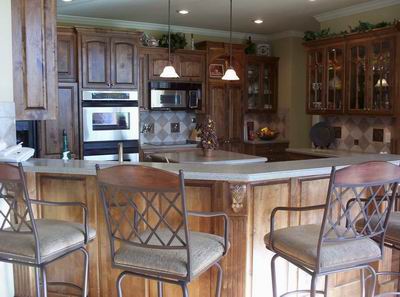
Don't build a wall! Build fluted legs and place the electrical box inside the leg and let it open just above the countertop. It adds more class than a wall and looks like more custom work than a cabinet against a wall with a countertop on it. There are electrical boxes in each leg, and the romex is fed inside the leg for a neat installation.
From contributor F:
Nice design element! Thanks for the picture too, and I also like the varying heights and depths of the uppers. Very popular features with my frameless cabinetry - I try and incorporate them into all of my kitchens and large wall units. Very popular for about a year now and it helps with installs since there are less long, strait runs of moldings. I can usually order standard 8' lengths shipped by UPS.
From contributor G:
I don't build walls either. I put a 3" frame pocket screwed to a matching wainscot panel(s). Screw from cabinet back into frame. Panels are 40 1/2" high with 3/4" MDF glued and screwed to top. Countertop is then screwed on from below. Sconces or corbels complete the job. Ditto on the various heights/depths too. To me, installation is easier and the projects looks so much better.
From contributor H:
If you've got the room, one way to handle this problem is to back a 42" wall cabinet right up to the base cabinets. This gives you a 42" high wall, with cabinet space on the bar side. Since this cabinet is under the bar you don't really need a toekick, and the doors of this cabinet also become your finished bar back. It is easy to screw your countertop on from inside your cabinet, and there is plenty of room if an electrical box is needed. But this will require a 25" bar top instead of a 12-16" top.