Checking and Splitting of a Large Poplar Plank
As predicted, this big piece of wood moved and split. But the owner ended up happy anyway. January 17, 2011
Question
I�m looking for a breakfast bar for a new kitchen. I came across a sawmill in GA and they cut me a large piece of poplar 14 ft x 16 in x 3 in from a green log. It has wonderful green/black/white colors with heavy graining. It is now sitting on sticks in my garage in FL. It is already showing signs of checking at the ends. How long will it take to dry before I attack with my plane/sander/finish? What should I paint the ends with? Is there any value in applying petrocryl or Wood Juice? Is there anything else I should worry about?
Forum Responses
(Sawing and Drying Forum)
From contributor W:
Coat the ends with something that cannot be permeated by moisture. If you don't have professional sealant, use something like paraffin, melted in a double boiler. Latex paint is not a good choice. I have used many large poplar boards like the one you describe, but I bought them from a supplier after they were kiln dried.
From contributor J:
At 3" thick, it will be years before it's dry enough to be stable unless you have it kiln dried, which it may be difficult to have done since it's an unusual thickness. Also, those greens are going to turn brown over time, though the black will probably stay black. I'd be looking for another plan.
From contributor G:
Get something on the end immediately. The best is Anchorseal but melted paraffin or several coats (thick sloppy ones of latex will do.) You need to stop the water wicking out the end of the plank. When it wicks out the end of the plank the plank end shrinks, however the parts of the plank further from the end are not losing water as fast so they are not shrinking as fast. Something has to give since they are all part of one plank, so the end splits. You want the drying to happen through both faces evenly.
The rule of thumb for air drying is one year per inch. So three years for your board. You will have a hard time finding anyone who will kiln dry three inch lumber. The kiln time for two inch is more than twice one inch and three inch is way more than double two.
The odds of your plank drying flat are not good. Poplar is relatively well behaved, but it would be much happier if it was at the bottom of a big stack of lumber being pressed flat. Unless it was quartersawn out of a really big log it will cup as it dries. If it was out of a log that was not grown on flat ground (straight up and down) then the reaction wood will also try and make it bow and twist. Keep the wood out of the direct sun or it will curl up like a potato chip, because one side is losing water faster.
From contributor W:
Poplar dries quickly, and the attic is a good place to make it happen. Even in this cool spring the upstairs of my shop is already starting to warm up nicely - in a couple of months my persimmon and white oak boards will be dry enough to work up.
From Gene Wengert, forum technical advisor:
Poplar has a lot of growth stresses in the tree that then are in the lumber. I suspect that you are seeing growth stress cracks and not drying cracks or drying checks. End coating will not control end stress cracks. Avoid latex paint, it does not work well at all especially on a thick piece. Use wax or Anchorseal, as mentioned. It is hard to give you adequate advice in just a short posting, as there are many subtle points to cover when drying thick yellow poplar. Check with local sawmillers and see if there is an experienced drying person in your area that can help you. I do agree with the comment about y-p being prone to warping at times.
From the original questioner:
Well, it�s now a few months later. I read all of the advice here and from other sources and decided that doing it right was not on the cards. I planed and sanded the plank and slapped a couple of coats of thin vanish on it and installed it. Over the next few months it did not warp much but large cracks spread from the ends through almost the entire length. It was worse than I had expected and thought that the $85 I paid for it was down the drain.
Not wanting to give up without a fight and since it seemed to have stabilized. I filled the cracks with black epoxy and went at it again with plane and sander. After a few false starts with stain and vanish which I sanded off. I bleached it with oxalic acid which turned the green to brown and the white to a mellow yellow. Then I added a coat of thin varnish and a rub down. I then put on a coat of shellac. I liked the result and found that French polishing is quite easy and applied a few dozen coats.
The result is spectacular - the grain is brown and stands out the cracks and other dings make it look old and the French polish gives a perfect shine without the plastic look of a heavy varnish finish. The only problem is that the finish is very soft and a hard finger nail will leave a dent in the surface. I would like to make the surface harder without sacrificing the thin-looking finish. Any ideas?
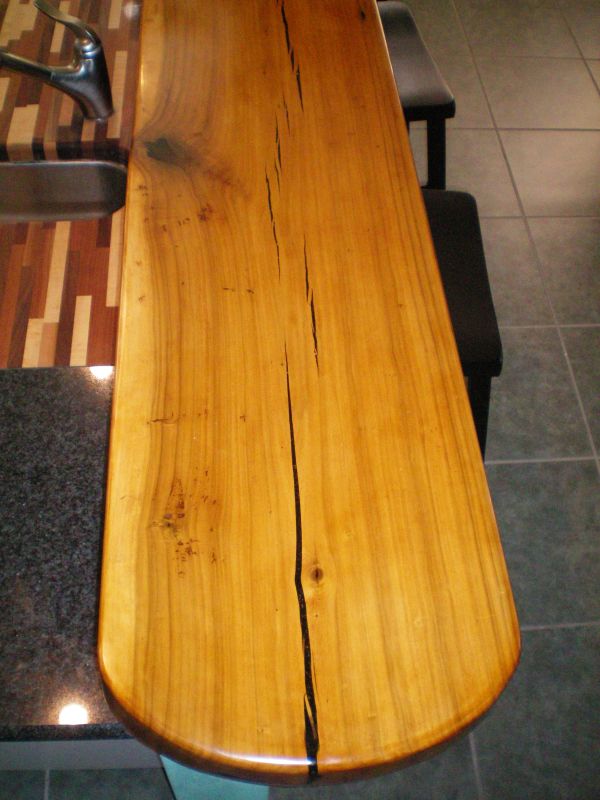
Click here for higher quality, full size image
From contributor E:
Satin spar poly will provide a nice hard finish, but would wait until you are sure that the wood is 100% stable before putting on anything that is very hard as it will be difficult to refinish or correct any new blemishes.