Clamping columns
Other Versions
Spanish
Methods of holding the angles together tightly, without using too many clamps. July 24, 2001
Question
I'm clamping long boards into a column type carcass.
12" wide and 83" long
3 boards - front and two sides
The boards are veneered MDF, and I've 45ed the joint and put biscuits every 6".
My problem is getting the corner to come together tightly. I'm using about 24 pipe clamps. I need to glue up about thirty of these columns. So I'm hoping for a clean and efficient way to bring that joint together tight and seamless, without using all those clamps.
Forum Responses
Line up the three boards good side up with the points of all bevels touching. Tape the entire length of the joints with wide masking tape. Flip the whole thing over to glue the inside of the bevels, biscuit slots and insert the biscuits (try to use 0 size biscuits). Fold up the three panels and clamp across the back with temporary spacers inside. Also try over-cutting your bevels just a hair past 45 degrees to be sure the heel of your bevels barely touch one another, so as not to pry the outside open.
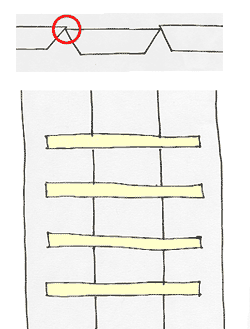
I've got a slight variation on the above method that I've found effective. Face the boards show side up as suggested, but overlap the leading ends of the joints slightly as in the image below. Then, instead of a long strip of tape along the joint, tape the joints across the joints, using the tape segments as hinges. The overlap will put added pressure on the joints, so use a fairly strong tape.

I've had good results with Bessey band clamps. A 45 degree lock miter cutter is slick as well, but not necessary. You'll probably need a clamp every 12" or so. Make a dumbing fourth side with the inside dimension and clamp away. You'll be amazed how square they clamp up, but I still cut a couple of squares of 1/4" ply of the inside dimension that can be popped out after cure.
I have had great results using the stretch film we use for packaging. I use the 5" width rolls. You can adjust the tension easily by how many wraps you make around the parts, plus it is clear so you can see what you are doing. I have done some odd shapes with no problems. Plus it is cheap and fast.
I would mill the pieces with a double tongue miter. Then you only have to clamp in one direction. If you buy a good quality cutter, it should leave a nice sharp edge on the miter.
Would it be possible to build a rectangular box (say 12" deep, 12 1/2" wide) out of 4 pieces of wood (1 X 2s), then use wedges at the joints to draw the pieces together? The hollow back of the column could be held at the correct width with a spacer. You would be sure then that the column would be glued up square.
We had to make some 40' long box beams with the miterfold method described above, but they were so big we couldn't flip them over to fold them. We took 4 shop carts and built boxes with pivoting outriggers and taped the parts face side up. When the parts were ready to fold we swung the outriggers in, the sides dropped down around the boxes and we were there. It took 2 men, went very fast and accurate and I never would have believed it would work. Good machining is the key, and it's nice to have a really big truck to haul them.
You say your material is veneered MDF. Why don't you butt join raw MDF, glue and screw, then veneer your columns using real veneer and spray adhesive (clear)? Fabricate as you would laminate.
From contributor R:
Why not make 15 oversize boxes, band clamp, then rip the boxes in half?
From contributor J:
Why didn't you just screw the boxes together oversized like stated above, then cut and then veneer after? You had to wait for the glue to dry the first time anyway, and it takes the superhero element out of doing it that way.
Veneer the sides and miter first and then use brad nails through the front miter and then just veneer the face last. You could probably even screw them through the front or make a box to hold the pieces together width-wise. Better yet, just buy oak plywood for the sides and veneer the faces after. On a job that size it would warrant making a jig, and/or buying a large 45 degree router bit to run the edges on a 45. I think they even sell a lock miter kit somewhere. You could just buy the bits and use all oak plywood. You'll save 10 sheets of veneer if you can make the boxes oak plywood and 11 7/8 deep, easily pay for the bits and have them for the next job.
From contributor R:
I'd use veneered stock and miters and biscuits like he originally intended. Then cut the boxes in half. Be a lot more trouble to veneer after, plus I don't know how much he's getting for the job or his shop setup. I don't think the clamps he's using are the best way to go.
From contributor J:
On second thought, you're right, post veneering would be a real pain in the butt. I would have used oak ply, oversized boxes and ripped them after, too. No bits to buy, and getting contact on the finished sides would be a pain to sand off, especially depending on the mil of the veneer he was using. It's cheaper for oak plywood than oak veneer sometimes, and doing the box, at least you know the three-sided boxes will dry square. At 25" x 83", it's the best way and easy to manage.
