Compound Curves: Circle Applied to a Cylinder
Problem: Create a curved molding shaped like a Frisbee wrapped around a drum. May 23, 2011
Question
Let's say you had a round window like a porthole mounted in a silo. The window frame is curved like the wall of the silo. How would you mold a casing (to stain) to fit on that frame?
Forum Responses
(Solid Wood Machining Forum)
From contributor D:
We do compound curves on shapers. The difficult part is making the molding blanks. After that, the shaping is easy.
From contributor M:
What are the two radii?
From contributor L:
Might try "Circular Work in Carpentry and Joinery." Or some urethane.
From contributor I:
You can also use the rubber-like flex moulding product if it is paint grade. They can cast it to the radius and it should flex to the curve of the wall.
From the original questioner:
The radius of the silo is 7" and the radius of the porthole is 5-3/16". The rubber molding thing won't work because it is cherry to stain. As far as making the blank, I was thinking of laminating half a cylinder out of cherry and then bandsawing the other radius, molding it, and then cutting the molding to width. I've got four to make so I would make 16 sections and each of the 4 sides would be twisted differently. And for added fun, the molding design includes a quirk bead.
From contributor E:
I think you could set up the blanks on a CNC machine. You would need to machine both sides by flipping in a cradle made on the machine. The blanks would be made a couple of inches longer on each end to eliminate snipe, and then the blanks would be run on a shaper with a cradle/fence facing the cutter. The shaper cradle would be done on the machine, also. Most of the work is done after you have made the fixtures, so it is easy to make a few extra pieces for fitting and joining. The quirk bead may have to be made with a router setup, or a hand-held laminate trimmer. One of the cradles should also work for holding the molded blanks on the mitre saw. I think that you will only have two different pieces, because the opposing pieces should be mirrored on this type of surface.
From the original questioner:
Yep, you're right about the opposing pieces. Am I right to think this would be a spiral, similar to a spiral handrail? Since I wrote that I cut a semicircle out of "flubber" and pressed it inside a 5 gallon bucket. It does twist - so would the cradle still work?
From contributor I:
Some folks have been able to stain flex mouldings using gel stain. Make sure you have the piece in final shape before finishing, as the topcoat will crack as the moulding flexes.
From contributor D:
Your parts will appear twisted - similar to a handrail for a curved stair, since you have a rising section along a curved surface. We refer to this work as a potato chip to help visualize it. Think of a flat circle based on the radius of your window and the casing width. Now bend it (mentally) to the radius of the wall, and cut out a 90 degree section that starts at the horizontal axis and ends at the vertical axis. Then cut along the inside radius and you have a quarter section of that potato chip.
Build a curved section of your wall (assumed to be 7') on the appropriate radius, then project the porthole radii onto the form, lay up your plies, then project your porthole radii again. With the radii given, you may be able to work in solids rather than plies. However, plies will make it easier to get the curve since it will come from the form.
As contributor E suggested, provide some material at either end for the inevitable. And you will have just two basic shapes for each four quarter sections of each window. I think a CNC will be of little use in this process beyond making parts for a curved form. The grain direction is important, and the blanks will have to be made from thin plies of matched sequential resawn material, so a CNC chewing into blocks of wood will not suffice.
Click here for higher quality, full size image
From contributor E:
I just recently cut some blanks like this on my CNC machine. I left the block ends square, and rotated the block between programs to make the different cuts (concave, convex, inner and outer radii). Most of the work is done on the computer. The glue lines that were exposed on the blanks were less obtrusive than a bunch of plies that are exposed when molded. I don't consider it "chewing into"; I call it carving, and it is very precise.
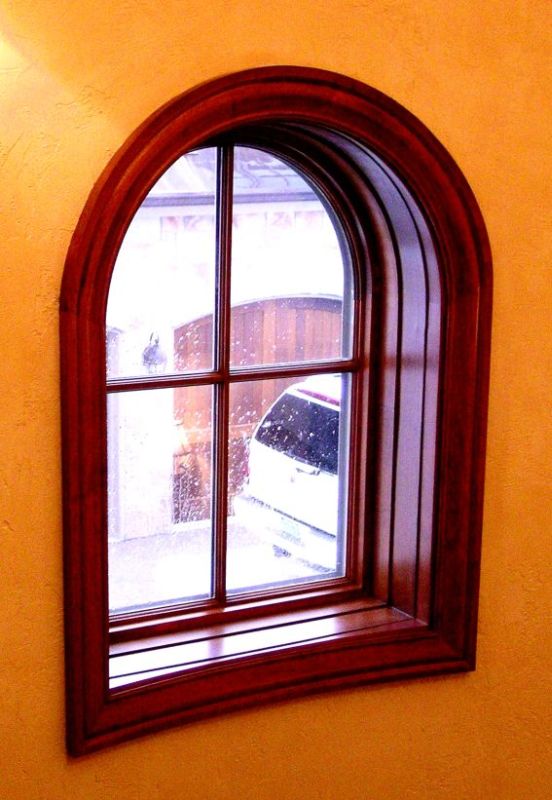
Contributor D, that window that you show is very nice. I think I could carve that molding right on the machine, since it has a gentle profile. If you look at the bottom sill in the picture, you can see that the blank is really not that thick, and there would probably only be two glue-lines angling across the part. I think that, when doing round casing, color match is more important than grain match; you will have four pieces mitred around each window, and the grain will change no matter what you do. The only people who will notice matching grain are woodworkers; other people see the window as a whole, and appreciate the overall look.
From contributor D:
When we build up blanks with plies, we resaw the plies and keep them in order for gluing back together. We also try - operative word - to place the glue lines where the profile lines will hide or diminish them.
The lower segment in the photo was perhaps made from a solid - I don't recall. It is easy to use the solids on single curves if one can. It is the compounds that eat up the thickness - dependent upon the radius.
You are right - woodworkers are the only ones that sweat over grain direction and such. It just seems wrong to ignore it, and our peers are always out there, looking.
When I said "chewing out" I meant no disrespect. While I am a fan of old style methods, I understand and respect the precision a CNC machine can bring to the craft. I work intuitively, and the problem solving process inherent in making compound curves is one cheap thrill I still truly enjoy. At this point, a CNC would rob me of one of the great pleasures I get in 3D visualization and problem solving. But others may feel differently - it is not for everyone. That is why this discussion has merit - more than one way to skin the cat.
Five bonus points to the questioner for committing to doing this in real wood instead of some gawd-awful rubber crap. A century from now, people that know will look at his work and value it and the craft that produced it.
I tend to think in additive wood solutions - adding smaller pieces of wood together to get to a given size. Reductive work involves removing wood to get to given size. CNC requires reductive thinking (among other things), and additive is where I'm at.
From contributor M:
Quote: "The radius of the silo is 7" and the radius of the porthole is 5-3/16". The rubber molding..."
We are talking inches, not feet, right? It seems like everyone is answering this question in terms of feet, but the questioner is talking inches. Just visualizing here, this is a 10" Frisbee wrapped 1/4 of the way around a cylinder. This could be carved from a one sq. ft. blank that is four inches thick (approximately). Or are you folks really running foot long pieces with a quarter turn in elevation and an eighth turn in plan through your shapers? And how?
From contributor J:
I can't imagine what this thing actually is, but I see it as contributor M does. This is a small piece of sculpture no bigger than a bent Frisbee. Forget about machine shaping and laminate bending and all... and no, this is not like a twisted handrail, it is simply a compound (double curvature) piece. A handrail is helical.
This is a job for the carver (hand or machine). I would carve this from two solid halves. Start with a 4" X 11" X 11" block. Cut it in half and band saw the convex radius on both pieces. (The grain can run either way.)
Now glue it back together with a paper glue joint and set it back down flat on the bench. Carve the full circle casing detail into the face and then split it back in two. Now you can bandsaw the concave radius and fit it to the cylinder. Finish by bandsawing the inside and outside edges of the casing and then gluing the two halves back together.
Since you have four total pieces to produce, you might want to send the first set to a duplicate carving machine. You can also turn a perfect circular casing on a faceplate and then have that piece cast in flex material. Bend your flexible ring casing over a solid radius block and deliver that to the multiple-spindle carver. They'll carve all four pieces at once.
From the original questioner:
Yes, you are right. This is a small 7" molding comprising part of a medallion which goes inside a curved corner of a soffit separating the first and second stories of a library. The molding is 3/8 thick and 5/8 wide. I've made plenty of curved molding with cradles and without (as in an elliptical one). We also have shaped a few spiral handrails. I'm thinking the main problem is the tiny size of this molding. I plan to glue up my blank bigger (leaving enough meat to ride on a bearing), shape it and then cut it down to size. I'll be cutting laminations at the correct diameter (10-3/8") and then gluing to a form of about 7". Any other ideas are welcome. I'll tell you how my experiment turns out. I do not own a CNC. I appreciate everyone's suggestions.
From contributor J:
Okay, I think I get it... I usually cut little moldings like this from solid stock and shape them on edge with a little router bit. I attach a curved base and spring hold down finger to an inverted router, or sometimes I use an adjustable holding fixture on a pin router.
I think your 10 3/8" diameter arcs bent to a 14" diameter form will produce an elliptically shaped molding medallion.
From contributor G:
I agree with contributor E regarding the CNC. This would not be a problem with a 5 axis CNC. All of the profiling could be done on the CNC using ball cutters.