Question
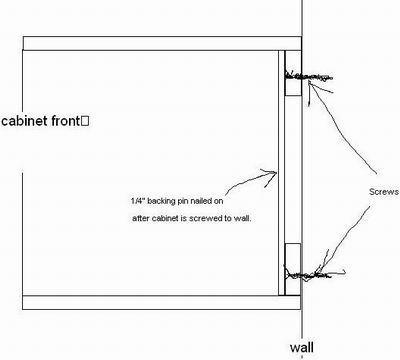
I use 1/4" backs on my wall cabinets with top/bottom cleats visible on the inside of the cabinet. I am contemplating switching to another method, something that will conceal the cleats. I was thinking of rabbeting the backside of the case, insetting the 1/4" back and then mounting the cleats behind the back. Is this too much of a pain or should I just use thicker stock for the backs?
Forum Responses
From contributor D:
This is how I recommend.
After assembly, drop the back in from the top and pin with 5/8" pins at an angle. Then screw a 3/4" top cleat into top of the box. This is the major support/fastening. The bottom cleat can be affixed with adhesive or carefully screwed to the bottom, once again at an angle. (Another alternative is to cut the bottom the same depth as the top - shallower than the sides - and treat it the same as the top... if you don't mind the cleat showing on the bottom of the cabinet.)
I've been using 3/4" backs planted on and am going to switch to 1/4" dadoed, like the two of you are doing. I haven't decided how to handle the diagonal wall cabinets, though. Do either of you have a drawing or some specs you could share?
I'm not sure exactly what you mean by "reveal the sides of the cabinet", but the issue of space for plates has never come up - unless they're way oversized, most plates are under 11 inches.
It's a much cleaner look with the cleats outside the back. Toss a fastcap over the screw head (or use a finish washer) and you're ready for occupancy.
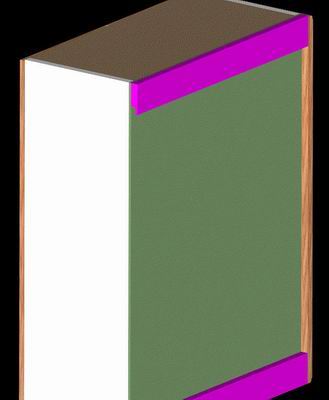
And yes, it's an eCabinets rendering - I've sold quite a few jobs on the "wow factor" of renderings like this...
Now I just do the interior upper and a pre-finished ledger strip below the cabinet. I think it's stronger, since it's under the cab.
I worked at a big shop and they did it with cleats visible, and mounting screws covered with plastic screw caps. This way is nice because you can miss a stud, redrill a countersink hole, and still cover up all the screws and holes with the 1/4" back afterward.
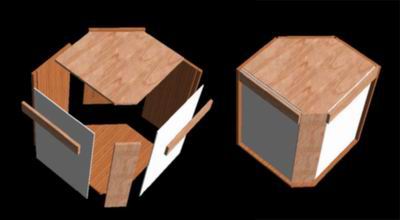
So basically, like shown in my sideview picture, build the box with back separate and pin nail it on top of cleats after installation.
This also makes painting the interior of the cabinet easier because you don't get the spray bouncing off the back of the cabinet, and you can spray the interior walls from the front and back of the cabinet.
As far as wasted space, sure, you lose more interior volume by 3/4, and if that matters, use a different method. But the wasted space is actually nothing where the cleats are, and stuff is usually stacked in the cabinet where the cleats are.
Also, if they did not know, they never would. You cannot tell with the naked eye, as there is nothing different in the area to reference it against. It is also cheaper to make and hang. Finally, it is more than strong enough.
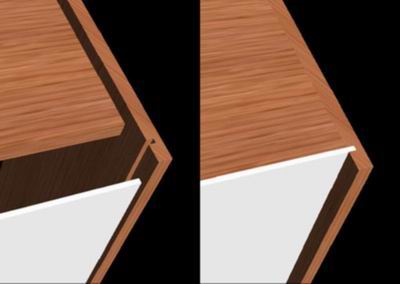
No dado for the backs, either. Only 1 1/4" x 1/2 rabbets on the finished ends. This leaves 1/4 for scribe and some to staple the back to and screw the hang cleats to.
Comment from contributor L:
I use 3mm (1/8") pre-finished white MDF and 80mm x 16mm rough plywood for the invisible cleats. I had a saw blade manufacturer make a 9" melamine blade with 4mm kerf and use a small powerful inexpensive dedicated saw (with a fence bolted down, fixed) for this groove (with dust attachment). I use 16mm white melamine for tops/bottom/shelves. I use 8mm dowel case construction and built a small case clamp on wheels with a single screw to squeeze and square everything together (with the back in place) and leave it in the clamp until the next cabinet is prepped for clamping.
The box with hardware-like plates or guides goes directly into the truck for delivery. I work in a true 32mm system. My cabinets are strong and much lighter, and place very well on any wall - straight, bumpy or otherwise. I plant on finished ends. I build the boxes and ship only the boxes and neccessary fillers to the job site. Install the boxes, countertop, doors, drawer fronts and panels when the other trades have left.