Question
I'm easing into frameless cabinetry, using Confirmat screws as the assembly method, but I�m not sure that these are the way to go. I�m low on funds, so I don�t have a lot of choices.
I've gotten a few sample screws and purchased a "step" drill bit. I am not impressed with the specifics of the bit. First, it's about 4-1/4" from tip to the end of the flutes. Because the screws are only 2 inches (50mm) in length, it would seem that I only need a bit that is slightly over 2" in cutting length. The drill is very coarsely milled and it is actually tapered, rather than stepped. I don't see how I can very easily control the proper depth of the hole to accommodate the length of the 5/7/10 - 50mm screw. I don't believe a drill bit stop will work on this bit.
Anyway, I gave it a try on some 3/4 VC ply scraps and found the bit to require a tremendous amount of effort to feed. When it reached about an inch and a half into the material, the plywood core split wide open - even before I reached the 7mm step (or taper). I recognize I was probably too close to the end with this sample test, which encouraged the blow out. I plan to build using mostly 3/4 VC ply but will also move into some work with pre-finished PB panels, and possibly even some MDF core products.
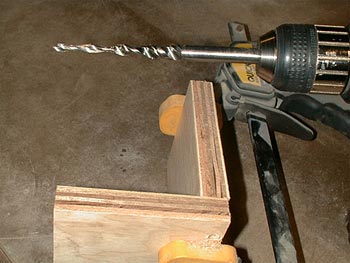
My Hafele rep tells me this is the correct bit for these screws and the Confirmat system. Surely there is a better single purpose bit on the market for drilling holes for the common 5/7/10 x 50 Confirmat screw. I've posted a picture to show what the bit looks like and the results I achieved on my virgin attempt to use these fasteners. I could use some help sorting out the particulars of this fastening system.
Forum Responses
From contributor F:
First, a Confirmat type screw is made for particleboard, not plywood. The bits are also made for the more consistently dense particleboard. Second, consider pre-drilling for the screw body or shank ("stern" GR) in the flat component and the screw portion, minor diameter of the screw thread in the end drilled component. Drilling depth is then only an element of the end drilling and not very critical. Then use an assembly screw with nibs for the countersink and set your torque limit for depth. Confirmat type screws are available with a pointed end or flat end in addition to nibs or no nibs.
I have been building VC ply (face frame) cabinets for some 11 years now and have used various methods of assembly - predominantly dado, glue and nail guns for the boxes, pocket holes for the frames and glue and clamp (with a couple of well placed nails, per frame, for added mechanical reinforcement) for fastening frames to cases. There must be a "stepped" bit that will allow drilling for the common sized Confirmat screws in a single drilling operation. I have considered drilling in two and even three steps but that will not do for the intended production efficiency I had hoped for.
I did see that these screws come in various sizes, to include pointed ends. If the nibbed heads of these screws are anything like the other nibbed headed screws I've tried, I'd prefer to counter sink for the head and ease the screw in its predrilled location. I will certainly try them, but one of the features of the Confirmats I was looking forward to was for use in KD furniture � bookcases, etc.
The drill that you show is a Hafele bit that is supposed to be used in their Zentrix manual drilling jig - that is why it is so long. The jig locates the bit in the center of 16,19 and 22mm sheet goods and stops it at the proper depth. It makes very quick work. The jig works well but is very pricey.
You can use the step bit alone in a drill as shown, but be careful as these bits are very fragile and easy to bend if they jam in the wood. I've made a stop collar (for the bit shown) out of fuel line tubing going from where the chuck stops on the bit to the depth that I wanted. This is so the stop never moves up on the bit. I think that the tubing is 3/8" inside diameter.
I have also seen much shorter step bits, including carbide tipped, but I have never used them. When I find a source I will try.
As for the blow out on plywood, you can expect the veneer layer to chip close to the edge of the panel - this happens to me all the time.
Also, look under custom cabinet construction in WOODWEB's Knowledge Base for more Confirmat info.
If you are considering making the move to frameless construction, run - don't walk - away from veneer core board. It's too inconsistent. Voids can cause problems in the bander, as well. I use thermally fused melamine on a particleboard core. Again, with the proper sized predrilled holes, splitting is a non-issue. I don't use MDF for case parts simply because it's too heavy. MDF does, however, make an outstanding substrate for doors.
One other comment on your test - AWI does not allow European assembly screws to be closer than 36mm from an edge.
If I had two drills set up, one with a 5mm bit and the other with a 7mm bit, I could drill the 5mm hole through both parts to the final depth, then pick up the drill with the 7mm bit and bore out the vertical part to a depth that (at least) clears the thickness of the V-part. I don�t reckon if I bore 1/8� or so into the horizontal part, that it would make much difference. Insert the screw and go on to the next, making assembly as the parts are clamped only once. Am I on the right track?
Drill bits come in various styles, end shapes, milling configurations, and metallic composition. What specific metric bits do you find cut cleanest and last longest?
As a side note, the plywood in the image is a high-grade 7-ply white birch that actually measures a consistent .750 and is virtually free of voids in the core area. Of course that varies some as the relative humidity in the shop changes from week to week, but as all panels (except the top one) change fairly consistently, the job progresses without difficulty. A closer look at these scrap pieces revealed that they came from a batch of plywood from a job I did several months ago. The core is made up of some very hard and heavy exotics, which I believe contributed to the difficulty in drilling and promoted splitting with this particular drill bit.
A hammer is for driving nails. A Confirmat is for the above. A dowel is for frameless cabinetry... done the right way.
Assemble the boxes with staples first. Now strike lines where you want your screws to go. Remove the edge guide from the zendrix attachment so the face of it will sit flat on the material (the edge guide is very handy if you will always be drilling on the edge of your work, but makes it impossible to drill for drawer stretchers, partitions, etc).
Pull back on the spring-loaded slide of the zendrix guide so the bit is exposed. Put the tip where you want it and let the guide spring back to the surface of the cabinet and drill the hole.
Contributor M has a good idea for a drill stop, but I�m not sure that it will give you guaranteed perpendicularity to the surface, which is essential.
These drills create a lot of dust and much of it can wind up right back in the hole. That�s why the drill is deeper than the screw.
Since the cost of the zendrix system has apparently gone down so much, it might be advisable to get two guns. One would have an edge guide attached and the other as I described above.
One last note. It�s been a number of years since I�ve actually used melamine (and therefore Confirmats), but I never had luck with the carbide drill bits. I found them to be very brittle.
If you're going to use the Hafele bit to freehand drill, I've found that you must hold the pieces tightly together or the bit can self feed very quickly and cause the side panel to jam and bend the bit - a very expensive mistake. You can use nails, staples, corner clamps, etc. This is not a problem with the zentrix jig.
Double-sided thermally fused melamine is a superior product compared to veneer core plywood at half the cost.
There is one option to consider over Confirmats. Try the Hafele Zip-R screws. They require no pre-drilling and hold like crazy. I use the #10x2". I made up several test samples and compared to Confirmat and simple wood screws. The Confirmats held very well but could tell no difference from the Zip-R's and the Zips eliminate the need for expensive, fragile step bits. Of course, I don't build my cabinets for RTA or take down. If I did, the Confirmats would be the way to go. And if I recall, that's why they are used in Europe. When people move, they take down their cabs and take them with them. Not likely to happen here.
And I disagree about dowels being superior in mechanical holding strength to any screw. I recall reading that a comparable screw has 450% more holding surface than a dowel. Although I agree that dowels will eliminate the need for end panels, we use raised end panels about 98% of the time anyway, so that's a non-issue.
If you want to use a hand drill, staple and screw is my preferred method. It�s much faster than using the Confirmats. It is not as strong, but you�re building kitchen cabinets - how strong do they need to be? I guarantee that even using staples and screws, the joints will be far superior to dowels. I cannot personally attest to using a #10x2� screw without the material splitting out. I can attest to using a #6x2� in 3/4� two sided thermofused particleboard, with no problems. I did pre-drill a 3.2mm hole in the side to help with part location as well as help get the screw started. I used the Hafele Zip-R�s as well.
In my opinion, 5/8� material is a complete waste of time. 5/8� offers no positives over 3/4�. It�s not going to save much in weight. In some cases, it can actually cost more, particularly when you get away from commodity colors, and there�s also the issue of screwing and doweling.
How are you going to bore for your hardware? Assembling the cabinet is the easy part. Boring for the hardware is the critical part. You can easily slap four pieces of board together to make a box, but if the doors and drawers don�t fit in it, it�s going to be a trying time.
Strength and durability are satisfactory with 5/8 as long as spans are considered. A couple of large dental suites I built in 1985 are still in good shape. (But when necessary, I buy 3/4 and just grit my teeth.)
Also, because I use 4x8x3/4 sheets of melamine, I purchased a panel cart from Hafele. No more back pains. You can rotate it from horizontal to vertical, slide the sheets on, about five or so, and rotate back to horizontal and lock. Then wheel it over to the panel saw and slide the sheets right onto the slider. A breeze!
I have always used Euro hinges and Euro slides of several configurations and from several manufacturers. I bore all my doors with a small Mepla hinge-boring machine. I have always drilled wall units for adjustable shelves. I have always applied wood tape to these shelves. Plant-on (usually 5-piece to match the door design) end panels are common on my finished ends. I have constructed dovetailed drawer boxes and doors but prefer to outsource them on all but the smallest of jobs. I have done about every degree of overlay you can imagine, even to the extent of full overlay - so that you would think the cabinets were frameless, until you open a door. Inset doors and drawers (1/6� reveal) are my specialty and here is where I had to really learn what square is. Okay, not �CNC� square, but as square as humanly possible.
I have what it takes to bore accurate system holes (albeit slowly) for doors, drawers, hinges and shelf pins. I have used the Euro leg levelers on a few jobs in the past - the ones that adjust from inside the cabinet and allow the toes to be clipped on and off the legs. I do certainly have a lot to learn about the details of frameless cabinet construction. Without the ability to drill for dowels (I believe it's called "construction boring"), I'm most concerned with the best method for me to join components, given my equipment and available funds.
I don�t have one of the Zindrex guides and so will try the 6x2 Zip-r screws. They are available in square drive, which I prefer. There is another specialty screw that I see in the Hafele catalog - the SPAX Screw. It�s uni-drive (square/pozi pecess), synthetic coated, no predrilling, aggressive grab threads with patented cutting threads. Anybody try them yet?
There are a few commercial jigs and manual systems on the market that make it possible to accurately drill system holes for Euro hardware. I have been through most of them and have settled on a couple that work accurately for me. And as I mentioned earlier, I use the Mepla hinge boring machine for door hinges. Of course, it all starts with parallel edges and square panels � without which, none of this matters.
Could someone point me in the right direction for looking at manual boring machines?
Using all 3/4� material (including backs), the process takes about 13 minutes per cabinet. In terms of profitability, myself, one full-timer and one part-timer produced over 500K in sales last year.
Note to all: a number of posters have sung the praises of melamine over plywood. Yes, it�s cheaper, it�s easier to clean and it has a greater yield due to not having to deal with grain orientation. Only problem is that it�s not wood.
I build commercial and institutional exclusively. Probably less than 20% is wood. In this end of the industry, melamine is the standard. I also use a fair amount of cold pressed HPL. At any rate, even if the cabinets have wood doors, they still have some sort of laminate box (unless they are open cabinets, in which case I use veneer laid up on PC core).
Nothing looks better than a natural finished maple interior, when it's new. I've got natural finished maple interiors in my house, natural finished red oak dovetailed drawers, the whole deal. My house is seven years old and I've got a 6 year old and an 8 year old who help me do dishes, cook, etc. I hate the natural finished stuff. Finished materials just don't wear like melamine does. I have laminate in my bathroom and laundry room and I love both units - they've held up well.
Particleboard seems to have a bad rap. The vast majority of the public is uneducated about it. The only thing they know is that cheap entertainment center they bought three years ago was the worst piece of junk they've ever seen. But I'm talking about thermally fused melamine. When was the last time anyone at this forum can recall a piece of melamine delaminating? We've used it for almost 20 years and I don't remember a single piece. I can't say that about plywood. Same thing goes with cold pressed laminate. I have seen some problems, but never with my supplier. It's pretty difficult to screw up spreading PVA on a board and pressing a piece of laminate on it. These things need to be explained to the customer.
Contributor G, have you ever stained veneer that was on MDF or PB core? MDF is hands down the most consistent staining substrate on the market and PB runs a close second.
Contributor B, architectural veneer panels are supposed to be void-free in the two outermost layers of their cores. Sounds to me like you were sold second-rate goods.
No sprayed finish (except perhaps polyester) is going to out-perform melamine in the durability test. Still, it seems like your wood cabinets should have stood up better. Did you use a catalyzed finish like Duravar?
Finally, lest anyone regard me as an �It�s got to be all wood or nothing at all� snob, I use ranger board (MDF) on all of my center panels on my paint grade work. You can�t beat it.
As far as my cabinets at home, the real problems are in the utensil drawer, where it's common for the utensils to be a little wet or me to have wet hands while going for one. Same for the junk drawer and my pot and pan rollouts. My drawer vendor, at that time, used Jellico's pre-cat varnish. The cabinets themselves have held up. We used Guardsman's Super Chem-Veer post-cat - in my opinion the best on the market. The point I was trying to make is the melamine in the Meta-Box drawers does not have the wear and tear.
Comment from contributor A:
I have been doing frameless for some years. 5/8 melamine is the standard here. I have tried most of the methods discussed and after several years I use a #6 x 1 3/4 particleboard screw. I pre-drill during assembly. I use finishing gables on all exposed ends. If you're a small shop doing a couple of kitchens at a time, this works very well and is cost effective.
Editor's Note: For imported machinery from Casadei, Busellato, Vitap, Bonacin and more, see JKL Machinery (website).