Question
Has anyone had any experience with converting an overseas shipping container to a DH kiln?
Forum Responses
(Sawing and Drying Forum)
From contributor D:
Yes, it is very commonly done. You must use a refrigerated container to get the level of insulation that you need. A 40' hi cube, when properly set up as a kiln, will hold about 5000 board feet (12M3). The size of the dehumidifier depends on the species and thickness being dried.
1. Purchase an insulated container if at all possible. High cube (9.5' ceiling height) is the best way to go. A 45' length will let you get two carts of 16' cants and one cart of 12' cants in the kiln, which works out to around 4500 bf.
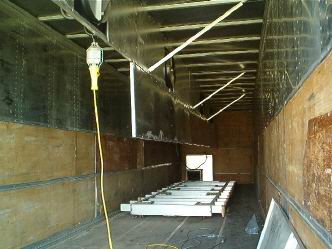
2. If you can't get an insulated container, the following process is very effective: Glue 1" foamboard (R3.2) to the inside top, sides and ends of the container. Over this, glue FBBWP (foil, bubble, bubble, white poly) Tekfoil available from FarmTek (www.farmtek.com). It's about 3/8" thick, and has an R value of 10.
This insulation combination is unbelievably effective at retaining heat inside the kiln, and moisture will not easily condense on the white poly. On a seventy degree day, with an inside kiln temperature of 120 degrees, the steel outer shell of my container is about 72 degrees.
3. Build a track system inside the kiln, and even more importantly, extend the tracks outside the kiln. You will need to have about a 4' removable gap between the kiln and the outside tracks to allow the doors to close. The Nyle manual provides an example of an effective track system. Don't skimp on your kiln carts or cart wheels.
Inside track is important because the weight of the lumber can punch the cart wheels right through the wood floor of the container. Track outside the kiln is critical in order to use a forklift or tractor loader to load the kiln carts.
4. Build a relief in the side of the container for the dehumidification unit to sit in. It provides for more consistent air flow through the kiln and you reduce the chance of damaging your dehumidifier during loading or load inspections.
5. Install one fan for every 8 feet of container length. I have 5 in my 45' container. Hang the fans on rubber mounts (Grainger�s has them), otherwise the steel container will reverberate and you'll hear it humming 600' away.
6. If you live in a rural area that is subject to power outages or surges (such as when a tree strikes a power line), be sure to install a surge arrestor on your load center. The kiln controllers can be susceptible to voltage surges. You can get surge arrestors at an electrical supply center.
7. If you purchase a Nyle unit, consider ordering the extended length cable from the controller to the dehumidifier. The standard 6' length is a little short.
8. Clean and paint all exposed metal surfaces inside the container, as moisture will condense and the metal will rust quickly. This is especially important on the insides of the doors and bottom of the door frame.
The folks at Nyle are really great, and their products are top quality and reasonably priced.
I have about 11k invested in my container kiln, excluding labor. Breakdown is as follows:
Container, delivered: 1,500.00
Nyle (Wood-Mizer) 200 series kiln: 4,745.00
Three extra fans (Nyle): 725.00
Moisture meter: 410.00
Total, excluding labor: 10,985.00
From a labor perspective, it took the following: Two men about 40 hours to glue in the insulation, with furring strips for extra support, and to build the side kiln chamber. It took two men about 40 hours to install the fans (including electrical) and fabricate the plywood baffles. Finally, it took two men about 50 hours to fabricate three kiln carts (two 16' carts, and one 12' cart), and the track system inside and outside the kiln.