Question
Does anyone cope MDF crown or is it most common to cope wood and miter MDF? If you cope MDF, do you have any tips to prevent the thin edges from chipping off during cutting and installation? Also, does anyone know the history of the miter saw scale? Why, when making a cut 90 degrees from the edge of a board, does the scale read 0? What were the carpenters in years past thinking when designing the tool with a scale that is opposite of a common protractor? Thanks for your input.
Forum Responses
(Cabinet and Millwork Installation Forum)
From contributor P:
Absolutely cope it. You will find that coping MDF is very easy. Don't back cut very much to help eliminate the thin edge chipping. You will still occasionally get some chipping, but a little caulk is all that is needed. After all, it is paint grade and will be caulked anyway. I've been using MDF now for at least 10 years. Some is better than others. The really cheap stuff is going to chip and dent no matter how careful you are. But once you work with MDF for awhile, you'll get the hang of it.
Carpenters don't use protractors. All squares and scale markers used in carpentry and woodworking are laid out the same. The scale is laid out for making miter cuts. A 90 degree cut is not a miter, so it has a 0 degree angle. Half of 90 degrees is 45, so the saw is turned to an angle cut of 45 degrees.
So, if the angle is 60 degrees, you can subtract 60 from the 90 degrees that the blade already moved (when it reads zero) and get a saw setting of 30 degrees for the whole angle. Of course, for a two piece miter, you then divide the whole angle by two for a saw setting of 15 degrees.
It also helps to learn some simple geometry when dealing with angles. If you keep in mind that there are 180 degrees in a straight line, which is the base line of a half circle protractor, you can use triangulation to work with and solve any problem related to finding the correct saw scale settings.
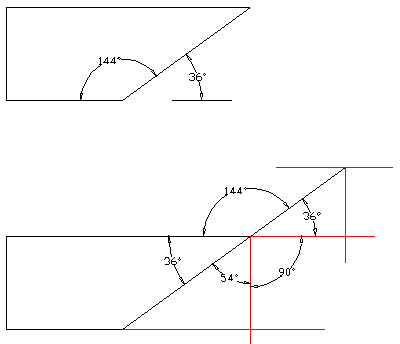
In the drawing below, triangulation is used to extend the lines in the drawing (red lines) and thereby expose all of the angles. Notice that if you add up all of the angles from the base line back to the base line, it always equals 180, which is the number of degrees in a straight line.
If you get an angle on a drawing that is larger than anything on your saw scale like, say, 144 degrees, you can subtract that angle from 180 and you get a saw setting of 36 degrees.
