Question
I have an enclosed staircase with a knee wall and banister on the right side. The stringers, 5 treads, and 6 risers, installed in 1965, were not cut correctly. I need to cut 1/4 inch off four of the treads from each stringer. Each of the trim skirts have been and will be removed. Drywall is attached to the bottom side of the stringers to make up a ceiling underneath the staircase, making it impossible to use a circular saw to cut the treads. Currently, new stringers are not an option. I am looking for suggestions as to what type of tool I might use to finely cut the stringer treads, thus lowering the riser height, in such a tight space? I'm considering a Bosch 1640vs flush cut saw, a router, or an osculating multi-function type saw.
Forum Responses
(Architectural Woodworking Forum)
From contributor R:
I have to do things like that all the time when I do stairs. The Bosch will work, but a Sawszall is better with long blade and a slower speed (the Bosch is tougher to get into the corners, unlike the flexible blade of the Sawzall). Remove the skirts, as you said, then any damage to the drywall will be covered by the new ones. What I finally did was get a left and a right sided circular saw to cut most of the way through and then finish with the Sawzall and a good sharp chisel. You won't get them perfect. Shims and PL Premium Urethane adhesive used somewhat generously will take up any space when you level the new treads and risers. Also, stay off the stairs for at least 8 to 10 hours afterward to allow the adhesive to harden up. 24 hours is even better. Oh, and a large bottle of Advil for afterward.
I have done a considerable amount of stairs over the years and they are never level or consistent. I always have to do some type of modification to the stringers to get the stairs to go together correctly. A lot of times that means doing exactly what you have to do.
A Fein Multimaster with e-cut blade will let you get into the corners of the stringers easier than a Sawszall, if you have access to one.
As far as the actual cutting of the rough stringers, I've done it two different ways.
1. Just as contributor R said, basically, except I use my cordless Makita 6.5" circular saw and a simple cutting jig made from 2 pieces of 1/4" MDF that I can screw directly to the rough stringer exactly on the cut line, then I finish/clean up the corner with my Fein saw. Only disadvantage is I have to make a plunge cut cutting from the back to front on one of the rough stringers because of blade to saw base orientation. Having a jig for the saw to ride on is pretty accurate, way more than the freehand method used to cut the rough stringers originally.
2. Overcut with cordless saw/Sawszall/Fein (freehand) then add 6/4 poplar blocking (3.5" - 4" X needed length). I use PL poly construction adhesive and my 15 gauge nail gun with 2.5" nails. Just be sure to scrape/brush off/vacuum rough stringers where blocking will be attached. I used to go back and add screws the next day but after many, many stair re-do's using this technique, I rely on just the PL and nails.
One word about the PL Premium Polyurethane Construction Adhesive - it's a bit expensive, but after using all the others, nothing comes close. It's basically bombproof! The extra $50-$100 bucks for a stair job amortized over the life of the stairs and peace of mind about no issues with squeaks, etc. is well worth it. The client is paying for it, not me. Just factor it into your bid. Word of caution - it's like working with roof mastic (aka Henry's) - it will get on everything including you. Always have plenty of disposable rags and naphtha or mineral spirits at hand!
I sister/scab onto both sides of the middle stringer. This technique allows you to level the treads and plumb the risers if you also cut back the front of the stringer. Most of the time all you have to do is push everything forward about a 1/4" and this extra cutting is not necessary. One thing affects another with stair work, so be careful here - I usually only do that when I can control the nosing at the landing so my tread depths/overhangs stay consistent. Most of the time the rough stringers are not in line with each other, so...?
Only use dry, well machined wood for this blocking, or what I've done lately is glue 3 pieces of 3/4" exterior grade plywood and cut new stringers and PL/nail them in place. I typically use 3 piece glueups for outer stringers and 2 piece glue ups on either side of the middle stringer. After everything is installed (lots of PL - as stated, it will take up any minor imperfections/bridge small gaps), it feels like you're walking on concrete stairs!
For the ultimate stair job and only when the client wants to fork out the extra dough, I will run pocket hole screws in the blocks/plywood stringers before I install them and then PL/screw the treads down from underneath. Need a right angle impact for that - works awesome, though - no face nailing through those beautiful solid 1" treads. Everything comes out super tight - you can even pre-finish treads if you're really good.
I disagree with contributor A - solid 1" treads are that thick because they are spanning across the rough stringers and will carry a fair amount of weight/stress. Routing out 1/4" on bottom side results in only 3/4" to do the same thing. In my experience there is too much deflection with 3/4" material when installed over rough stringers only.
The biggest problem with routing (thickness issue aside) is that if all three stringers aren't perfectly level with each other it will be almost impossible to get the rout depth to work. Also, cutting all those stopped dadoes is going to be a royal pain in the butt and if they are off, you can't get in to shim where needed. Easier to just cut the stringers to height. Once you set your story pole, all you need are a couple of levels and a sharp pencil to mark them out.
As I said in my prior post, a left and a right cut circular saw will get you close, then finish with the Fein Multimaster. If you don't have a need for them in the future, then rent them. Porter Cable makes a great 6 inch pair, the Saw Boss (only about 150.00 ea). All you have are 5 steps? Shouldn't take more than a half an hour to do. Mark one stringer to the proper height and then transfer the lines with the levels. The left and right saws allow you to get in tight to the wall.
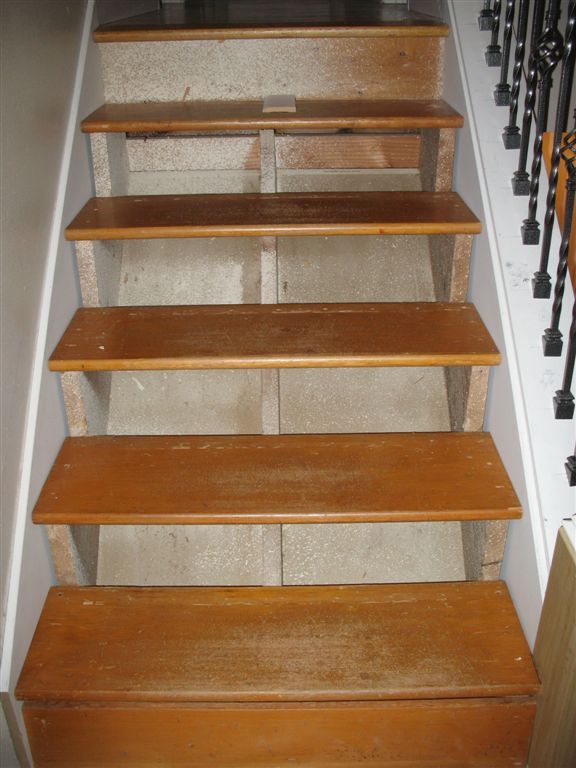
What exactly is the riser issue? Looks like in the picture the tread nosings are pretty consistently spaced down from the top edge of the skirt boards - can't really tell unless you set a long straightedge across the tread nosings, then you'll see which are low and/or high. Remember, changing the overall slope angle will affect this tread nosing to skirt board top edge dimension.
Contributor R, I really like your last thought - sister up new stringers. If the router doesn't work, that is what I'm going to do! Perfect will do.
If it takes you more than 1 hour to dado the backs on a table saw with a chisel for clean up, I would be amazed. Take them off, dado them, glue and nail them back down. Sistering stringers like that would be a full day's expedition at best. Cutting them with a saw will work, but another big waste of time. You will need lots of PL construction adhesive to even make it work.
The dado method is fast, accurate and changes nothing, so you could probably get away without the adhesive (I use it anyway). 2 hours out the door.
Sounds like you're as anal as I am and you want perfection like I do. The best way is to re-cut new stringers out of plywood or something dry and stable (I've used 8/4 poplar but now prefer laminated plywood). Using green lumber is why there is almost always a downward slope to the tread cuts after it has dried out, along with the warping issues. It does take extra time (most non-perfectionists would never even consider) but the results are near perfection. Just do some real careful layout on one piece as a master and template all the others off that - I usually trace/rough cut with a jig saw/glue/clamp or screw to master/flush trim with router setup. Set outer stringers first, plumbing with lots of PL and shims. It can be tricky getting a good reference point, so think that through before you commit to the PL. Use a straightedge/level to line all 3 or 4 up when installing the middle ones. Keep weight off new stringers as much as possible during installation - shims and screws at critical points will help. Don't forget the first riser height will be 1" less than rest when using 1" tread material - that's where an accurately laid out story pole comes in handy. Show rough stringer and finished tread locations, otherwise it can get confusing. My mentor, Lon Schleining, has a great article in Fine Homebuilding about making a story pole - check it out.
One last thought - there should be a law that only allows finish carpenters to cut and install the rough stringers for stairs! Only stair guys who've had to deal with poorly cut stringers will appreciate that.
Contributor R, I'm on the west coast in So Cal. If they used to have the stair guy come out during the framing stage, that was way before my time. I've only seen closed/routed stringer and skirt stairs on some 100 year old houses that I've worked on over the years. I think that's referred to as the "good ole days."
Comment from contributor C:
I think contributor M has it right. 3/8" between risers is a maximum variation in height between adjacent treads. I think I would leave it alone.