Creating a Bead Profile on Curved Stock
Cabinetmakers suggest tools and setups for beading curved pieces, and offer an alternative applied-bead technique. Check out the photos! September 22, 2005
Question
Can anyone tell me how to put a bead profile on a curved piece of wood? Obviously it is very straightforward with a router on a flat or straight piece of wood, but I gather I would need to use a hand plane on the curved. If this is correct then which type of plane would I need?
Forum Responses
(Cabinetmaking Forum)
From contributor F:
Of course a bead profile can be run on the edge of a curved board, but I�ll bet you want to run it on the face/edge of a curved board. If you need a bead on the convex face/edge of stock it can be done by screwing a curved fence to your router table fence at a height that allows your curved work piece to pass under it. It also has a curved fence that rests on the router table at the fence that supports the convex edge of the work and steadies it as you pass your work piece through the cutter while the beading cutter routs a bead into the convex edge/face right near the router table top surface.
Routing a bead on the concave face/edge is a problem unless the curved work piece is narrow enough that you can raise the router bit high enough to get in position on the concave face while running it as in my first example (in my first example the convex edge of the work is near the router table top while the concave edge faces the ceiling).
Even if you have enough height adjustment there is a good chance that the groove portion of your (I assume here) quirked bead cutter will not fall in the correct position in relation to the bead and the edge of the work piece. I think there are quirked bead router bits out there that have the bead portion of the cutter in between two equal .0625" groove portions and can be set up to cut the same profile from either edge of material in relation to the router table top/router base.
If you have a planer style molder these curved parts could be run on that, and again if the knife was designed correctly it could be set up to run a quirked bead from either the concave or the convex edge with one single moulding knife.
Other than that, since you asked about planes, there are old wooden planes that were used for moulding, but you would have to make or have one made to match your particular radius and that would be the only radius it can plane.
That pretty much leaves a tool called a scratch stock that can be shop made and would enable you to scrape the shape you need along the edge by means of your hands and numerous passes. Sometimes these are just the ticket to doing a small molding that would require a tool you don�t have if done any other way.
These can be learned about in Fine Woodworking and other woodworking publications or books. If you don�t regularly use card scrapers and other hand tools like planes plus have never made or used a scratch stock, don�t count on making any money on this project, try to look at it as paying for a continued woodworking education.
From the original questioner:
To contributor F: You've just saved me $200 as I was about to buy a Stanley no 44 plane off of E-bay even though I couldn't really see how it would do the job. Are you suggesting then that something similar to a cabinet scraper with the bead profile ground out would do the job?
From contributor F:
To the original questioner: Yes a scratch stock is essentially a shaped scraper. I thought about mentioning a plane like the one on E-bay, but I didn�t think you would be willing to go that far for one job. What I mean is you could probably do the beading with a 44 if you made a wooden modification to one of its fences.
The Lee Nelson tool in the link above is essentially a scratch stock and may be worth it for you. Personally, I would try to find a way to do the job with routers if I didn't have a planer style molder. There will be a learning curve to using the scratch stock and the risk of spoiling a curved section and having to make it over.
From contributor K:
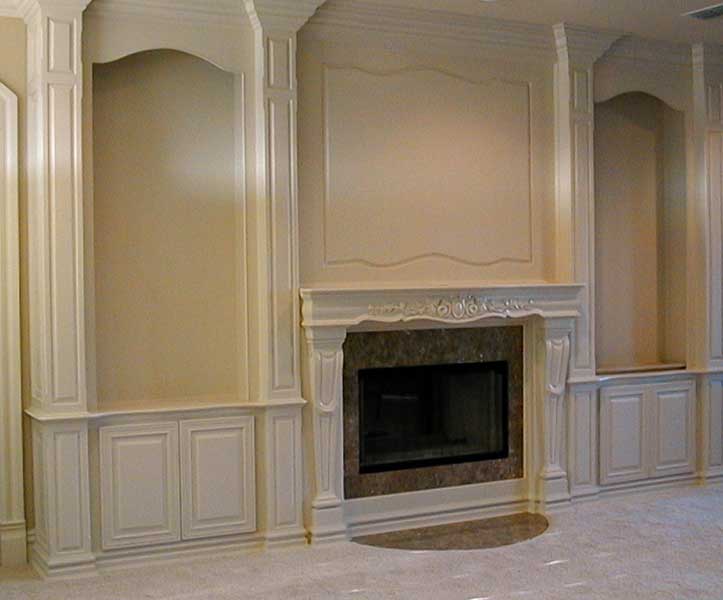
I usually apply a bead for curved work. The picture below has a 3/8 bead that I steamed and applied to the double curve in the head piece.
Click here for full size image
From contributor W:
To contributor K: That looks very nice. Is that MDF material that has been primed and painted? I remember when I first got in this business that I thought all cabinets were made completely out of plywood and stain grade hardwood or the same with architectural millwork. Our shop probably does 90% MDF boxes with poplar face frames. It wasn�t until I went with one of the installers on the jobsite to help with a problem that I saw how awesome the final product looked. The painters really did a great job. Paint grade cabinets can look phenomenal just as your picture looks.
From contributor K:
That is actually all 4/4 Fas red oak lumber. All of the panels are cope and stick, even the large panel above the mantel is 4/4 oak glued up. The customer wanted to see the grain in the wood after it was painted. It originally was to be glazed but they decided to just paint. This customer would not allow any MDF on the job. That panel above the mantel is almost six feet wide.
From the original questioner:
To contributor F: I think an investment in the Lee Nelson tool will be worth it as I'm doing several curves in different radii. Your help has been very much appreciated. Contributor K thanks for your input - are you suggesting that you cut the timber and then apply a bead afterwards?
From contributor K:
To the original questioner: That is correct. I use a molder to run a bead molding, but you could do it with a router. I use a router to cut my radius and then use the fall-off to clamp the bead until the glue can set. For a tight radius I steam the bead molding before gluing it up. I started doing it this way because I like the bead to stand proud of the face frame.
From contributor K:
To the original questioner: Maybe you can see the applied bead a little better in this shot.

Click here for full size image
From the original questioner:
That's exactly what I meant. It seems so obvious now but I suppose that's the beauty of these forums. That's rather magnificent. Out of interest, what method did you use to joint the sections in the curved piece?
From contributor K:
I finger-jointed the blanks before cutting the radius that way I could cut down on waste. Because of the applied bead the finger-joints on the edge aren't visible, I should have matched grain on the center piece a bit better.