Crown Moulding for Uneven Height Cabinets
Alternating high and low upper cabinets create a puzzle when it's time to apply crown molding at the top. Here, installers share ideas and show finished examples. July 24, 2005
Question
I have been asked to build and install a kitchen with the uppers alternating in height - 42" then a 30", 42" then 30". My question is, how do you finish the tops of these cabs? Do you run crown around the 42" and leave the others? Any help is greatly appreciated.
Forum Responses
(Cabinet and Millwork Installation Forum)
From contributor M:
When you go up, also go out a couple inches and then the lower crowns can die into the uppers. The changed depth also adds to the appearance.
From contributor T:
I'm assuming that your uppers at 42"h. are not against the ceiling, and just have a crown as a finish element. If you do not want to vary the depths as mentioned, which is a very good and common idea, then another way to give a tied in look is to run a header with crown moulding at the 42" h. across the adjacent lower cabinet possibly with a down light to give a continuous finished look.
From contributor R:
These are both good ideas. Have you thought about a smaller, similar style crown or bed mold on the 30" units to compliment the full size crown on the high stuff?
From the original questioner:
Good ideas guys. I'm assuming the 30" uppers would then need to be 14.5" deep or so to accommodate some small crown. Contributor T, I didn't quite understand the header idea. The 42" uppers will be against the ceiling. It looks like I need to build the 30" deeper. The one thing I'm still not understanding is if I run crown on the 30" units, how do I die back in to the 42" unit with only a .75" face frame showing? Any more ideas are appreciated.
From the original questioner:
It's the 42" that is deeper.
From contributor T:
Yes, the 42" unit should be deeper with the crown of the 30" unit to die against the side of the 42" unit. The crown moulding does not have to be at a 45 degree angle. You can alter the angle to get a lesser projection with good looking results.
The continuous header idea is an additional bridge the same height as the moulding on the 42" unit which is attached to the ceiling with the same continuous crown on it spanning across the lower 30" unit.
This way all cabinets can remain the same depth with a continuous crown along the ceiling. You can also raise the 30" unit to the same height as the 42" unit against the ceiling. This gives a varied height above the counter, which looks good and gives additional height for different appliances on the counter which clients find useful when their coffee pot etc. does not fit under the standard height space.
From contributor K:
If you don't want to alternate depths, another option that is common is to use crown on the 42's and galley rail for the 30's.
From contributor W:
I've worked on solving this problem at some length. First of all, if you bring the tall cabinet out from the wall, it will require an over-depth cabinet or an over-depth skin to cover the gap created.
What I have come up with is to make a return on the crown on the shorter cab where it would come over next to the tall cab. To make the return, make the first cut (that joins the long crown) at 22-1/2, then make a 45 on the back (end) side. Take a piece of toekick material (that should be the same color as the cabs) and hot melt it against the back side of the return and next to the side of tall cab. The toe material should be even with the top of the crown. This will result in a solid appearance that will tie the two cabs together and cover up that little "v" hole created by the angle of the return. I've had many favorable comments about the way this looks by moulding/trim installers.
From contributor T:
To contributor W: I was wondering if I was the only one doing it that way. We run into this situation a lot, especially with taller corner cabinets. If you make a 15"d corner cabinet 24" wide, the front of the frame is considerably smaller (about 12 11/16" versus 17" on a 12"d cab) which is too narrow, especially on a 42" tall cabinet.
Also, there is the added cost factor. I had just always kept them the same depth and made that return, covering the resulting "v" gap. However, I had been making a 90 degree return straight back into the shorter cab. I'm sure the way you described looks a lot better, and I'll use that next time (it should also make a smaller gap than the 90).
Another consideration with your making the 22 1/2 then the 45 instead of my 2 45's is that you can come out closer to the taller cabinet side, whereas I have to stop the moulding shorter to accommodate the door swing, right?
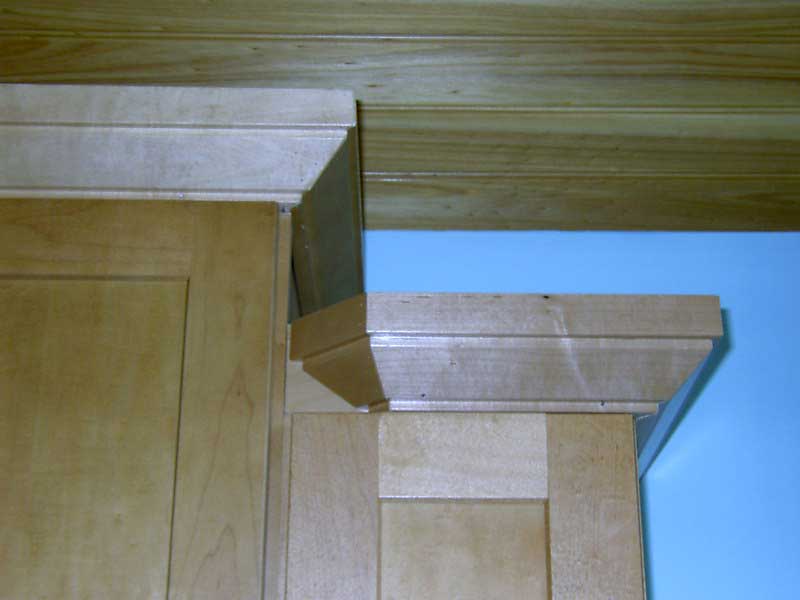
From contributor B:
Here is a picture of some staggered height cabinets we recently did. Hope this helps.

Click here for full size image
From contributor W:
I'm finally able to get a picture of the technique as described in my previous post. The angle next to the long piece is 22-1/2, and the angle at the back of the short piece is 45 degrees. The backer is toe kick material glued on with hot melt. It works really well for me.
Click here for full size image