Question
I'm starting on a job to build two adjoining walls worth of floor to ceiling mahogany bookcases: crowned, paneled sides, and beaded edges. The field conditions are unbelievable - everything is out of whack. Naturally, the walls are 3/4" out of plumb, but that doesn't worry me at all. It�s the ceiling that concerns me. The ceiling is 2.75" out of level from the left side of the left wall to the right side of the right wall. The floor isn't as bad but follows the same slope. On the left side are French doors, to the right (which actually has a deeper cabinet that returns onto the third wall) there is a large picture window (also on the third wall).
There are lots of vertical visuals to keep in mind as well. I'm designing, building and installing the casework. This is for a long time, repeat client who trusts me completely. I�d like to have her still think that when I�m done with this project.
I suggested a staggered ceiling line, but they want it all the way up. The problem is there is a finite amount that can be cheated over 17' with just the crown. I do believe this isn't going to go in dead plumb and level.
My question is, how far off can something be and still "get away with it"? My thoughts are to cheat the floor: install the ladder and baseboard a little out of level. This will make the cases a bit out of plumb, but since everything else is so far out, it might look "right". This will probably gain me 1/2" or so at the ceiling line. Then I can probably make up an inch simply by lifting the base on the right wall. This, weirdly, will make the baseboard seem straight and level! Next I can cheat the crown relative to the frieze board, another 5/8"? That still leaves almost a 3/4" gap at the ceiling (if I can pull off all this other stuff and still look good). My plan is to float down the ceiling (I've got loads of plastering experience) to make up the difference.
Ultimately, the interior of the case will be "shorter" on the right than on the left side by about 1.5" or so, but with adjustable shelving I don't think it will be noticeable as long as all the reveals are close to normal.
Forum Responses
(Cabinet and Millwork Installation Forum)
From contributor K:
I know the "plumb-and-level" people will jump on you soon here. But a good lesson to the less experienced is to take a level out with you on the estimate/planning phase. I even take my 6' inch with me on simple kitchen install quotes to see if anything really off.
Your question of "how far off and still get away" - I assume the out-of-level issue has been addressed with the customer? They might give you your answer. 2 3/4" on 17' is quite a bit to cheat. I did a small galley kitchen a month ago that ceiling was out 2.25" on about 13'. Customer knew about it and decided did not want ceiling floated out.
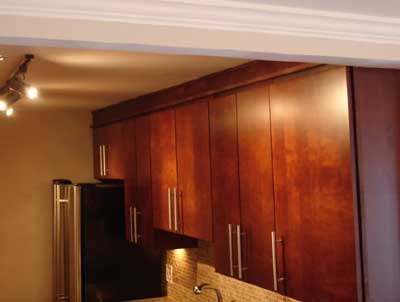
On top of cabinets I laid a 1x4 flat, another 1x6 on edge that I scribed to ceiling angle, then a small piece of scribe, about 1/4 x 3/4" to the ceiling. I also cheated the uppers down a bit to make the 2" difference less noticeable. The image below helps.
I think part of the answer is to figure out what you can widen to make any difference less noticeable - taller base, crown/frieze/upper part of casework detail. Any room for flat surface so fewer horizontal shadow lines to highlight out of level?
The distance between the uppers and the countertop changed from one side of the kitchen to the other but was broken up by a window over the sink and the stove with a microwave above it. I got away lucky there but with floor to ceiling shelving it will be tougher to disguise.
I once built a residential library in a room where the floor dipped more than 2.5" from either corner to the center. I set those plumb and made the baseboard tall enough to hide the change in height from being really obvious. The difference was I had 13' ceilings to work with and the cabinetry only went 11'6". A world of whack can be disappeared in 18" of empty space above cabinetry.
This current job goes all the way up and is in an 8' tall room. As it is bookshelves, there will be plenty of horizontals. The ceiling will definitely need to be floated. I just want to spread the cheating around and not try to make it all up at the base or crown or by having the casework listing too far to the east.
The first thing I learned working in old homes was "throw your level away and just make it 'look' right". Even with this in mind, I�d rather steer closer to proper plumb and level.
I don't know if there is a formula for figuring this out but you have a lot to make up for. My first thought is for a mahogany library it is probably worth a couple thousand to level the ceiling first. I think it's easier to blend the floor in than the ceiling. If that is not an option, then I would try to leave as much of a flat at the top as possible. If you have that flat facade it won't hide all the difference in height but it will help it blend in.
The one thing I would avoid is trying to install it out of plumb. If you start with the base out of plumb your whole job is going to be a headache!
On the base, you're right on target. I don't make ladders or egg crates for all bookshelf cabinets, preferring to make them full height when I can, but way short of the ceiling because crown covers the rest. But cheat an inch on the bottoms, at least. Over that distance, no one will see it.
I'd make the bottom rails of the cabinets tall, so the reveal between the baseboard and the top rail is 3-4 inches, at least. Then no one will see that reveal difference across a 17 ft. distance.
Contributor K's right on about the cornice design on the top - I've never used a more forgiving design. That flat 1x4 is a great detail - that's an architrave-type molding. You can cut a profile in the edge, too, like a cloverleaf or whatever. Then the piece that stands above, vertically, is a frieze board or fascia board. You don't need to use a huge piece of crown when you build a cornice like that, so the reveal on the frieze board, between the bottom of the crown and architrave, can be big, 4-5 inches, which allows you lots of room to visually cheat those bookcases into a nice finish shape.
I've found that homeowners and contractors appreciate knowing what and why you're doing stuff - plus telling them ahead of time sure takes the risk out.
Another thing I would consider is using a furniture base with the kick (if any) back as far as you can get. If you use a simple radius at the bottom stile to rail joints, you will be able to cut them to length and I think gain or lose more height less noticeably than with a base - even a tall one. You can get away with a pretty huge difference in height one side to the other especially where hardwood flooring runs perpendicular to the cabinets. When it runs parallel to the cabinets, it will show much more. However, either way, people are more used to seeing sagging floors than tapered frieze and crown reveals � and the former are more psychologically acceptable in my view. Further, you can adjust the look from rural to more formal with a jig saw.
Next, again if possible, I would build separate base and uppers, with the base units being slightly deeper than the uppers. I don�t know if these get doors or not, but it doesn�t really matter. I would attach the uppers to a nosed bottom projecting far enough beyond the bottom unit face frames to accept a molding beneath.
If the lower units do not get doors, I would be real tempted to run the top rail of the bottom unit uphill by whatever you want, to make up some more distance. This obviously would be much easier by having the intermediate stiles jack mitered into the top rail. If they have doors, scratch that plan and shim the top of the lower cabinets (which will be the bottoms of the uppers) uphill, and taper the molding beneath the nosing on the top (again, the bottom of the uppers) so that it follows the beaded top rail pretty well.
The nosing protruding beyond that tapered molding will tend to be much less noticeable than a reveal difference between bead and molding bottom. The top rail of the uppers can likewise be run on an angle to better match the ceiling and crown. The carcases of both uppers and lowers can be built square, and the top rails just lowered a goodly amount to hide the differences. So long as you are using a 38/52 3 � or wider crown, you will also be able to rock another 5/16�s difference as well.