Question
I'm about to make 1000 sq. ft. of flooring for the first time but I'm very nervous about shrinkage and how it goes together. I'm using red oak kiln dried to 8 percent. But my question is about the type of cutters to use. I'll be cutting it on a WM 718. I have the option to mount two routers at the end and use it as a 3 sided planer, or I could just run it through one operation at a time. I've been looking at a lot of different profiles but I've noticed that some, like the Grizzly c2307 and c3699z, both have a 1/32 taper on one side. This looks great for the install, but what about when it's sanded - won't this start to form a gap the more it gets sanded? These cutters also do not have an undercut for the nail or staple. Is this an issue? If anyone uses a type of cutter or router bit that works well, I would love to know.
Forum Responses
(Solid Wood Machining Forum)
From contributor C:
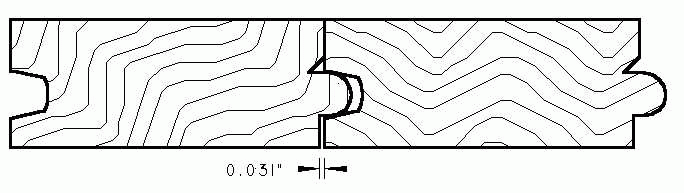
A true flooring profile has 2 distinct differences from just T+G. First, the edge below the groove (the bottom face, if you will) is typically 1/32 narrower than the top. This is so that the exposed joint, the top, can always come together without interference from the bottom edge. As far as its opening up post sanding, you would have to sand through the T+G 1st to get to the gap, which I think would be more noticeable than a 1/32 gap. And how many times are you planning on sanding this? I offset the T+G about 1/16 to the bottom to get a little extra for the people refinishing the floor 80+ years from now...
The other difference is that above the tongue, there is a small groove milled, a nail slot. Flooring nails are flat, and either L or T shaped. This slot allows the head a little extra room to sink, so that like the offset bottom edge, you don't get interference on the exposed joint.
I would think if want to run this in one pass, which you do, you might want to take a look at some of the knife suppliers here on WOODWEB; their profile books will show an illustration of what I'm talking about. Many of the guys here can help you find either a corrugated back head for your machine that will allow you to run any profile you can grind on your side heads, or perhaps dedicated heads would be the way to go.
As long as the house is climate controlled (heat/AC), and insulated well, 8% should be okay. I typically dry our floors to 5-6%, but that's because most go into new high end homes that are buttoned up tight and dry.
I am concerned when you state that it was kiln dried to 8% MC. I wonder if there are a few 9% pieces or even wetter. You should get a moisture meter and check the MC so you know both the average MC and the spread of MC around the average. In a kiln of 50,000 BF of lumber (about 10,000 pieces), the operator usually runs the kiln based on only 12 samples. Wetter pieces can happen.