Question
I have been asked to build a raised panel wall. The wall is 32'x9'. There are two doorways and in the middle is a fireplace mantel they purchased from me. I refinish antique furniture and build furniture, so a raised panel wall is new for me. The mantel is solid mahogany and 1890's. They installed a fireplace insert also (lots of heat coming from exhaust pipe). Customer wants solid wood with raised panels. I plan on using sapele, since it has the same grain, but is better wood to finish and work with than mahogany. My stiles and rails will be 4" max and I am trying to keep panel size to a minimum without making the wall look too busy and overpower the mantel (the focal point). I plan on using a stile and rail shaper cutter for joints. I will be finishing both sides and maybe trying the space balls for expansion and contraction. I would just like some thoughts on this from any point of view.
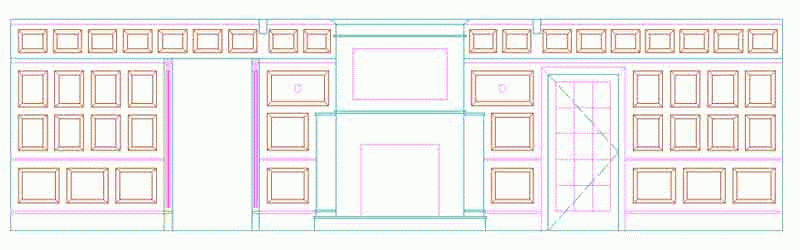
Here is a drawing of the panel wall. There is a soffit about 20in square at the top.
Forum Responses
(Architectural Woodworking Forum)
From contributor M:
Sounds good so far. Here's a hint. If you are going to use solid wood, which I agree with, on the back side of the panels, apply a coat of fresh hide glue with a layer of canvas and then more hide glue. This will help to stop the checking you sometimes get (I hate central air and exceedingly hot zones).
If you work with antiques, then you probably know about the Golden Section (or Mean, or Ratio, or Rectangle) and now is the time to drag out those old references so you can apply it to this opportunity. Also, if you work with antiques, you already know to go to history and find out what has gone before, why it is considered good, and how it came to be good.
You may look to the AWI quality standards to differentiate between blueprint match, sequence match, and random match of the panels, and advise your client of the whys of each. Then consider the joinery and the molding profiles, and the reasoning behind a bunch o' panels. But please don't build what you have drawn.
Advanced paneling techniques�
1. Flame the grain on the panels (flat sawn panels have a top and bottom, flames always point up).
2. Google Fibonacci's sequence, Golden Section.
3.There are excellent books with line drawings of old homes with fully paneled walls.
4. Personally talk to the electrician about placement of receptacles. Integrate them into the design.
5. There is always a compromise between ease of construction versus pure aesthetics.
6. Remember it's a layering affect - use that to your advantage. It's not one big piece of furniture. It's composed of various layers of mouldings, reveals that hide the fasteners below.
7. Try your best to hide all surface nailing/screwing.
8. Don't get too hung up on one panel that isn't perfect. (There are always a couple that no matter what you do will never be perfect, only correct.)
9. Use exaggerated thickness and protrusions to give more depth (i.e. thick mouldings on base/chair rail/etc.). Lay out the section view and make sure it isn't flat.
10. Lay out the fussy sections full scale on plywood. Definitely lay out the entire wall on story sticks for accuracy and this will help you feel the dimensions. Some layouts look real good on CAD/paper and awful full scale.
This is only meant as constructive criticism. Looks like a great project. Double your install estimate.
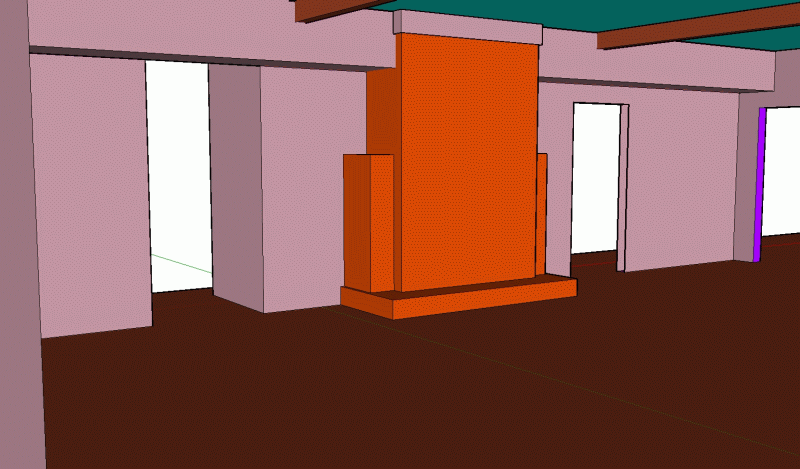
FYI on the Golden Section, it's built into SketchUp, which seems to be what the 3D image was created in. If you use the rectangle tool, start to drag out relatively square and you'll see a dashed line form on the diagonal and the word "square" will appear on screen. Just change the dimensions a little and you'll see "Golden Section" appear too. It may take a little time to get good at it, but it'll be helpful.
Running crown molding both sides of the ceiling beams and all around the room. This would cut down the encroachment of the ceiling beams into the soffit, and then I could treat the soffit more like a box beam with only one or two panels each side of the fireplace, running horizontal.
Holding the chair rail height low and using one panel above it going to the soffit (in line with the panel below the chair rail).
Using a backband on the casing to greatly aid installation and to give some base and relief to the job.
But everything depends on the style of the rest of the house as well. One thing I always do is make a story pole, snap some lines on the wall and then freehand the paneling right on the wall as close to the right sizes as I can get. I pick the wall that I think looks the most awkward. Then I use a lumber crayon in a walnut crayon holder I got someplace out west about 30 years ago, and freehand the whole wall in - casing, base, chair rail, crown picture mold and all. If you do the job, you might tell the GC that his installation will be much easier if the electrician just runs his wires long and wild, and uses old work boxes after the paneling is installed.
What sizes do you generally make stiles and rails? I have drawn them in at 4". Do you change them along wall and doorways and a little smaller between panels or not? The main reason for the large panel next to the fireplace is the owner has two large sconces to place on each side. With two panels they will not be able to center it. Maybe three will work. Miscellaneous outlets will be placed by the contractor and owner and all are existing. The one thing that was stressed by the owner was that this wall was the only one being touched. It will be an accent wall, as interior decorators seem to be doing so much.