by Jon S. Elvrum
It was Einstein, I believe, who best answered the question of "Where's the boring pattern?" when he responded that "Everything is relative." At least, that was his theory.
Light jesting aside, where boring patterns are concerned, everything is relative. One must complete a decision table and make many decisions about your specific product -- who you are, your reputation for quality, existing standards in the marketplace, finished heights and depths, material thickness, surface finish, and so forth. All these exist as unknowns, and need to be clarified before you can set forth accurately to create your boring pattern.
As we see in Figure 1, there are two distinctly different types of holes to be bored, and hence to be included in a pattern -- assembly or construction holes designed to receive dowels and connector elements and line-bore or system holes designed to receive hardware and special 5mm screws called Euro-screws.
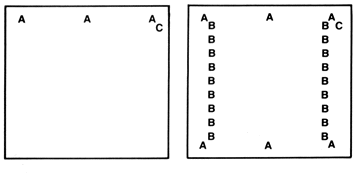
Figure 1.
A -- Assembly or construction holes used for dowels and connectors, usually 8mm holes for 5/8- and 3/4-inch stock. B -- Line-bore or system holes, usually 5 mm holes. C -- Back groove.
The number of set-ups required to bore all the holes you need is a direct function of your boring machines' capabilities. Not having a system of machinery means maximum labor involvement, with heavy reliance on jigs and templates to achieve the demanded accuracy. At the opposite end of the spectrum is CNC point-to-point boring machinery which makes holes in a given range of sizes any place within the boring field of the panel. Between these two ends of the spectrum lie most of the single- and double-head machines, both pass-through and tilting-head types. Your boring system will be influenced by your machine capabilities. The one certainty is that they will be able to work on a 32mm grid.
Questions to Answer Before We Start to Bore
We must know a great deal about who we are and what we build if we are going to make a fruitful change to the 32mm system. Up front, before we cut one board, we have to lay down some laws for our shop. These decisions will vary from company to company, and may vary within the same company for different products. There will be no confusion if we clearly understand why we made these choices. We simply agree that once a standard is set we must be persuaded to change it only by overwhelming evidence of need. We cannot be capricious.
First, decide the panel thicknesses to use for each product. We may be able to use 5/8-inch (16mm) particleboard on all of our kitchen products while state and industrial standards may require us to build commercial work with 3/4-inch (19mm) product.
Second, what size dowel is used for construction, how many per panel, how close to the edge of a panel will you allow a dowel to be centered and how far away?
Since 5/8-inch material is generally considered a minimum panel thickness for kitchen cabinets, we may declare this as our minimum standard, recognizing that a drop to 1/2-inch material would necessitate a smaller dowel diameter to hold this standard.
As for the number of dowels needed per panel, the industry works within these parameters: 12-inch (300mm) panels, three 8mm dowels per line of boring; 18-inch (450mm) panels, four to six 8mm dowels per line; and 24-inch (600mm) panels, six to eight 8mm dowels per line. Your experience may allow you to vary from these. You may even use non-metric dowels. This will shock the purists in our audience, but the construction boring is really your province, and as such, doesn't demand 32mm spacing or machinery. If you have it, it's easier to use it. A point to remember -- if you employ connectors in the line in addition to dowels, 32mm spacing again is desirable.
Third, how thick is your edgebanding? This dimension is frequently overlooked, but it's critical to a correct location of line-boring holes (B in Figure 1). Let's look at how we are affected.
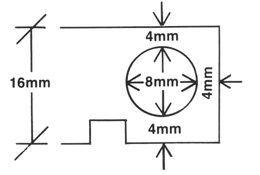
Figure 2.
Figure 2 shows us an 8mm x 32mm dowel in 5/8-inch (16mm) material. Centering the dowel bore in the panel leaves 8mm from each dowel center to the edge of the panel and 4mm from the edge of the dowel to the panel edge.
Figure 3 shows us that varying the thickness of the edgebanding will have a definite effect on the location of our line of bored holes, as well as upon the overall finished panel size. Therefore, if we bore before edgebanding and expect to apply a 1mm thick edgeband/glue combination, we set our setback (the distance the hardware manufacturer specifies as required for correct hardware function) minus the 1mm. Example: much of the hardware works on a 37mm setback, so for our project we would set our panel bore 36mm from RP2. Then when the panel is banded with the 1mm edge, the setback will be 37mm.
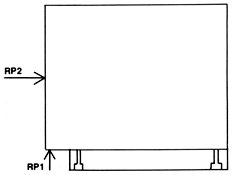
Figures 3. & 4.
RP1 is reference point 1, from which all upward measurements are made. It is situated at either the top of a level toe kick or the bottom of the bottom shelf. RP2 is reference point 2, from which all inward measurements are made. It is described as the outside finished edge of the bored side panel.
Suppose, however, we get a call to do a detailed edge, shaped from 1/2-inch walnut strips with a net thickness of 10mm. If we've pre-bored the panels at a 36mm setback, we will find our setback at 46mm after banding and shaping. Now the hardware cannot be used without retrofitting everything. This is a major problem.
If you find yourself with pre-bored panels too large in depth for the changed edgebanding needs, simply trim the difference off the panel. From our prior example, we had a 36mm unbanded setback and we adding 10mm (9mm greater than the normal band needed). Trim 9mm off the unbored panel, in front of the setback, without serious loss of material and only minor additional labor.
As you can see, there's a great potential for problems here, and I suggest smaller shops who lack panel optimizing and CNC options band their products before they are bored.
Fourth, how close to a panel edge will you allow a dowel to center? How far back should they sit from the panel edge as a maximum to prevent the joined edges of casework from opening up? How close to a groove will we permit a dowel edge to sit?
Our concern here is with the strength of the finished case. A countertop connected to stretchers doweled too close to the top can't be moved by lifting the countertop. The dowels will simply blow out, letting the countertop come loose from the case. All of these points need to be clearly understood and decisions made before we are free to create boring patterns. This is doing the front-end math.
Line-Boring Holes
Most of these decisions have been aimed at construction, or assembly dowels. We've scarcely examined system, or line-bored, holes at all. Whereas you can pretty much do what you wish with assembly holes, the system holes -- 5mm holes in lines on 32mm centers -- belong to the hardware company of your choice. The next requirement is to choose one.
Once your choice is made, there are some important things to find out. What's the setback? Setback is defined as the distance to locate a fixing point on the sidewall from RP2 in Figure 3. This will not only receive the baseplates for hinges, but will serve as the first hole for the drawer system and a variety of clips and other hardware. About 90 percent of the hardware suppliers now use a 37mm setback for all overlay and half-overlay doors. Inset doors must add the thickness of the door to the setback as well as any desired side reveal. It's very important to remember that all setbacks start with the manufacturer's requirements. An inset 19mm door with a 50mm side panel reveal and a hinge with 37mm setback would actually have the setback line boring at 106mm from RP2.
Finally, try to place the second row of line-bored holes based on the drawer slide you intend to use as a regular item. If you use a slide manufactured by a 32mm supplier, the slide's case member has hole patterns arranged in 32mm increments. The interior row of system holes (farthest from RP2) will reflect the setback plus 32mm increments as specified by the manufacturer. The spacing varies from manufacturer to manufacturer, as well as from size to size, even within one manufacturer's group.
Even if you don't use a 32mm system slide, it is often possible to use system boring methods by locating the first hole by a pin template, offset from the first line-bore hole, and selecting a back row of line-bore holes which fit your slide. If you use a slide outside the 32mm system, you must increment its hole location in terms of your metric machines. For that purpose try to match the line-bored hole with one of the elongated case member holes. This solves many of the conversion problems you might otherwise encounter. To specially bore for these outside-system applications will require special setups of your fences as well. The good news is that you must only locate two holes in any guide to correctly align and place it.
Architectural millwork houses who work to diverse specifications are often able to gain the speed of a 32mm system manufacturer by opening their machine ideas to embrace products not specifically designed for, but not excluded from, the use of system machines. This also tends to ruffle the feathers of purists.
Placing the Bottom Hole
Now for indexing the lowest hole in the bored line. This should be done with drawer use as the paramount concern. Potentially, you can use every system hole in the line, if the drawers are small enough and the first hole is the first drawer. Therefore, the critical sequence for line boring hole location is as follows:
1. Accept hardware setbacks and decide which hole in the drawer slide will determine the second line's placement.
2. Locate RP1.
3. Calculate bottom thickness in mm.
4. We now need to add the minimum distance required above a bottom shelf for a drawer to clear and slide without danger of interference or screw drag. I had been unable to find this figure in any manufacturer's literature, so I literally called them all and asked their technical people. They are in agreement that 6mm is needed to clear the bottom thickness (example 19mm bottom thickness plus 6mm equals 25mm, the distance from RP1 to the bottom of the first drawer).
5. We now return to the hardware catalog and find a drawing that looks like Figure 5.
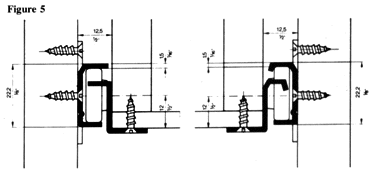
Here we determine the distance from the lowest suspended point of the drawer (not the drawer guide) to a center line of the case member's mounting screw. This number also varies from manufacturer to manufacturer. In the manufacturer's sample in Figure 5, the distance is 12 mm. Add this to the 25mm we've already built up from RP1 and we find that the bottom-line boring hole is 37mm from RP1 and 37mm from RP2. If we were using 16mm material for the bottom shelf, the first hole would be 34mm from the bottom of the shelf. The second row of holes will start at the same point.
That's what front-end math will do for you. It will tell you everything you have to do and it's the biggest difference between running the 32mm system and having it run you.
Jon Elvrum currently manages distribution developement for Technology Sales, a company specializing in technical format European style hardware.
Editors Note: Jon Elvrum, one of the woodworking industry's earliest system manufacturing adherents, has more than 30 years experience, and is well known for lectures and articles on the 32mm system.