By Dr. Eugene Wengert
Professor and Extension Specialist in Wood Processing Department of Forestry, University of Wisconsin-Madison
At least 75% of the wood manufacturing problems I review in the University's Forestry Department are moisture related. That's why eliminating wood problems begins and ends with monitoring and controlling the moisture content (MC) in wood.
"Wood 101" - The Basics
As the moisture content in wood changes, wood expands or contracts, and this in turn causes a variety of problems. The moisture content of wood is measured as a ratio between the weight of the water in the wood and the weight of the wood itself. This ratio is stated as a percentage.
Freshly forest-cut "green" wood may have a moisture content of 30% to more than 200%, depending on the species. Before using any wood, it needs to be dried to reduce its moisture content. The "ideal" moisture content depends upon the use of the wood and the annual average relative humidity at the place where the wood is to be used. It is critical that the wood you work with be dried down to an MC within 2 percentage points of the equilibrium moisture content (EMC) of the in-use location. The EMC of air is numerically equal to the MC that will eventually be attained by any piece of wood when stored indefinitely at a particular humidity. Temperature has no direct effect on MC or EMC.
The relative humidity (RH) in most homes and offices in the U.S. (except in coastal areas and exceptionally dry areas like the desert Southwest) averages 30% to 40% RH. This is 6% to 7% EMC (see the tabulation), which means that wood in interior locations will average 6% to 7% MC.

Therefore, lumber intended for interior use should be dried to 6% to 7% MC and should be kept at this MC prior to and during manufacturing. Two special notes: (1) Softwoods machine better at a little higher MC and shrink and swell less than hardwoods when the MC changes. Therefore, often the target MC for softwoods is 8% MC. (2) The term kiln dried has no special indication of MC for furniture, cabinet, or millwork manufacturers; don't specify kiln-dried lumber without also adding the actual MC that you want.
Wood is a cellulosic material, so it is constantly losing or gaining water to or from the environment. Therefore, it is important to remember that even after wood has been dried to the proper MC, MC can change during storage, manufacturing, or use.
One of the key points in working with wood is that, if the shape or size of wood changes, it is because of a change in MC. That is why metering of wood at all phases of manufacturing is critical.
Now let's review several ways of eliminating wood problems that may occur in the mill or in the plant environment.
1. Sunken Joints in Panel Manufacturing.
The most common cause of a sunken joint is that wood around the joint swells when it absorbs water from the glue itself. If the wood is planed or sanded flat before the swelling goes down (that is, before the MC equilibrates), the wood at the joint will shrink later, creating a depression at the joint.
The remedy for a sunken joint is to wait for the moisture around the joint to dissipate before planing or sanding. Generally, seven days at warm temperatures is sufficient.
In a few cases, a very dry wood panel machined flat in the dry condition and then permitted to regain moisture during storage will have very little swelling in thickness at the joint area (the glue is rigid), while the wood away from the joint will swell in thickness normally, creating a sunken joint appearance. The cure in this case is to make sure that the MC of the lumber at the time of manufacturing is within 2% of the EMC of the air, even in the humid summer months.
2. Uneven Surfaces in Panel Manufacturing.
Occasionally, several days after sanding, a glued-up panel seems to have been made up of pieces of different thicknesses. This is often referred to as planking.
Assuming that the panel was even when it was sanded or planed, the wood could change shape only if its moisture content changed. Therefore, planking is caused because individual strips or pieces were at varying moisture contents when the panel was glued up, and these MCs were not equalized before sanding or planing. For example, a 1" thick panel could experience a noticeable thickness change of up to 0.01" with only a 2% to 4% MC difference between individual strips. (That is, planking can be obvious when one strip is 6% MC at the time of gluing and the adjacent one is 8% MC.)
3. Panel End Splits.
Within hours to a week after edge gluing of a panel, end splits may be noted, usually, but not always, at the glue line. End splits develop only because wood is shrinking, and the only reason wood shrinks is because it's drying. In short, end splits are caused because the panels are too wet for the dry air in the plant.
Remember that the end grain of wood dries up to 50 times faster than the edge or the face. The ends therefore dry rapidly and shrink, while the center of the panel dries and shrinks more slowly. This difference leads to stress build-up and, potentially, end splits.
To correct this problem, keep the moisture content of the lumber within 2% of the EMC of the surrounding air. Because the EMC in the plant and in the home or office is lower in the winter, lumber should be dried to a lower MC in the winter (typically 5% to 7.0% MC), and/or the plant must be humidified slightly.
4. Cupped or Curved Panels.
A panel, after manufacturing, may show cup or curl across its width. There are three possible diagnoses for this problem, but all three are caused by moisture changes in the panel that, in turn, result in shrinkage.
A. Because the face of the lumber closest to the bark shrinks more than the other face, a glued-up panel with most or all of the pieces with same grain orientation will shrink more on the bark side as it dries, thus causing cupping. Most important, lumber should be dried to the correct MC to minimize all shrinkage. As an additional safety factor, individual pieces should be varied in their grain orientation-bark side up, then pith side, and so on. (Note: The reverse situation occurs if the lumber is too dry for the EMC.)
B. If the finish on both sides of the panel isn't identical, the two faces can swell at varying rates, resulting in warp. Therefore, the finish must be applied equally to both sides, especially water-based finishes. Again, all wood should have similar initial MC.
C. If panels are designed with a cleat or rail which is securely fastened to the bottom of the panel and if the panel changes MC (resulting in shrinking or swelling), the top face is free to move but the bottom face can't. Warping will result. Therefore, the cleat must be free to move slightly as the panel shrinks or swells. I recommend using slotted screw holes and not gluing the cleat to the panel. But the real cure is using lumber at the correct initial MC.
5. Splitting and Chipped Grain when Machining.
Overdried lumber is stronger and less bendable, so it is more prone to developing splitting and chipped grain when it is machined. Splitting is often noted with pines; chipped grain with dense hardwoods like oak. (On the other hand, lumber that is too wet will develop panel splits, open glue joints, and warping, as mentioned previously.) The rule is that in addition to sharp knives and properly adjusted machines, avoid excessive overdrying and underdrying. Get the wood at the correct MC. Measure the MC yourself-do not trust an invoice or word of mouth.
6. Fuzzy Grain after Machining.
This condition is characterized by wood fibers not cutting cleanly; instead, they bend over. Then, when they pick up a little moisture, they spring back and stand up above the surface, looking like "peach fuzz." If the stock is being run slowly, planer knives are sharp, and sandpaper is fresh, this fuzzing is caused by too high an MC in the lumber.
7. Gluing, Laminating, and Veneering Failure.
One of the major areas in furniture manufacturing that causes problems is gluing-edge gluing, laminating, and veneering. There are at least 100 things that could be wrong when a glue joint is below par. But, as general rule, a gluing problem is a breakdown of one of the five "links" in a glue joint.
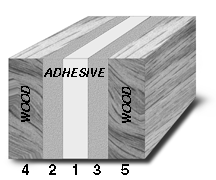
The adhesive, or middle link (#1), is determined by the strength of the adhesive itself. If the proper adhesive has been chosen and handled correctly, this link shouldn't be a problem. The next links (#2 and #3) represent the bond between the wood and the glue. In practice, weakness of this bond is the most common cause of glue-line failure. Weakness results because the adhesive cannot attach itself to the wood. Two common reasons are: (1) the surfaces to be glued are several hours old and have become less active because the glue-bonding sites are occupied with dust or with moisture from the air; and (2) the wood MC and the EMC aren't close enough, so the wood changed MC, swelled (or shrank), and now the surfaces are no longer perfectly flat (0.002" to 0.006" is the preferred gap between surfaces-no more or no less for maximum joint strength). Links #4 and #5 are the wood surfaces themselves.
8. Glue-line Failure.
There are five stages in forming a good glue bond. The key to several of these stages is proper wood moisture. That's why metering is important.
Stage 1: After application to the wood face, the adhesive must flow to form a fairly smooth, continuous film. It won't flow if it's too thick, if the wood's too hot or too cold, if the wood surface is dirty, or if there isn't enough adhesive.
Stage 2: The adhesive must transfer to the opposite, mating surface. This requires pressure and sufficient adhesive. Excessive assembly time or wood that is too dry can cause a failure in this stage. Lack of sufficient pressure and precuring are also common causes.
Stage 3: The adhesive penetrates the microscopic nooks and crannies of the wood surfaces with the application of pressure. Pressure also pushes the two pieces within the required 0.002" to 0.006" gap. Too much pressure squeezes out too much glue which is a weak glueline; too little results in a thick glue line, which is also a weak glue line (except for gap- filling adhesives).
Stage 4: Good glue joints are characterized by good "molecular" bonds between the molecules of the wood and the adhesive. For this bonding to occur, the wood and adhesive must be in intimate contact. However, sometimes the wood surface is contaminated or is chemically unable to bond. This is called a"nonwetting" surface. (Imagine trying to glue two pieces of wood that have oil on their surfaces.)
Stage 5: The final stage is the solidifying of the adhesive. Failure to solidify may be caused by cold temperatures, pH problems, or adhesive/catalyst problems. The rate of solidifying is influenced by the wood's moisture content (the drier, the faster) and by temperature (the hotter, the faster). Lumber that is too dry withdraws water before all five stages are completed.
A final note on gluing. There are a considerable number of factors in the gluing operation that affect the strength, durability, and appearance of a glue joint: (1) factors relating to the adhesive itself; (2) factors relating to the handling of the adhesive from its arrival in the glue room until it is applied to wood, pressed, and heated; and (3) factors relating to the wood itself.
9. Cracked or Checked Finishes.
This is a frequent complaint. When today's finishes dry, they become quite rigid. Any expansion or contraction of the wood underneath causes stress which can lead to cracking and checking of the finish. Correcting this problem requires maintaining an EMC in the plant equal to the in-use EMC, and achieving and consistently maintaining the MC of the wood that is equal to the EMC in-use.
10. An Ounce of Prevention. . .
The first step in eliminating moisture-related problems is to make sure that the lumber source certifies the MC of every load. Just ordering "kiln- dried" lumber without specifying anything further is not good enough. Further, the MC of everypiece of lumber that comes into the manufacturing facility should be measured.
Remember: Anytime wood or wood products are stored, a change in MC can occur if the MC isn't equal to the EMC.
Humidity can be controlled by varying or controlling the storage temperature. How does this work? This concept is based on two facts: First, when air is heated, its RH goes down. Second, every morning, the outside RH is close to 100% RH in most of the U.S., summer and winter. Therefore, it is a simple matter to achieve the desired RH (and therefore EMC) by heating a storage facility a certain amount above the morning low temperature. (For example, using the tabulation shown, heating air 22 degrees F above the morning low results in 7% EMC.)

Practical Moisture Measurement
Because moisture causes the majority of problems in wood manufacturing and wood use, it is important to measure the MC of wood before, during, and after manufacturing. (Why put your time into making or shipping something that isn't right?) There are three basic ways to measure MC:
A. Oven-drying (requires scales and an oven at 212 degrees F; test is destructive).
B. Hand-held moisture meters (ideal for spot-checking; small pocket-sized units are ideal for checking work in process in most plants; the simpler they are, the more they will be used; the faster the readings are taken, the more likely these meters will be used.)
C. For rough lumber, an in-line system can measure the MC of each piece of lumber. (Ideal for the cut-up or planing operation; gets wet wood out of the plant before it costs you money.)
Final Practical Advice to Manufacturers
Once a perfect product has been manufactured, maintaining the correct MC throughout, several steps should be considered to protect the quality and integrity of the product: It is a good idea to provide full instructions as to recommended storage humidity, with an additional statement indicating your quality responsibility for the product if it is maintained within the proper EMC. You may also wish to include with the product a slip of paper indicating that "inspector #39" has rechecked the final MC-just like the little slips in shirt packages that assure you someone has checked the quality.
For a copy of this report contact Wagner Electronics via e-mail at: wagner@cdsnet.net