Engraving a 3-D Rope Pattern with a CNC Router
Suggestions and advice for programming a CNC router to carve a circular braided rope pattern. January 28, 2009
Question
I�m trying to figure out how to tool this design with Alphacam. I haven't had much experience with the 3D engraving function outside of training. Also, I�m looking at Mastercam Art to help out with this. Does anyone have any suggestions?
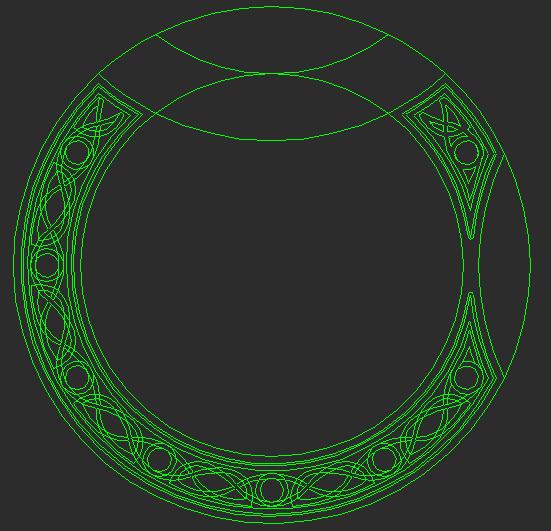
Click here for full size image
Forum Responses
(CNC Forum)
From contributor H:
If you are just looking to engrave those geometries, all you need to do is run a 45 or 60 deg bit on center. Just try cutting different depths until you get the look you want. The solid simulation works great for this kind of thing.
From the original questioner:
I think we're looking more to pocket the flats and create a raised rope profile. I'm trying out different things nowand one problem I'm running into is the simulation doesn't like my tool geometry.
From contributor H:
What kind of tool have you defined? If you are doing lots of pocketing requiring you to constantly break and join geos to get the pockets you want, just copy the entire drawing and set up one pocketing procedure for each. Then just overlap them. It looks like you might end up having 3 or 4 different levels to make the rope look intertwining. Please let me know if I'm misunderstanding what you are trying to do.
From the original questioner:
I'm using a beading bit with a 1/8" radius. And yes, that is sounding like what i will have to do. I'm still waiting for further details as far as pocketing and crossover/interweaving.
From contributor H:
I would start with a section that I could just repeat around the radius. I would then create a few sloped surfaces using polylines. For example, two polylines right around where you want the rope to be at its highest say 3/4" and sloping down to 5/8". Then create a ruled surface between the two. Using the 3D menu, use "3D Project' to project the geometries to the surfaces. At that point, you can create ruled surfaces from the projected geometries.
This is going to be time consuming, but very feasible. Once it�s surfaced, rotate it around the circle to create the pattern. You will then need to use ball end bits to machine the surfaces, and end mills to cut the shoulders. This is advanced work and I hope you have the time to do it because it could be a great piece. I have attached a picture of a carving I did. It's not as intertwined as yours, but the same principals apply.
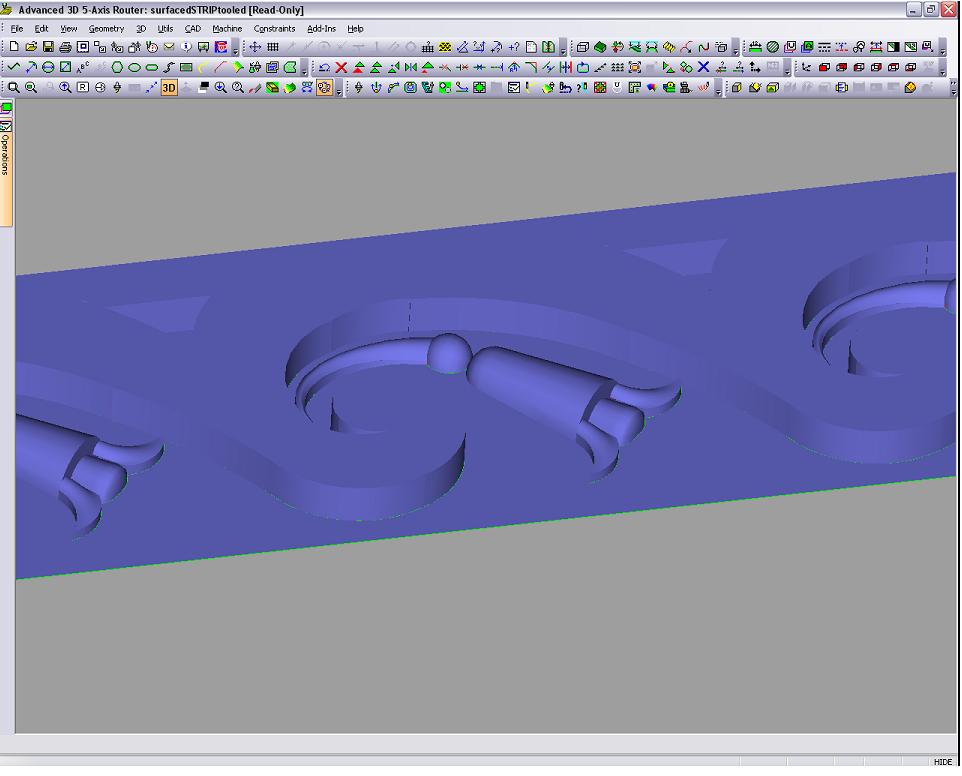
Click here for full size image
From the original questioner:
Can this be done with 3axis? I sure hope so, as this very well could be a great piece once it's finished.
From contributor H:
You can absolutely do this with 3 axis. I program a 4 axis right now, and in this instance, the 4th is not used.
From contributor M:
I agree with contributor H. You will likely get good results quickly by sticking with toolpathing/engraving lines, and it will take a lot less machine time to cut your pattern. Ball milling in 3 axis can give great detail, you can even do undercuts with lollipop cutters, but it takes a ton of machine time and is more complicated to create the geometry and strategize toolpaths.
Pocketing doesn�t work accurately with compensated tools, so keep that in mind when running your program in the end. I can't remember doing it recently, but pocketing should render nicely in alpha and accurately if your tool definitions are accurate.
Alpha handles this kind of thing pretty well, but if you are getting into a serious amount of surface machining with a great deal of detail, I would step up the power on surface creation. Rhino Cam is very intuitive and has a lot of cool tools to create surfaces, which then can be imported into Alpha, just as Autocad drawings can be imported. Then you use the power of Alpha's toolpathing to send it to the machine. It's not too expensive a program, I think about a grand now, but you can download a fully functional version for free and they give you 25 saves. This will let you get your head around the program if you decide this route sometime in the future.
From the original questioner:
Well, it didn't really take much at all. Pocketing with an 1/8" downtwist and profiling using an 1/8" radius beading bit. Turns out the client doesn't want near as much detail, so the machining is down to a centerline pass with the beading bit. I sure would have liked to get further into the 3D aspect.
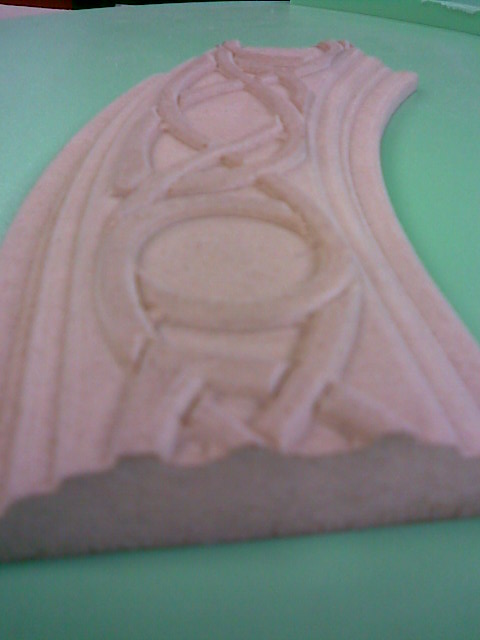
Click here for full size image
From contributor J:
I've done a lot of exactly what you did. It adds a lot if you come back after with your chisels and cut down the ends that look to go under and then sand. A nylox sanding brush on the drill works well for clean up also.