Face frame clamping options
Other Versions
Spanish
Woodworkers discuss their clamping systems and share pictures of what works for them. July 24, 2001
Question
I make face frame cabinets and am looking for a technique to clamp the face frame to the box quickly. Currently I use wood blocks with bar clamps to hold the surfaces together until the glue tacks. I end up with a ton of clamps on the cabinet, that I am constantly adding or removing. There has to be a better way, maybe something like a frameless clamping system that could press the face.
Forum Responses
We use pocket screws to attach the frames to the cases, and this works great! All the finished ends are applied after the face frames are installed to cover the screw cutouts. Assembly is quick, as we also cut a grove in the stiles so there is never a problem with alignment.
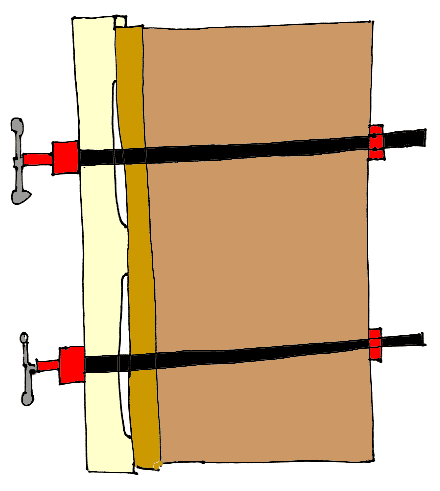
Below is an illustration of a clamping system we used on face frame cabinets. The clamping block is full-length maple with a small block attached as a hook to keep it in position while working. The business edge of the clamp block is a 3/4" strip of pine laminated to the edge of the maple to help protect our pre-finished face frames. The key to the system is the relief cuts made between clamping pressure points. In the case of base cabinets, this reduces clamps and clamping labor by 33%. If the relief cuts are about 1/6" deep, the clamps will bend the clamping block, forcing it to contact the frame and applying pressure directly under the clamp as well, actually giving you added pressure points.

From contributor B:
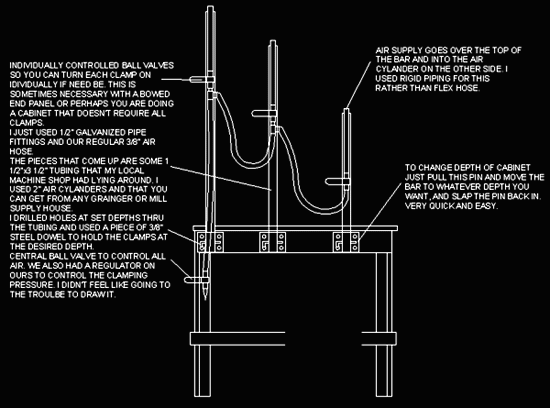
We used a system very similar to the above, except I had metal bars made that attached to the table. We used pins to locate for different depth cabinets and air cylinders for the pressure. Our table was only 36" long, with 3 clamps. That would handle virtually any cabinet with the exception of utilities. Simply catch what you could staple and then move the cabinet.
Lose the wood blocks and get yourself a Senco Senclamp gun. We would spend about 60 seconds applying end panels to a face frame. If you use a 1/4" groove in your face frame and 1/2" end panels, you'll need a 7/16" Senclamp.
From contributor R:
We used the method described above bench building 100+ cabinets per day. I inherited the system, and would have liked narrower benches. We had longer models, but change is glacier to guys who've been on the same bench for 30 or so years.
We did place the frame on a "cookie sheet" to keep from scratching it when the builder spun it to clamp the opposite side. We built "in the frame", not attaching a frame to a completed box. Pinned it from the outside, across the tongue into the other side of the groove.
How about Jet Weld with no clamps? Never tried it but I have heard good things.
From contributor B:
Being a former user of a certain laminate company's failed attempt at a non-flam contact cement, I prefer to let others be on the bleeding edge of technology.
Titebond and Senco are tried and true performers.
From contributor R:
In a production environment, I'd be concerned about quantity control in the hands of a less-than-skilled person. Is the cure speed slow enough to allow the clamp to shoulder the rab against the frame before it sets? Is the viscosity low enough to allow the clamp to force excess adhesive to go where it isn't an issue? Or could excess glue hold the panel tongue out of the frame groove? This could cause a nightmare if frames were referenced at different distances from the box.
Not a bad idea, but one I'd have to do some serious testing with, before implementing it.
We have, at the high volume end, a solution of interest. You need to provide a groove on the back of the frame that laps over or covers the end panel. For this purpose, in high volume applications, the front sides are notched so the frame fits over the end of the cabinet side. The frames are pin-nailed from the outside edge. In this case, face nailing is eliminated along with the putty and associated clean-up work. It's not for everyone, but certainly a speedier method.
We have also seen new assembly tables emerge that build up and out from the face frame. Face frame screw systems and necessary back grooving have made these possible, and the time gain is exceptional.
I like the idea of the tables you are describing, but I just can't get it in my mind what they would look like. The pins? The metal bars--three of them?
From contributor B:
Here's a picture of the table I tried to explain. Not all of it made it through the translation from DXF to GIF, but I think you can still get the picture.

I am curious as to what the Senclamp gun does. I ordered a sample from Senco. They look far bigger than anything I would want to shoot into the show side of the face frame. Or is the object to shoot it into the side of the face frame, capturing a bit of the plywood side that is nestled in the groove dadoed into the back of the face frame?
From contributor B:
It's basically a wedge type device. As it's driven in, it pulls the two pieces together (maybe that's a reverse wedge device). You drive it in the inside. The gun goes at a 45º angle between the end panel and the face frame. There is a little angled piece on the gun to aid in this. I'm sure your Senco rep would be more than happy to bring one in for you to try.
If you use glue and Senclamps, it is absolutely impossible to get the end panel back off without breaking the frame, once the glue has set. Conversely, the end panel will not stay on without glue. All the staples do is hold stuff until the glue dries.
I understand RF gluing, but how will that work with a solid wood face frame and a composite end panel? In a production environment, I don't think an RF gluing station can keep up with clamps and a Senclamp for putting end panels on.
From contributor R:
RF would cure adhesive between composite and hardwood, although it would likely take longer to cure each step with plywood. The signal would probably try to follow the voids instead of the glue line.
PB to hardwood is not a problem. I've used my WorkRite to make small runs of Lumberbanded cores.
Speed? Since the signal has limited travel away from its center, multiple firings would be required on typical cabinet heights. Not the volume path. Additionally, there is the occasional arc that could leave a mean black burn on the face.
Since a clamp is required, the question becomes mechanical fasteners or electronic curing. Speed tells me to use the WorkRite gun in more productive scenarios.
I've used pins in this application, and as stated, they're just there to hold until the adhesive sets.

