Fine Points of Face-Frame Cabinet Construction
Cabinetmakers discuss dadoing face frames, leaving a "scribe" overhang, and other details of face-frame technique. July 5, 2006
Question
I am a one man shop supplementing my furniture business with cabinetry to pay the bills. I have been building my boxes first and then attaching the face frames. After reading a lot of the recent posts on this subject I am looking to change my method to face frames first.
If you make a groove in the face frames, say 1/4" from the edge to accept the sides, what do you do with that 1/4" ear when building a bank of say 3 or 4 connecting cabinets? It seems to me if you left the ear you would then have a 1/2" gap between the sides of the connecting cabinets. If you sanded the ears off as I was told, then your face frame stile would be 1/4" thinner? What do you do?
Forum Responses
(Cabinetmaking Forum)
From contributor A:
Do it like this.
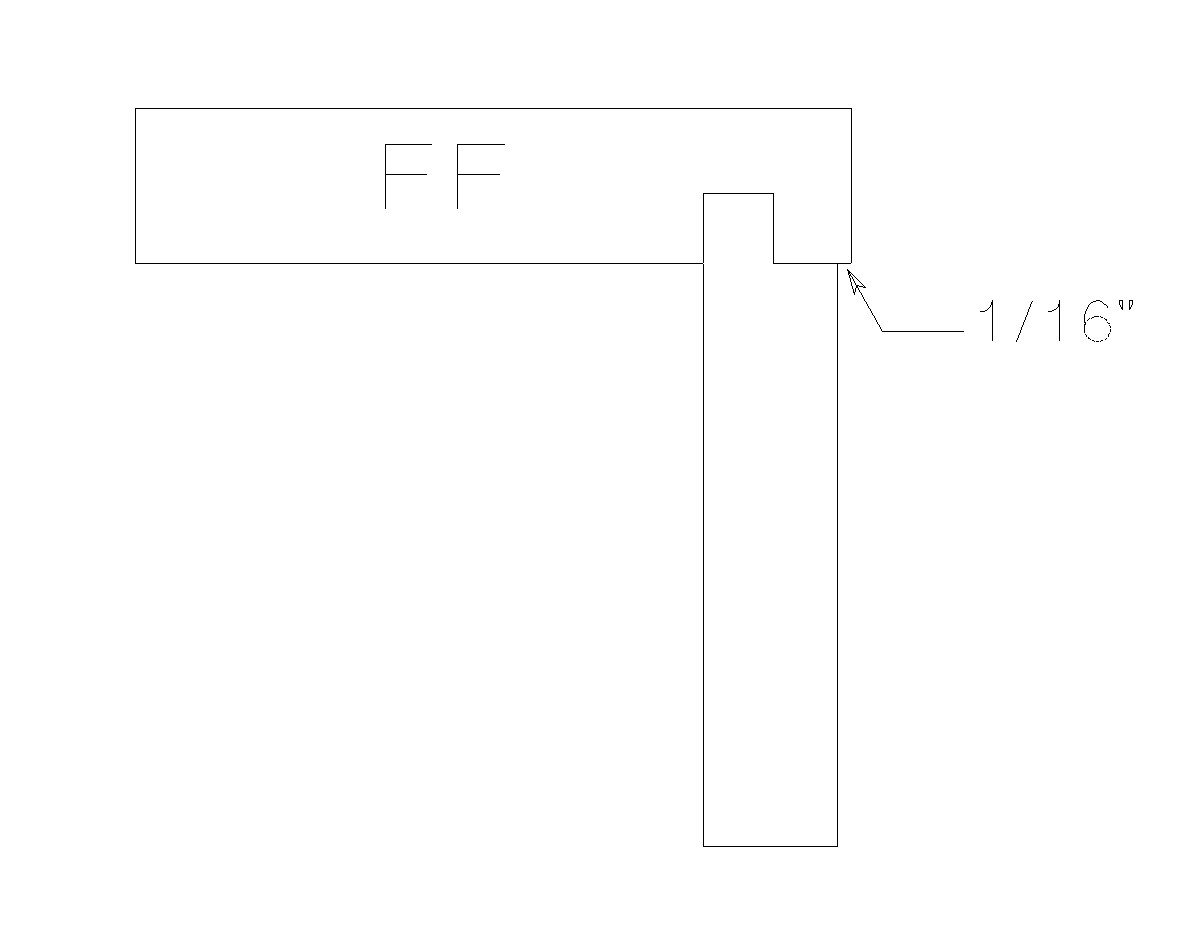
Click here for full size image
From contributor B:
First, we build our face frames and boxes at the same time - one guy on face frames and another on box assembly. If all goes well the face frame guy gets done a little sooner and moves on to hardware installation. But if we had to choose it would be face frames first. An unassembled box is far easier to modify than a fully assembled face frame if there's an unforeseen issue.
We don't dado our face frames, but we do leave the ears as you call them - we refer to them as scribes. And yes, when 2 or more cabinets are installed next to one another there is a gap between the boxes equal to the sum of both scribes, but that's the point. When you install them the only thing you have to worry about matching up is the face frame, which is a lot easier than getting 2 full cabinet panels and face frames perfectly aligned.
It makes installation much easier and cleaner since you have space to play with between each cabinet if there are serious deviations in the wall surface or if the cabinets get racked a little out of square during delivery or installation.
And one last thing, I don't know who mentioned sanding off the ears to you, but sanding them off would be the LAST way to remove them. I don't care how good anyone is on a belt sander - you'll never get a consistently straight edge on every cabinet. Even the slightest little deviation would show up as a glaring gap between stiles, in my opinion.
From contributor C:
I leave the ears on the frame too. I've also always referred to that as the scribe. 1/4" is standard but sometimes, if I know I'll be scribing to a wall, or anticipate some other problem, I might make the scribe a little larger. That extra space between the boxes can be very beneficial during installation. If necessary, I will put a 1/2" spacer at the back, between the boxes, to tighten everything up.
From contributor D:
We run almost half of our sides flush to the inside of face frames. Then we don't have to block for slides. 95% of our work is beaded face frame with
Blumotion slides. The tolerances are pretty tight, but we always seem to hit our dimensions. I never understood the idea of dadoing face frames.
From contributor E:
I never understood the idea of dadoing face frames either. With 3/4 in sides, glued and clamped or screwed, any added strength from the dado seems really unnecessary. If it�s to strengthen 1/2" sides, I'd rather pay a few bucks for 3/4 than spend the time on the dadoes. But, there are a lot of things I don't understand, so I'm curious what I'm missing. Maybe someone who does it can explain.
From contributor A:
I don't dado my face frames either, but I can see it being a great benefit if you want to finish your face frame first, or it can work as an alignment guide. I just did a cabinet that was a bear to keep aligned, it worked but it would have been real easy with the dado guide.
From the original questioner:
I feel like the majority who dado their face frames are using 1/2" plywood, which of course rolls over to another debate as to 3/4 vs 1/2. I do know that from what I have priced in regards to prefinished plywood (another area I am exploring) there seems to be a substantial price difference. Anybody else feel this way?
From contributor F:
�Seems to me if you left the ear you would then have a 1/2" gap between the sides of the connecting cabinets". We build with 1.25" wide stiles, flush with cabinet interior. All cabinets have a 1" gap, and nobody has ever complained. When building framed cabinets, a lot of us build integrated opposed to individual boxes (modular) to save material and speed installation. In such a case the gap issue is minimized even more. Cabinets with adjustable shelves get 1/2" partitions centered behind mid stiles. End cabinets with finished end panels are made 1/4" short. The 3/4" panel butts into back of stile and protrudes that extra 1/4". We then use a
Festool saw/quide to rip the corners off, creating a nice big bevel at the finished corner. Not necessarily prettier, but it's our trademark. Our customers like the idea of no sharp corners too. Around here, everyone else builds the other way, and they look fine. We just wanted to be unique.
From contributor C:
I'll definitely agree with you guys about minimal added strength benefit with the dados. I use 3/4" prefinished ply dadoed, glued and pocket screwed. The reason I dado the frames is for alignment. I've built frames without dadoing and doweled, pocket screwed, buiscuited, face nailed etc. I always had a tough time aligning things and those methods almost always involved clamping which I hate. The dado only takes a second and gives me a square index for the case sides; I pocket screw and move to the next box. This has just worked out to be the fastest and most consistently repeatable method for me. One other thing it does is hide any banged up edges on the ply.
From contributor E:
OK, it's starting to sink in. For you dadoers - do you dado the deck too or just the sides? How big do you size the dadoes to allow for any tolerances in the box and face frame?
From contributor G:
I usually use 1/2" sides and I use a dado joint on the face frames. I also use a dado on the sides and back to receive the bottom and top of the case. A rabbet on the sides receives the 1/2" back. I typically use 1.5" face frames and allow a 1/4" scribe on the sides. The top and bottoms are installed 3/4" up and down the sides respectively, allowing the same face frame stock to work for both the rails and styles. That of course leaves a 1/4" lip on both the top and bottom, but I have never had anyone complain about the lip. I've not had any issues with lining up as the parts are cut in sequence. The dadoes are cut so that the part fits snugly, which allows a case and face frame to be built with virtually no clamps.
I found this technique to work well for me. The parts can be cut out quickly and the case can be assembled with very little hardware. The dado in the face frame hides any slight imperfections on the plywood edge and also allows for a generous glue up with no squeeze out. The dadoes also serve to straighten up any bows in the sheet stock. I do use pocket screws to fasten the face frames together, but rarely are there any in the case work.
From contributor C:
I don't dado the bottoms and tops into the frames, just the sides. That's way too much trouble in my opinion. I pocket screw them to the frames. I use 1/2" prefinished plywood backs and use Kreg screws right through the back to secure the back to the bottom. If it's a long run on the cabinet I also add a cleat underneath (front and rear) for added support for the bottom. That too may be a bit of overkill, but you never know. I weigh 225 pounds and find myself putting my full weight on those bottoms when installing countertops. That's not the time to find out I didn't build it tough enough.
I use the 23/32 undersized plywood bits in a dedicated router table. That's it. I don't cut anything wider unless there will be a finished end and I allow an extra 1/4" to put the finished panel in. Everything fits just right most of the time.