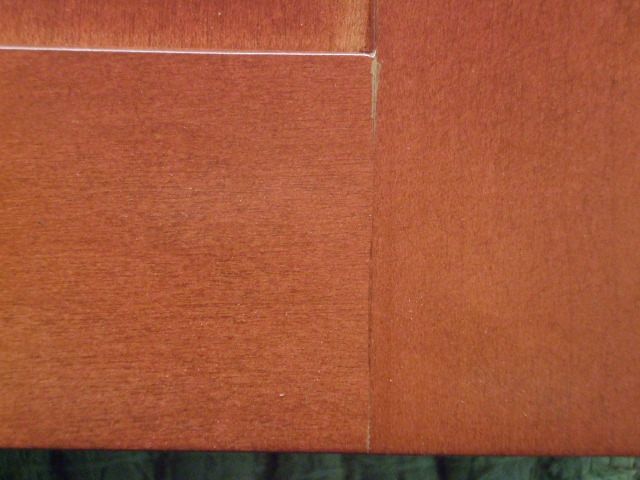
Question
Can anyone tell me what causes the finish to crack and start to chip (but only where the rail meets the stile)? Is this an issue with the finish or the joinery?
The wood is maple and the rails/stiles are joined with glue only. My finish schedule is sprayed on dye stain, pigmented wiping stain, toner, Mohawk vinyl sealer, and 2 coats of Mohawk pre-cat lacquer.
Forum Responses
(Finishing Forum)
From contributor S:
It shouldn't have anything to do with your coating. Picture is not real clear but it looks like possibly wood movement at the join. What type of glue was used? Are you certain there wasn't any glue left on the face before spraying? Are all the doors exhibiting this?
If I am getting movement, would nailing in addition to gluing help? I've added another picture, because often it seems to start at both the top and the bottom of the joint and work towards the middle.
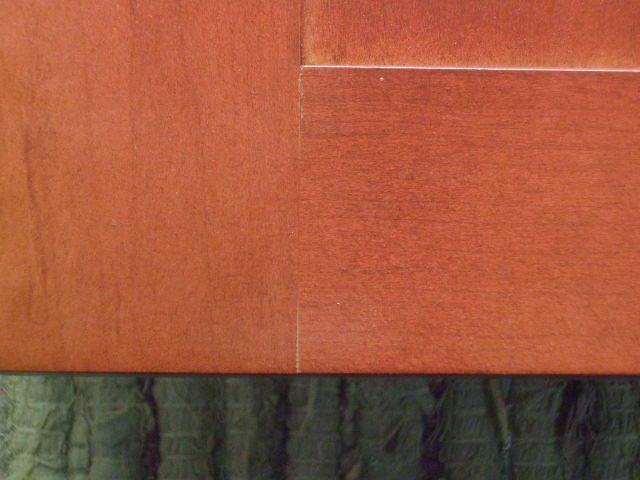
Perhaps you already know that the top and bottom edges of a rail have more exposed wood, so they dry out faster (if the MC is a bit too high and the plant's air is a bit drier) than the center of the piece. With the drying comes localized shrinkage, which can open a joint. The forces can be so large that they can break a glue bond. Also, the piece that the rail is joined to has the grain running at 90 degrees to the rail, and so that piece does not change length with changes in MC. So, one piece is trying to move and the other is not. Stress builds up and the joint opens.
The key is to make sure that the MC is correct just before assembling, because without MC changes, there will be no movement. Any MC measurements after the problem shows up will not tell us if the wood was wet prior to gluing, so measure the MC before gluing. Use a digital moisture meter; in this case, a pin type meter might be best. Use a name brand meter, costing about $200. Remember that any readings under 6.5% MC are not accurate. Use a $30 RH meter from Radio Shack to monitor the plant's RH. We do not need a more accurate RH meter.
After finishing, there will still be moisture changes (no finish is an excellent moisture vapor sealer), but they may happen more slowly with an excellent finish. You didn't ask, but I think that a hot melt PUR adhesive should be evaluated for this application. Make sure you consult with the PUR manufacturer to find out the proper pressure, curing time, open time and so on.
All the Titebonds will behave similarly with regard to creep, but unless you have a joint under a high load, you will not see any creep. What some people call creep is not creep but is the result of size change when the MC changes. Moisture size changes are very large compared to creep size changes. Creep occurs over a few years, not within a week or two or even several months.
Note that TB I is not as resistant to wetting as TB II or III. But again, a cabinet door is not going to get wet long enough and continually to merit using TB II or III. All the TB adhesives will make a joint stronger than the wood itself...so will almost all adhesives. So why spend more money if you cannot take advantage of the extra or special properties?
The above discussion appeared earlier in the Adhesives Forum and was reviewed and supported by Jeff Pitcher, the forum technical advisor.
As a test, I put three large drops of TB I, II and III on a piece of wood and then after it dried have hung it so that gravity will make it creep. So far, nothing. I am not sure where the creep information for an adhesive in furniture, cabinet doors and the like comes from. Certainly, a joint can creep in a laminated beam under stress (but it takes time) and it must be a carryover from this concept. Wood also creeps, as many of us have seen when looking at old flooring beams in a house or barn. Also, a heated joint with some PVA adhesives can creep under stress as the adhesive can soften. Similarly, moisture softens some PVAs. Nevertheless, moisture movement is far greater than creep movement.
One approach that has been tried to avoid this problem, especially with a wider bottom rail, is to pin the joint with a fastener at top and bottom. Unfortunately, when the rail loses moisture and shrinks in width, the fasteners hold real well and the wood will crack between the two fasteners. I have also seen a design (mortise and tenon) where the amount of wood (thickness) of the stile on top of the tongue from the rail is very small. This allows the rail and stile joint pieces at the face to move together more easily. In any case, the joint needs to be prepared within minutes before the pieces are glued to avoid any size changes due to unequal MCs and EMCs. The moisture of both must be the same and should match the shop's EMC and the customer's EMC, so any moisture changes are minimal.
What we see in practice is the wood parts are actually compressing the dried glue out of the joint, causing an obvious raised area. Allowing it to dry for long periods of time (2 weeks) then sanding it flat will often result in another raised glue line in the future. I have seen this a thousand times in my career.
White glue is the worst (nice and gummy)
Titebond 3 behaves much like the white glue
Titebond 2 will get squeezed out of joints
Titebond 1 will not.
I will take a photo of my cherry lamp if need be. If the glue joint was creeping then there would be a depression rather than raising.
Second, there are at least two reasons why a glue joint is raised. One is that the glue joint itself is rather rigid, so when the surrounding wood dries and shrinks a bit, the area right at the joint does not (as the glue makes it rigid and unyielding). Second, when wood expands, especially the surface while the core is not changing, the surface will create a raised bump at the joint area. We see this often with a t&g floor. Third, if heat is involved, it is possible for the adhesive to flow and any excess to be squeezed out of a joint under stress.
Of the three TB adhesives, TB II and III are more stable with heat and moisture. TB I will be the one that is softer than the other two, but all three are very rigid.
A good glue joint has an original thickness of 0.002 to 0.006 before the moisture diffuses out. After curing the joint is even thinner and the amount of adhesive that is not chemically tied up with the wood molecules is extremely small. The amount of adhesive available to squeeze out is minute.
Again, the wood is going to move much more than the adhesive, even if there were forces trying to make the adhesive creep. It is the wood that is moving and that "creeps." Contributor A, I have no doubt that you have observed a glue joint issue 1000s of times. I do believe we are talking about the same final results. We seem to be using different terminology for the same event. I do believe that my explanation is a more accurate description of why this is happening.
1: Water dripped down into the floating panel and got into your joint.
2: The door got stained, and stain fell heavy into your joint. Not a big deal if you let it dry overnight, but if the door was sealed before that heavy glob of stain in that joint dried, then you're gonna get this problem.
If the stain caused it, then chances are this flaw won't show for a day or two after it was sealed. If a few days pass after sealing, and the join doesn't haze like that, then it isn't excess stain moisture in the crack, and chances are the homeowner tried to clean the cabinets with an overly wet sponge, and water soaked down into the center panel crack causing it, or if the cabinet is near the sink, it could be that water from the sink dripped into the door and caused it.