Flip-Top Vacuum Frame Press
A discussion of flip-top vacuum presses and router jigs for making wood-edged veneer table-tops. July 18, 2008
Question
Over the last few months I have built a few countertops/furniture tops using two sheets of 3/4" veneer core plywood with solid wood edging, at least 3/4" thick, some thicker. The results were quite good and the clients very happy. However, I am not happy with the process that I used and want to improve.
My method was to place the top piece upside down on my assembly table, spread slow-setting yellow glue, add the bottom piece, and then use screws to hold the pieces in place until the glue dried. The next step was to use my CNC router to perfectly cut the rectangular shapes I needed. (Note - one must be very careful in placing the screws so the router misses them. I removed the screws just in case.) Then, I used clamps to glue on the nosing, making the solid wood a little bit thicker than the two sheets of ply. Finally, I used a belt sander, followed by a small random orbital sander and a scraper to match the nosing surface to the ply surface.
I am contemplating replacing the hold-down process with a vacuum flip-top table or frame press. If anyone is doing this, I would appreciate some feedback as to the merits of the vacuum process. I have at least one new counter top I want to build this way for a current special project, and two more nearing the proposal stage. I figured this may be a good time to add to my shop's capabilities. Currently I have no vacuum capability, so I would need all of the necessary equipment.
One of the problems that I have had was that the glue set up before I could get all of the screws in, even with slow-setting glue. Also, adding vacuum capability would allow me to do my own veneer lay-ups rather than depending on the luck of the draw in finding good looking veneer core plywood pieces. I am looking for additional comments, equipment sources, equipment pricing, etc.
Forum Responses
(Veneer Forum)
From contributor A:
I have a flip top press and love it for doing all kinds of flat layups. You can do some curve work also if it is not too tall. Vacuum pressure is great for any kind of glue layups and things can be done with it that are not convenient any other way.
From contributor B:
I got into vacuum bagging 12 years ago for less that $1200 and it changed my life for the better. We just use the bag, but do lots of large surface to surface glue-ups since it is so easy. It seems like you could set up a frame press and get a better bond with far less work, and save wear and tear on that screw gun. I started with a bag due to space constraints, but am now eyeing a frame press for its fast load and unload.
From contributor C:
We have 5 vacuum bags including a flip top. The latter is used daily and has pressed thousands of panels. I highly recommend it.
From contributor D:
If you want you can skip all the expensive machinery and make a machine like I did. This set up is not very pretty, but it clears more air much faster than the other systems I've seen, and it cost me about $150.00 for the entire thing. The parts can be purchased at any industrial surplus shop. The tank allows me to empty a bag quickly, but is not an absolute necessity.
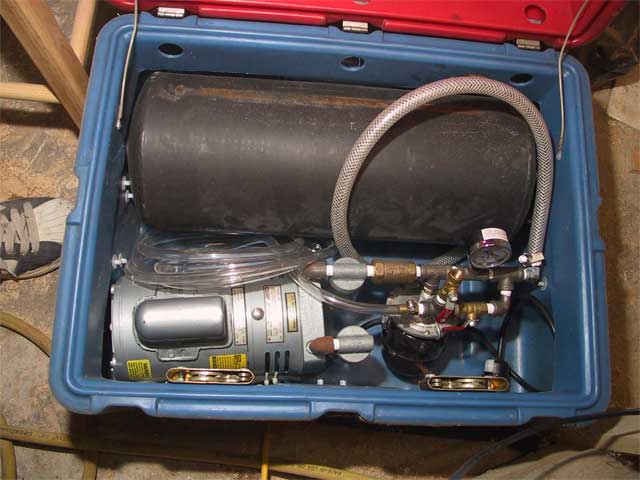
Click here for full size image
From contributor D:
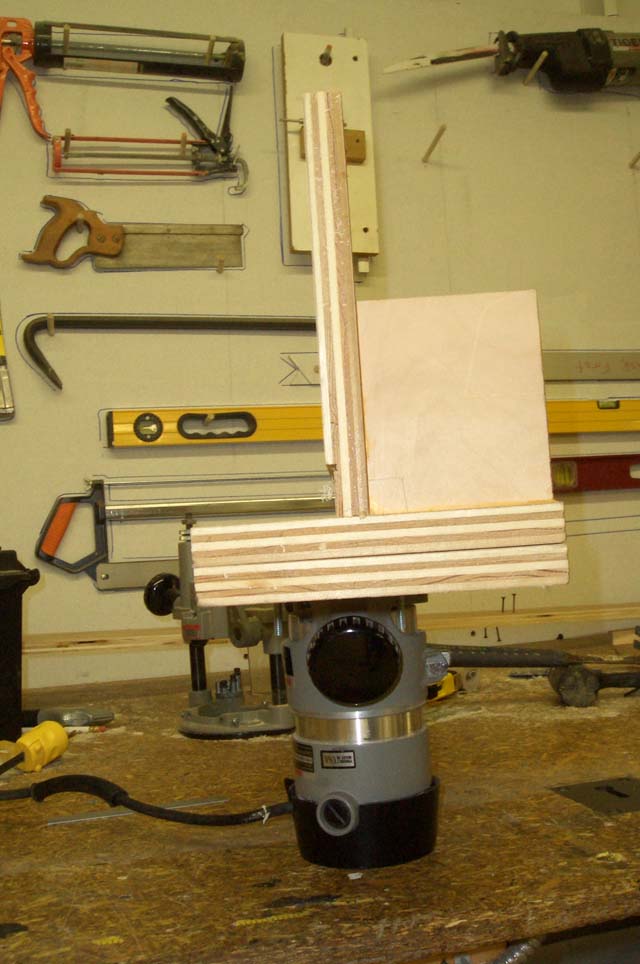
Here is a dedicated jig I made for trimming solid wood edging. I make the edging 3/4 by 7/8. The remaining 1/16 on each side is so cleanly cut off with a 4 flute spiral bit that you only need to scuff the cut with sand paper so it matches the other wood. This jig will cut the wood to MCP or any other surface without damaging the panel. After the cut you cannot tell the difference between the nosing and the panel when you close your eyes and run your finger over it. I will include another photo of the end view.
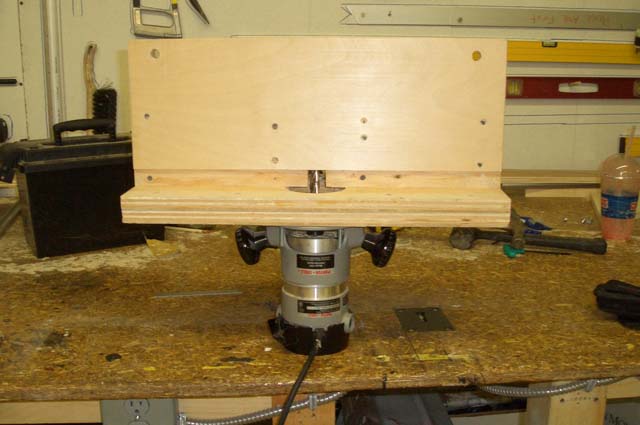
Click here for full size image
From contributor D:
Notice that I had to shim between the first piece of plywood bolted to the router and the second piece which holds the fence assembly. The bit must be in the exact same plane as the vertical fence. Regarding the cutter, I use an up spiral bit, 4 flute to make the cut. Go to Grizzly, or some other place like that selling imported cutters for metalworkers and buy the bit especially made for metal workers cutting aluminum. The Al bits and the wood bits are exactly the same, but the Al cutting bits sold to metal workers are much cheaper.
I also have a simple foolproof way of gluing the edging to the panels perfectly every time without a lot of clamps, but I don't have any pictures of the process currently.
Click here for full size image
From contributor D:
One more thing - instead of gluing two full sheets together, why not cut strips to build up the top sheet and staple/glue them around the perimeter and a few from counter edge to back splash - kind of like a ladder. This will lessen material costs, lighten up the countertop for delivery and allow you to have only 3/4" thick scribe where you want it.
From contributor E:
I built a system from spare parts and use it to press 4 x 8 marine ply panels. We use a large bag made of 20-30 mil vinyl. We use epoxy thickened with silica (cabosil) for the adhesive, as epoxy gives a longer open time. Apply adhesive, align sheets, use a pinner to shoot a nail in two corners to keep sheets from sliding, and then vacuum for 4 hours at 17-25 inches. We place a platen sheet on the top and bottom of stack for good air flow. These sheets have criss-crossing .25" wide x .125" deep kerfs on 3" centers on the side that contacts the bags.