Flush-Trimming a Curved Corbel
Following the curves on this piece is a challenge. Here, architectural trim pros discuss router and belt-sander techniques for working on curved edges. December 14, 2005
Question
I am building four corbels that are curved on three sides. They are a built-up core with bent plywood and will be veneered. I am having trouble trimming the sides accurately and efficiently. I intended to use a flush trimming router bit, but that does not work because the router sits at an angle, putting the bearing uphill and therefore not flush.
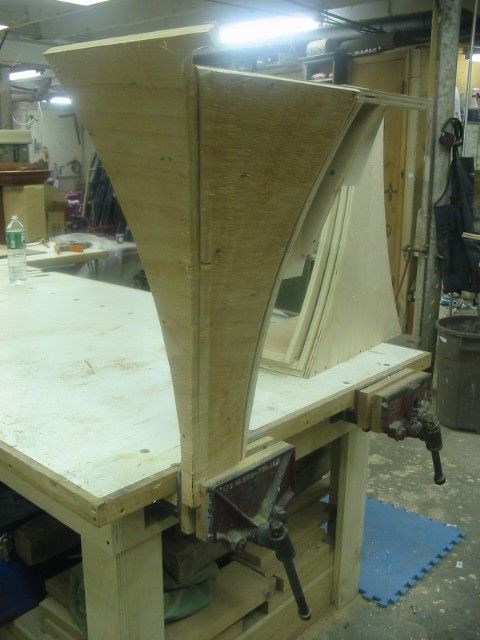
Click here for full size image
Forum Responses
(Architectural Woodworking Forum)
From contributor J:
You could try using a trim router with angle adjustable fence. You can trim at any angle with this router. I like the Dewalt.
From contributor K:
I would grind the overhang down close with a right angle sander. Then, if you are good with a belt-sander, slip a curved wedge under the platen so that the base is now curved rather than flat. You may be able to sand any overhang flat if you develop a delicate touch.
Lay it on its back so you can see down the line of tangent. Try to keep the axis of both the sander base and the work aligned. Cut the veneer with a sharp knife from the back side, pushing against counter-pressure from the face with a scrap of bending ply.
From contributor M:
It is inherently dangerous, but when doing curved work, we take off base and put a vice grip with both hands on router and freehand it with straight bit and bearing, then sand it flush.
From contributor F:
I have a trick that would probably work. When I bought a
Porter Cable biscuit machine 20 years ago, it came with a base that only works on 90 degree and 45 degree edges. So when I need to use it on odd angled edges, I make a wooden wedge to fit the plate joiners base and with the angle I need and fasten it to the base with double sided tape. I don't see why you couldn't do the same on a trim router base. You just have to be careful not to twist it side to side while you trim the angled edges.
From the original questioner:
Thanks for all the responses. I tried to rig up something with an angle base but it didn�t seem to work too well.
Contributor M, that idea is crazy... I like it. Maybe I could work something out with starting pins attached to the trimmer and freehand it. The Boss likes things with real precise, machine-made edges, so I am a little reluctant to sand it in, but if I go slow and use a fine grit, I can probably get away with it. I can fill and sand on the core but the veneer has to be right on.
From contributor K:
You may want to point out to the boss that if he wants you to do straightforward jobs, he should not be selling jobs that can only be done by someone with delicate hand skills. It will only take you a couple of minutes to cut a double taper arc, and slip it under the platen of a small belt sander and try it. You will never know what you can achieve without a little experimentation. This is an easy trick that I wish someone would have shared with me.
Since you did not acknowledge my suggestion, I am wondering if you did not understand what I was suggesting?
From the original questioner:
I'm sorry - yes, I did see your idea and that is likely what I will end up doing. I have seen this trick before - thanks for bringing it up to the top of my crowded brain.
From contributor M:
Also, for future reference: we stopped using thick bender ply years ago. It is not consistent and makes for a wavy base for veneer. We now use layers of 1/8 poplar bender. Extremely consistent thickness. Tighter radii and easier to work with.
From contributor R:
You could make a cutout jig that the unit pops into. Take some thick MDF and cut out the appropriate size opening for the corbel to drop into. Make sure it's sitting properly, then draw a line around corbel, rough cut using jigsaw or whatever. Now's the fun part - just use a belt sander to sand even with the surface of MDF. If you're fussy, use some laminate on the surface of MDF to reduce wear. If you're really fussy, you can replace the laminate as it wears. You can trim the veneer the same way if you like.
From the original questioner:
I finished one up yesterday. It came out nice. I spent a couple hours trying to come up with a base to use with the trimmer and ended up tossing it in the trash. Grabbed the trusty old P.C. router, removed the base and put a big flush cut bottom bearing bit in it and went at it. Was surprisingly easy to control and I ended up only needing to touch it up with the belt sander a small amount. I guess I was over thinking things a bit. I tend to do that.
Contributor M, how many layers of 1/8 do you use?
Thanks again for the advice. I hope I can help some of you sometime.
From contributor M:
For areas that won't get much abuse, we do three layers. It is stiff enough. If need be, you can make as many layers as possible.