by Professor Gene Wengert
Editors note: The following article is an excerpt from the book "The Wood Doctors Rx", by Gene Wengert, Professor and Extension Specialist in Wood processing Department of Forestry, University of Wisconsin-Madison.
One of the major areas in furniture manufacturing that causes problems is gluing - edge gluing, laminating, and veneering. There are at least a hundred items that could be wrong when a glue joint is below par, ranging from an incorrect adhesive formulation to an excessive cure time because employees were on coffee break. Moreover, as a general rule, a gluing problem is frequently a result of several factors that by themselves are no problem but when combined add up to trouble. A manager or supervisor who must troubleshoot an adhesive failure is therefore faced with many possible causes for the failure. The following four sections are presented to provide an understanding of glue joint failure of what is needed for proper adhesion and also to provide a few clues on what could be wrong.
Anatomy
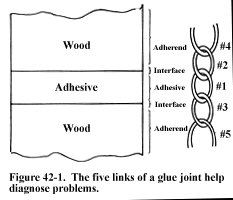
There are five "links" in any glue joint (Figure 42-1) and the strength of the joint is the strength of the weakest of these five links.

Link 1
The middle link is the strength of the glue itself. If the proper adhesive has been chosen and if it has been handled correctly (stored at the right temperature, not too old, correct catalyst added, etc.) then this link is very strong, stronger than the wood.
Links 2 and 3
The next links on either side of the middle link are most often the cause of glueline failure. Weakness results because the adhesive, for one reason or another, cannot attach itself to the wood.
Links 4 and 5
These links represent the strength of the surface of the wood. It is possible through machining or sanding to damage the wood surfaces so that they are not so strong as necessary. A recent study by the U.S. Forest Products Laboratory for example has shown that abrasive planing damages surface fibers more than knife planing, causing possible problems for joints in exterior exposures.
Stages in Formation
Stage 1
The adhesive, after application to a wood face, must flow to form a fairly smooth, continuous film. If the adhesive doesn't flow, marks from the spreading pattern will usually be visible. The adhesive won't flow if it's too thick (possibly because it's too cold), if the wood's too hot or too cold, if the wood's surface is dirty, or if there isn't enough adhesive.
Stage 2
The adhesive must transfer to the opposite, mating surface. This requires pressure and sufficient adhesive. The adhesive must also be able to flow and cannot have begun to set and harden.
Usually a failure of Stage 2 will be evidenced by having the adhesive only on one side of a broken joint. Lack of sufficient pressure and precuring are common causes. In turn, often caused by excessive assembly time or too dry wood. Insufficient adhesive can be a cause as well. Often the lack of pressure is a result of "non-flat" surfaces.
Stage 3
With the application of pressure, the adhesive penetrates the surface's nooks and crannies. This action provides mechanical strength for the bond.
Such mechanical strength provides shear resistance, but has little tensile (pulling apart) strength. As with Stage 2, pressure (as well as the other items mentioned) is important.
Stage 4
Good glue joints are characterized by good molecular bonds between the wood's and adhesive's molecules. For this bonding to occur, the wood and adhesive must be in intimate contact. However, sometimes the wood's surface is contaminated or is chemically unable to bond. This is called a " nonwetting" surface. (Imagine trying to glue two pieces of wood that have oil on their surfaces.)
Stage 5
The final stage is the solidifying of the adhesive. Failure to solidify may be caused by too cold a temperature, pH problems, or adhesive/catalyst problems. The rate of solidifying of a PVA is influenced by the wood's moisture content (the drier, the faster) and by temperature (the hotter, the faster).
Technical Nomenclature
The nomenclature for failures of the five stages is rather straight forward:
- Bonded joint: No failure; it's what we want.
- Starved joint: Insufficient adhesive in Stage 1, 2, 3 or 4 results from low spread rate, too much pressure squeezing all the adhesive out, or too much penetration into porous surface. This latter condition results in bleed through with thin veneers.
- Pre-cured joint: The adhesive reached Stage 5 before completing all of the earlier stages.
- Unanchored joint: Stage 3 was successful but not Stage 4.
- Undercured joint: Stage 5 did not occur; adhesive may still be tacky.
Diagnostic Appearance
As a final clue, the appearance of the glue line may identify the problem:
- Foamy or air bubbly. Air bubbles are trapped in adhesive because it was setting up too rapidly or because of bubbles in the adhesive itself.
- Grainy or sandy. The adhesive doesn't adhere to itself (old glue, error in formulation), or lumber that is too dry withdraws water before all five stages are completed (apply pressure faster, use more adhesive, etc.).
- Separated. The resin filters into the wood leaving filler and/or extender on the surface. Check catalyst and assembly time.
- Tacky. See Undercured joint in the previous section.
- Fuzzy. The joint appears covered with wood fibers (like peach fuzz). Evidence of failure of Links 4 or 5, a damaged wood surface, as mentioned earlier.
- Skipped or intermittent. The closeness required for good bonding is missing.
- Burned. (only in Radio Frequency units.) Indicates too much adhesive in one spot or wet lumber.
Professor Gene Wengert is Extension Specialist in Wood Processing at the Department of Forestry, University of Wisconsin-Madison
Editor's Note: For high quality veneering tools, supplies and equipment, check the offerings from Veneer Systems (website).