By Ben Hoffman
Reprinted with permission from the June/July 98 issue of Independent Sawmill & Woodlot Magazine.
Precision felling is the key to safe, efficient logging on your woodlot. Take your time, and follow these general guidelines to stay safe.
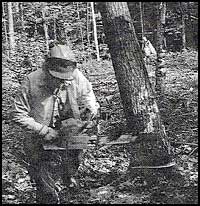
Photo: Ned Therrien
The norm for woodlots is partial cutting, which is more dangerous, and less likely to be mechanized, than clearcutting. Falling within a stand increases hazards for workers from branches and debris dropping from cut trees and those the trees contact. Unless a tree falls freely, it may hang up or its butt may rebound over the stump. And if the hinge breaks too soon, the tree may fall in the wrong place or the butt may swing to either side. Precision felling is the key to safe, efficient logging.
Preparation, the first step in felling, takes about half your time-walking to the tree, sizing up the situation, planning the fall, clearing around the base of the tree and preparing an escape path. ALWAYS, as you approach a tree you plan to cut, LOOK UP! Size up the crown, any dead branches that might fall, dead branches in nearby trees that may be knocked loose, rotten stems that may break, intertwined branches that may affect or prevent the fall, and look for nearby snags that may be hit. Also consider the lean and crook of the tree and the direction the wind is blowing. Look the crown over carefully-is it balanced, one-sided, or loaded with snow? Anything that affects the balance of the crown will affect the direction of fall and may also have produced reaction wood.
Next, look at the impact area, keeping an eye out for trees that may be knocked over, spring back or toss broken pieces at you. Look for obstacles--rocks, stumps, uneven ground that may cause the stem to break or rebound. Cut dead and downed trees or snags that may interfere with limbing. Then limb the lower portions of the tree and clear an escape path. Be sure there is nobody within two tree lengths of the stump.
Felling is dropping the tree safely to the ground, exactly where you want it, for easy removal with minimal damage to other trees. Probably the best measure of felling work is the cross section area of the stump. The less sawing, the less work. Consider notches of 1/5 to 1/4 of the stump diameter. If notch depth is 1/4 diameter, the two notch cuts are roughly 2/4 of cross section and the back cut is 3/4, a total of 5/4. A notch that is 1/2 stump diameter equals 6/4, or 20 percent more work. Smaller notches mean less work, less waste in the butt log, easier, safer wedging, and shorter bars.
I learned to cut with a "misery whip" and an ax, first sawing the undercut, chopping the rest out with the ax, then making the back cut with the saw. Chopped notches were 45 degrees or less, so the tree broke off about halfway through the fall, pulling splinters from the butt and often going where I didn't want it. When the chainsaw came, out of habit, I continued to cut in this manner, and the practice is still common today.
Safely Notching
The safest notch is open faced with an angle of 60 to 90 degrees, as shown in Figure 1. Why? As the tree falls, the wider the notch angle, the closer the tree is to the ground when the faces meet and the hinge breaks, and the better the chance of it landing where you want it. Shallow notches with sloping undercuts in the stump put the "chip" in the butt swell that is slabbed off at the mill.
Old timers checked the direction of fall by placing the top of a double-bit ax against the back of the notch--the handle pointed the direction of fall. Modern chainsaws have a sight line on the saw body so the faller can "aim" his tree. The old timer could make minor adjustments to his notch and fine-tune his direction, but the high speed of modern saws makes it easy to mess up a notch.
When the back cut is finished, the tree will fall 90 degrees to the back of the notch. But, if either kerf is deeper on one side (Fig. 2), the fall will be 90 degrees to the deeper one. For a perfect notch, make the TOP CUT FIRST, then sight through its kerf to make the undercut meet in a perfect V. A slight error in direction of fall can hang a tree on one of its neighbors, and hung trees are a major cause of fatal accidents. Safety demands precision. How you make the back cut depends on whether your bar is longer or shorter than the stump diameter. If the bar reaches through the tree, you can cut from either side of the tree, as shown in Figure 3. As soon as the back cut is deep enough, insert a wedge to keep the tree from sitting back on the chain. If the tree is too small to fit the wedge behind the chain, cut one side of the back cut, insert the wedge, then cut the other side at an angle so the chain does not hit the wedge.
Figure 2. If one cut is deeper than the other, the tree will fall at about 90 degrees to the deeper kerf.
Figure 3. If the bar is longer than the stump, make your back cut from either side of the tree witht the top or bottom of the bar.
Figure 4. If your bar is shorter than the stump, bore behind the hinge and cut around the tree, inserting a wedge at the halfway point to keep the tree from sitting back.
Boring and Plunging
For stumps up to twice the bar length, bore into the right side behind the hinge and cut in a clockwise direction (Fig. 4). Pause halfway through to slip a wedge in the kerf. For trees up to 2.2 times bar length, bore-cut the center of the notch, as shown in Figure 5. If in doubt, measure the tree first, and if necessary, save it for a longer bar.
Boring or plunge cuts are dangerous, with high risk of kickback, unless done properly. Try them only with help from a skilled sawyer who can demonstrate and explain them fully. To reduce kickback risk when boring:
1) Run the chain at full speed so the teeth cut and do not catch.
2) Begin cutting with the bottom of the bar tip and create a hole into which you can bore without the tip kicking out.
If in doubt, be cautious. Rather than bore into the stump, cut from the back of the tree, using the bumper spike as a fulcrum, and cut around the tree (Fig. 7).
Figure 7. To cut large trees without boring, use the bumper spike as a fulcrum and cut around the tree.
Holding Wood
Holding wood works like a door hinge to control the direction of the fall, so its strength is very important. A proper hinge calls for attention to two factors, thickness and rot. The hinge is the wood behind the notch V (Fig. 1), but since the back cut is higher than the V, it is often difficult to see this holding wood, and a common mistake is to cut past the V. If you have this problem, first cut away the bark behind the notch so the depth of cut can be plainly seen. Take your time and be sure your hinge is thick enough to hold the tree through its fall, especially in frozen wood.
Figure 6 shows the effect of rot and notch depth on holding wood. The shallower the notch, the more holding wood. If there is much rot--you can see it with the first cut--move the felling cuts higher where the stem shape is more uniform and the rot (hopefully) has tapered down. Cut rotten trees high and then cut the rotten stumps off. If rot is severe, leave it for the woodpeckers, or hook a winch to it first, finish your cut and pull it over from a safe location. NO wood is worth an injury!
Figure 6. Heart rot reduces the area of sound wood. A shallow notch leaves more hinge wood, but leave a thicker hinge, too, to be safe.
If gravity fails, use a wedge or felling lever. On trees with dead branches, especially frozen ones, I prefer the felling lever. Pounding a wedge and raising a tree 1/4 inch may move the top 2 to 3 feet and cause enough vibration to snap a dead top or branches. When the tree starts to fall, get away from the stump, quickly, at an angle of 135 degrees from the fall. Standing and watching leaves you open to the hazards of butt rebound from a hung tree or debris knocked loose by the falling tree.
I cannot consider every situation in a few brief articles. For YOUR safety, get the chainsaw safety manual published by the manufacturer of your saw and study it. Also, most saw distributors have safety videos, and if you cannot get them from your dealer, contact the extension forester at your state land grant university.
Problem Wood
REACTION WOOD is abnormal wood formed in leaning or windblown trees. It is a growth response to imbalances in stem loading. In softwoods or conifers, the reaction is COMPRESSION WOOD formed on the down side of the lean. In broad-leaved or hardwood species, TENSION WOOD forms on the upper side of the tree-the reverse of softwoods. Either may cause problems for cutting.
Compression wood is not normally a problem, but it may break faster, especially in frozen trees. Since it forms on the downhill side, when falling conifers at an angle to lean, the hinge is a mix of normal and compression wood. As a precaution, make your hinge thicker and pare it down carefully.
Tension wood causes serious problems in felling hardwoods as it is more brittle and easier to break than normal wood. Improper cutting produces "barber chairs," causing serious splits in the butt log and creating a major safety hazard for the cutter. The nature of tension wood has been poorly understood by loggers and dubious practices have been devised to cope with it. For me, the best approach to cutting a hardwood leaner is to notch it in the usual manner and use a plunge cut to start the back cut. Leave holding wood at the back of the cut (Figure 8) and cut it last.
Figure 8. To avoid splitting hardwoods with tension wood (back side of lean), leave holding wood at the back of the tree and cut it last.
Reprinted with permission from Independent Sawmill & Woodlot Magazine. Subcription information is available at their website, www.sawmillmag.com.