Hold-Down Solutions for Cutting Small Circular Parts
Here are some creative approaches to holding down the work when cutting out a multitude of small circles on the CNC. August 16, 2009
Question
I have to cut a few thousand circles, from 2 1/2" up to 8", with a 3/4" hole in the middle. I just can't yet think of a way without tabbing, which will take forever to cut. I'd love to hear some creative ideas! We have a 10 hp Becker vacuum, but I imagine this won't be anywhere near enough.
Forum Responses
(CNC Forum)
From contributor E:
I cut smaller stuff like your circles all the time. I only have a 7 1/2 hp vac and it holds fine. I have had to go to a two step cut and onion skin the parts. I cut all the pieces with the first cut and then go back and cut through the onion skin on the second cut. On the second pass I try to do the smaller parts first while I have a better vac pressure and work up in size. It's a little slower, but it works.
From the original questioner:
Thanks. What bit are you using? I would prefer at least a 3/8". As well, what sort of finish do you get? I haven't cut any of these yet, but we also onion skin regularly. With the holes in the center and also the small parts, I wasn't sure the vacuum would hold.
From contributor J:
You have a better chance at hold down if you drill the 3/4" hole with a .75 end mill. If you cut a circle, go counterclockwise.
From contributor F:
Onion skin, then flush trim them out on a table router. The operator can flush trim them while the machine is running so it won't cost extra time.
From contributor M:
We will often cut a sheet of parts that are roughly 1.5" x 3". We onion skin them leaving .008" skin. Then we break them out of the sheet, and they clean up in just a few seconds with a quick brush of sandpaper.
From contributor R:
I don't know if you're going to cut enough to make it worth the effort, but you could cut your tool path into a sheet of MDF with a slightly oversized tool, edge band it and seal the top, then fly cut the surface enough to get just the areas you need to have your vacuum. This will concentrate your vacuum where you need it. It might be possible then to cut through and have your parts stay put. Perhaps a ramp entry?
From contributor A:
Not sure of your material or the finish, but I've had great success with onion skinning as described above, then take the blank, flip it over and run it through the widebelt sander. The sander removes the onion skin and the parts drop off the belt like doughnuts.
From contributor S:
Contributor R, that's a great idea.
From contributor B:
I agree with everyone else about the onion skin. There is, however, another way to cut your circles. If you cut the 3/4" circle first, you can use a peg to hold the piece. This is actually a very good way to hold the piece down.
The drawback is that your vacuum fixture will have to be made to accommodate pegs and this will be a little bit of work. The pegs have to be placed after the 3/4" holes are set, which will require more work.
Now with that said, pegging will save you from twist out as the part will not be able to move in the x and y direction on the table because it will be held with a pin. The vacuum will keep the part from spinning (provided that you mill your part less aggressive at the end and you create a tool path that exits your part at about 5 thousandths from the end point).
From contributor I:
If possible investigate a roller hold down option for your router. This will help hold down the circles as well as allowing you to stack panels.
From contributor W:
I agree, contributor A - I use the wide belt sander quite often to get parts out. Depending how large the parts are, I also use material .08" thicker than needed, cut the parts out with .06" left and then run it through the planer at the finished size. Works great.
From contributor J:
I have had to do something like this and had to make the last pass slow. Time consuming, but it did allow for faster feeds on the mass cutting!
From contributor T:
I have used contributor A's suggestion on numerous occasions and it works great! If you do not have a widebelt, I would not give up on the tabbing, just perhaps attempt another tabbing strategy. For circles, I have had good success in the past by creating incremental subroutines to leave small tabs 180 degrees apart, about .25 mm thick and only a few degrees wide. They are easily broken out by hand, and require minimal touch up. But hands down, if you have the widebelt, contributor A's suggestion is premium!
From contributor H:
What I've found helpful with the onion skin/wide belt sander process is to use a downcut spiral bit. This will compress the sawdust into the bit slots and help to hold the parts in place. Not good for the bit I'm afraid, but worth it in my experience.
A separate benefit of this is that even while running face down on the wide belt sander to free the parts that compressed sawdust will, for the most part, stay in place. This will help keep parts from breaking free and being drawn upward into the belt and roller mechanism. Often when I do this in 3/4" pine, I have to apply a fair amount of finger pressure to break each part out of the board after the onion skin has been removed.
From the original questioner:
Many thanks to all of you for your suggestions. My partner and I came up with an idea sparked by some of these threads. The biggest problem is vacuum. If we had some super vacuum we would be fine, but we don't. So I thought about multiple zoning to allow the Becker to be on or off in different sections. But, still not enough. Then we got it... a 4' wide roll of pliable plastic that we roll behind the spindle after each row of cuts. We just need to program these sheets to cut across the 4' axis first, one row at a time. There would then be no more than one row of pieces (4' wide by about 8" max) exposed to the vacuum at any time. 175 cfm and 25" hg should be fine over this area. Haven't done it yet - I'll let you know!
From contributor H:
Allstar Adhesives has a gasketing material you lay down on the table under you sheet stock. Your first parts cutout clears away areas where you need vacuum. Then you are good for the rest of the run. It's your same idea of the plastic on top but it's underneath the sheets and you don't have to roll out the material with each row. Should have thought of this earlier.
From contributor D:
All Star's low compression gasket could also be used. Engrave the shapes of all of your circles on the spoilboard and then gasket to the inside of the engraving. We hold all kinds of small repetitive parts with this technique. I have held parts as small as .5 sq/in for through cutting. Takes a little setup to make the spoilboard, but if you are making a lot of these, it is easier than onion skinning. Good luck!
From the original questioner:
Thanks for this. I went on the Allstar website and I'll call them tomorrow. A dedicated spoilboard with gaskets sounds perfect. Nothing new under the sun, eh? You just have to ask lots of questions... Many thanks to all.
From contributor O:
I use sheets of 1mm thick flexible PVC to blank off areas and save vacuum as you suggest, as I am often removing 30% or more of the material leading to major vacuum leaks. It works well overall, but you do need to be very alert as to where the spindle is and where it is going so it requires a bit of supervision. I often edit the G-code to insert pauses at specific points so I can reposition the sheets. But this is only viable on short run machining; if you have lots of repetition, nothing will beat a dedicated gasketed spoilboard.
From contributor Q:
If none of the other ideas work out, we have on many occasions used double face tape to hold small parts down to scrap spoilboards. This has even worked well on when we had to cut out hundreds of 1" diameter acrylic circles as well as thousands of .438" x .625" laminate color chips.
From contributor K:
Done several of these sheets today. I never use tabs, onion skin, tape or anything - just a 4kW vac pump. No problem ever.
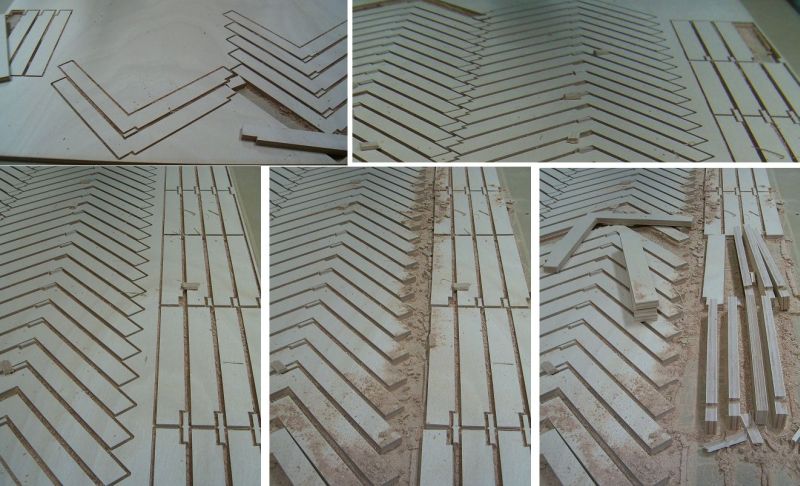
Click here for higher quality, full size image
Click here for higher quality, full size image
The comments below were added after this Forum discussion was archived as a Knowledge Base article (add your comment).
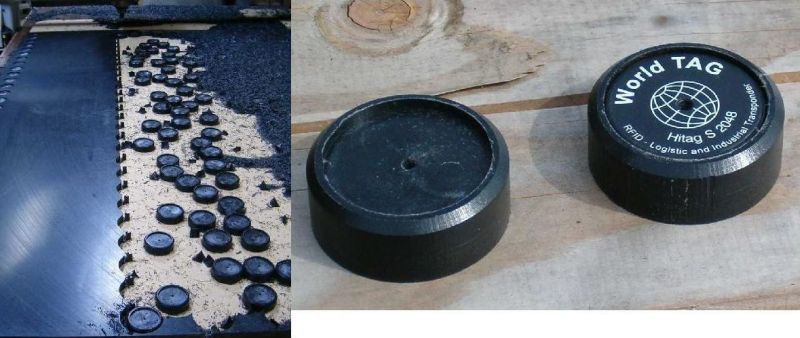
Comment from contributor V:
We have done the same type of thing (80,000 wood plugs 3" in diameter) and we used clear carpet protector from white cap. It's a clear plastic that is sticky on one side and comes in a three foot wide roll. The plastic goes on the back of the panel first and really helps the vacuum pump pull harder and also makes a great added onion skin as well. You can also peel of the plastic after machining if you want to leave an onion skin on the product an just use a wide belt as mentioned above.