Question
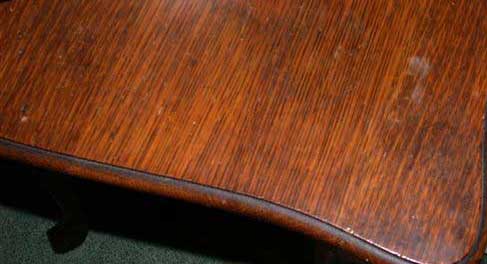
I need some help with this one. I need to finish a red oak fireplace mantel so that it comes close to the image below. The picture is of a 100+ year table. The wood is actually quarter sawn so that at least the grain pattern is close. I'm totally stumped on how to create the dark pores, dark edges (the legs are even deeper), and even the aged finish look. To make matters worse, the piece will be used on a wood burning fireplace so that this piece needs to standup to some heat (like a real old mantel would.)
My preferred finishing methods have included stain, 3-4 coats layers of tung oil followed by either several coats of thinned hand-rubbed poly, sprayed varnish or shellac. I've seen some references to mission style using Aniline Dyes but I've not had much luck comparing the dyes to what I need to achieve. Also, the mantel isn't really mission style, although I suppose it would be of similar age.
I've also seen a recent recommendation by Alan Noel to use asphaltum/roofing-tar as a glaze. I've not tried this yet but I was thinking that this project would be a good candidate (after testing of course.) I can't convince myself to stain (or dye) the piece first and then try to address the grain. Can anyone recommend a procedure?
Are there any ideas on how to address the heat issue? It's not that the mantel has to be protected from burning so much as I'd prefer the finish not to fail because of the heat.

Forum Responses
(Finishing Forum)
From contributor S:
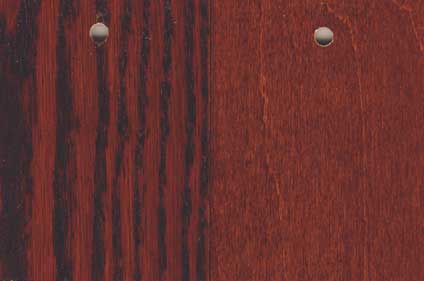
Do you intend to strip the table? It looks like it needs it. The brown mahogany color looks like you may find it as a stock color. Have you looked at any color chips from your salesmen, or the local stores?

When this is dry, use an orange shellac finish - the shellac will tend to darken with age and soot from the fireplace and match the table. You could add a little dark brown glaze between shellac coats to match the existing dark areas in the table finish. I would test the table finish in an inconspicuous spot with some alcohol and lacquer thinner to determine what is on it; if it is an old finish, it is probably shellac. This takes a little practice, but you should be able to get an old looking finish pretty close to the table.
As far as the heat is concerned, it depends on how close this is to the firebox. If the mantle is far enough away for the wood itself to be safe, any heat distressing to the finish will probably be isolated to the bottom of the mantle, and will add to the authentic look.
1. Dark grain filler – water-based or use Famowood Wood Putty thinned with lacquer thinner (walnut putty will get you real close to the look). You can dye the putty with extra dyes (aniline). Wipe on with putty knife, allow to dry, and sand it flat. The final sanding should be no more than 150 grit to get the rich color from the stain.
2. Stain with choice of stain color that brings out the red.
3. Two coats of conversion varnish (sanded in between).
4. Scuff sand entire area, but scuff the areas you want "antiqued" with a coarser grit. I would use a scotch-bright type abrasive (Mirka's Mirlon pads are great). The coarser the scratch, the darker the glaze will take.
5. Glaze with ML Campbell's Amazing Glaze, which is an instant drying glaze that can be wiped away with the Mirlon/scotchbright pads.
6. Final topcoat of CV.
If you are using a dark filler on a light wood (like, say, walnut colored filler on ash) a washcoat is advisable. But the problem is that a washcoat of finish will significantly reduce stain penetration/color.
Most washcoats, whether plain varnish, lacquer, or conversion varnishes vary from 10% topcoat/90% thinner to 50/50. I typically use a 25/75 of topcoat/thinner if I'm washcoating anything. I always play with samples to get the feel of what will happen.
A washcoat (which to me means a finish coat thinned to less than 10% solids) prevents the colorant from bleeding out if the colorant is a dye. It also prevents the filler (or glaze) from coloring the smaller pores and results in a brighter, less cloudy look when the filler is a contrasting color. The table doesn't appear to be a full fill finish. If it is not, you can get a good, contrasting partial fill with a heavy body glaze or with a gel stain and they're easier to work with.
Everybody has their druthers and I'm not here to say they're wrong but this is where I would start:
1. Dye a pale yellow.
2. Stain with a red mahogany wiping stain.
3. Wash coat (maybe x 2.
4. Glaze with a dark gel stain to highlight the earlywood pores. You'll have to pick a color based on where you want to be and what you see after 3.
5. Seal.
6. Topcoat. If you're worried about heat, shellac and lacquer are thermoplastic and I believe most epoxy and polyester finishes are too. Better to steer clear of them.