Joinery Methods for Attaching Face Frames to Cabinets
Other Versions
Spanish
French
A long discussion on various joinery methods for face frame fastening. June 16, 2010
Question
I am trying to figure out a faster way to fasten my face frames to the carcass. Currently I use pocket screws in the places where cabinets butt a wall or another cabinet, and clamp finished ends. I saw a corrugated fastener in a catalog and I think I recall seeing this method used to fasten face frames. Does anyone do this? Would I have to clamp the face frame to the cabinet anyway to keep it from pushing off the plywood when I shoot from the back of the cabinet into the face frame at an angle?
Forum Responses
(Cabinetmaking Forum)
From contributor K:
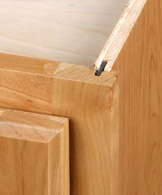
Conestoga uses splines in a dado to attach their face frames to their cabinet systems. I've seen it in action and have considered changing from pocket screws which we've used for many years now. The only reason we haven't changed is I feel more secure knowing the screws are a secondary backup in case of glue failure over time, but the splines they use seem to do the job as well. The glue is important.
From contributor V:
You can try Klicks or S-Klicks from Stafast. Just back them up with a bead of glue. I prefer a shallow dado and a series of brads shot diagonally into the joint from behind.
From contributor C:
Senco (I am almost sure) makes the fasteners and the gun. I've thought about it too, but after researching, it seems inadequate for high end work as far as reliability, accuracy and looks. I am sticking with pocket screws and glue or dado and pins (angled) through sides into back of face frame.
From the original questioner:
Do you use a dado along with the pocket screws? I didn't in the past, but I found it too hard to get a nice reveal, just a pain to line up. Now I just cut an 1/8" dado in, but I have to be really careful to remember to use only 1" pocket screws and not to over-tighten strip it out. I will have to give the brad trick a try - I have never thought of that one.
From contributor V:
Pocket screws and dados will get you as strong as it can be. Here's the thing, though, if you want to pocket screw you can do without the dados if you like. I like dados, glue and brads. One advantage to pocket screws without dados is, if you have a cabinet box that is out of square, you can float the face frame and get it aligned with your adjacent cabinets. If you dado and you're out, you're out!
From the original questioner:
So you would pocket screw without glue or dado? Hmm, the other nice thing about that is when I put a face frame on upside down (and it happens from time to time) I don't have to try to beat it off the box... But you too like to dado and brad from the back, right?
From contributor V:
I always glue! Don't always dado. When you glue up a dado, it's indestructible - brads or screws, doesn't matter. A flush face frame with pocket screws, I glue as well. The screws are only as tight as the last torque. I worry about shrinkage later compromising the grip of the screws. If the face frame is glued as well, it never becomes an issue.
From contributor J:
I like to tongue and groove it. I build my face frames first and square the cabinet to it.
From contributor K:
Just curious... The way you do it requires three runs - one for each side of the ply and then the dado for the face frame. Why not just run a 3/4" w x 1/4" d dado to accept the whole side of the cab and use 1" PH screws? That's what we do, and it only requires one run for the face frames on each side. Add the glue and pocket holes, and they are pretty much indestructible.
The other advantage to pocket holes is, even with shrinkage over time, if the glue fails, the face frame has nowhere to go, as the PH screws are basically gripping it all the way round and along with the 1/4" dado, it doesn't allow movement.
From contributor J:
I don't do this for a living and generally do a little more than I have to. Pocket screws are fine, but I think my customers see a higher quality looking product without them. I generally don't use them - I don't like the way they look, even when hidden (but they do work well).
My plywood tongue is done in one pass on my shaper with two 3/8" rabbet bits with a spacer between. That way the tongue is consistent even when the ply varies. It's really quite fast once set up, and always the exact same width.
From contributor K:
Even so, consider that by doing one 3/4" dado, you have a larger glue area. I don't understand what you mean by you don't like the way pocket holes look, when you don't see them. I don't like the way the bottom of my car looks, but then again, I don't see it... Probably why they don't paint it.
From contributor J:
How do you use pocket holes for face frames so you don't see them?
From contributor S:
Cover them with a skin - 3/16 for stain grade or 1/4" MDF for paint grade. Swirl the glue around or however, and then pin nail.
From contributor J:
I see. Sounds like a lot of extra work and material to me, but I see where it would work well. By the way, a tongue and groove like I use has more glue surface than a straight dado. There's not much chance of it failing.
From contributor P:
I use contributor J's method with tongue and groove and glue. I have used this method for over 50 years. Don't remember a failure. I make cabinets full time.
From the original questioner:
I too have thought about doing the tongue and groove thing, but what do you do when you are building a pantry that is 24" deep and 90" high? That would be tough to balance on my shaper. However, it would be great not to have to worry about varying widths in my plywood, which does rear its ugly head all too often. As for the extra glue area, true enough, but man do I have to pound hard to get a face frame to break free of the plywood with just a dado cut into the face frame. I have a hard time imagining a glue failure using either method, but I guess anything is possible.
I think these Lamello slide-in connectors may work well for what we are talking about. They may be a bit pricy. (I only found a price of 30 Euros for a pack of 50. What is that, about $40?) But it seems like a good alternative for exposed ends for those of us who use pocket screws to join face frames to the carcass. Thoughts?
From contributor J:
There are plenty of ways to do this. And most of them work just fine. We all have different preferences and there's nothing wrong with that.
From contributor O:
I don't know how fast my technique is in comparison to others, but I do know that it is easy, rugged, and lends itself to loose scribes in the field. Before I get into my how of attaching face frames, I've got to describe the other factors.
All my cabinets are built using 3/4" ply for the sides, bottoms and tops, or base cabinet top spreaders. Typically the face frame verts are 1-1/2" wide x 3/4" to 7/8" thick (the top and bottom rails are often wider) and most often are set up to be flush with the inside face of the box sides and bottoms and outside face of tops or spreaders. Scribe verts are left wider and often are sent to the job loose but pre-assembled and finished with the rest of the frame.
Also, I usually build a box for each cabinet section, i.e. I rarely use partitions to divide sections � each section is a box with its own two sides ganged up to other boxes. My face frames on the other hand can be built as one assembly to cover 2 or 3 or 4 cabinets in a run � all depends on how strong I might feel on delivery day and how much turning room at the client's house. The face frames are assembled with pocket screws and glue.
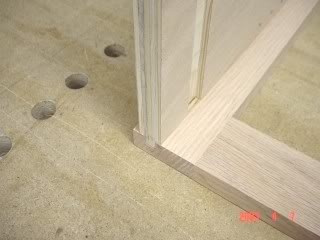
My face frames are attached to my boxes using biscuits and glue. That's it. I register the Lamello base off the faces of the cabinet that will align with the flush face of the face frame. This flush frame to 3/4" plywood side system lends itself very well to biscuits. However, when I need to offset the box to the face frame, I still use biscuits in the plywood sides, but use a shaper or table saw to run a biscuit size full length slot on the unassembled face frame parts.
The backs are kept off the cabinets until the face frames are applied. I turn the cabinet assemblies onto their backs on plywood T-stands - slot the plywood to match the slots on the face frame � set biscuits in glue � add glue to the ply edge and tops of the biscuits � lay my face frame on � tap in place with a hammer and block � then clamp around the assembly with as many Besseys, or the like, as I need � clean up the glue squeeze out then move on to the next gang of boxes.
By the time my third group of cabinets is ready for its face frame, the glue on the first group is set enough to steal those clamps away.
I tried using Festool dominoes instead of Lamellos, but I gave up on that the first try as the dominoes are actually too precise. The sloppiness of the biscuit to slot alignment is a good thing in this application.
One other little key to success here is that I use a trim router with a 1/16" radius bit to run around all the mating edges of the plywood to face frame. This leaves a little paint break that helps in glue cleanup and some forgiveness at achieving perfect flushitude.
Finished ends are connected to the face frames before they are attached to the cabinets. The scribe verts can be fitted in the field then tapped onto their biscuits and pocket screwed to the rails. In the case of a tall vert where I might need to clamp it to the cabinet, I make up a clamp block that is set into the shelf holes and clamp lightly from that block to the face of the vert.
I am very happy with the ease, strength and professional results of this system. Thought it might be worth some consideration for others.
From contributor T:
I like your "flushitude" index. It fits nicely with "plumbosity."
From contributor V:
Anyone have experience using dowels to fasten face frames to cabinet boxes? Dowel construction of cabinet boxes themselves is a popular and highly regarded method of construction (at least AWI thinks so). It seems like it might be somewhat less labor-intensive than some of the methods described above - at least if you are trying to produce some level of volume. I'd be interested to know if anyone has tried it, or if it has some obvious disadvantages that haven't occurred to me.
From contributor O:
If you are asking about blind doweling, i.e. that the dowels do not go through the face frame but just part way into the back, consistent alignment is nearly impossible. Biscuits are forgiving in that regard and with glue make a face frame to cabinet assembly virtually indestructible. Try taking one apart.
From contributor T:
Why does the face frame have to align exactly with the box?
From contributor O:
It's not aligning the face frame to the box as much as aligning all the dowels sticking up out of the box with all the holes in the rails and stiles of the face frame. Invariably the dowels will be tilted off center ever so slightly and as you try to set the frame onto the already glued in dowels, all the slight out of vertical dowels will teach you a whole new list of curse words.
It is one thing to use a CNC machine to set dowel holes into your cabinet box parts. These will come together nicely with little aggravation. Making dowel holes in face frame parts and plywood edges is mostly hand work, though, and that's where all the error sets in. Pretty tedious work and near impossible to achieve perfection.
From contributor T:
I understand why and agree that you need to have some adjustment in how you fasten face frames to cabinet boxes if you intend for the alignment to be flush. But why does the alignment need to be flush? Could not the face frame overhang the box a click and just use a thicker mountplate to account for the differential?
From contributor O:
Yes, absolutely. I just prefer setting my face frame flush to the box. That is absolutely not the norm. It is very typical to have the face frame overlay the faces of the box sides or be set below the bottoms. All kinds of ways to achieve this and no one system, or look, is better.
My last two posts have been just about how difficult it would be to set a face frame onto a cabinet by trying to align dowel holes, regardless of whether or not the face frame is flush or overhangs the cabinet parts. Dowels just don't stand up straight when the holes are bored by hand. You might get two or three perfect, but good luck with the rest.
Try mocking up a few of these situations. It will all become very clear.
From contributor G:
I agree with contributor S - Lamello ff in place with the backs off. Very strong and easily indicated during glue-up. Allows a little room for error/adjustment, but not much.