Kerfing Plywood for Bending with a CNC Router
Other Versions
Spanish
French
A CNC router can kerf out 3/4-inch plywood to make it bendable, but it takes a little tweaking to get there. August 12, 2007
Question
I have the CNC and programming capability to create an object to be reused at will for present and future projects. I would like to create a kerfed plywood object for bending so that I can use it in our design program, whenever the need arises. What I don't have is experience in kerfing and bending 3/4 ply. Can someone point me to a resource that outlines width, depth, and spacing of cuts to accomplish this?
Note: I don't see the need to buy kerfed plywood when I have a router that will make it for me.
0
Forum Responses
(Architectural Woodworking Forum)
From contributor L:
I'm assuming your router is equipped with a saw blade so it can cut kerfs. If it is then you can do a quick experiment: run various depths and spacings of kerfing on a few panels and see how they work for the amount of curve you are trying to use. Our beam saw has an automatic kerfing program as part of the built-in controls and we use it fairly often, mostly on MDF.
From the original questioner:
Well, that would be nice, but no. I can duplicate it with a router bit quite easily though. I'm just looking for guidelines that tell what spacing and depth for certain radius.
From contributor S:
Try "The Complete Manual of Wood Bending" by Lon Schleining.
From contributor G:
Practice on some drop to get the result you want. Then cut the final piece. You may find a .125 millend, while thin, won't give you the bend you want. Too much flat in between for the thickness of your material. Do they even sell bendy .750 ply?
From the original questioner:
Oh yes, they sell the brand name Kerfcore in pretty much all thicknesses. And yes, I could practice on some drops. I have nearly completed programming the object, and if no other information appears, will probably begin experimentation tomorrow.
From contributor N:
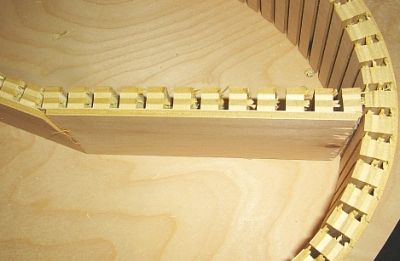
We've done a fair amount of kerfing in the past and have run into numerous problems doing it with a router bit. We've worked through most of them, but it has taken a large amount of trial and error. We started with an 1/8 bit and broken too many, so we went up to 3/16. This worked better, but two more problems arose. If we used an upshear bit, the force would cause delamination of the remaining material. If we used a downshear bit, the kerfs would be packed with chips that were a pain in the behind to remove. If we didn't remove them the piece would usually snap before fully forming it. We finally went to 1/4 downshear with 1/4 spacing and it works well for what we are doing, which is mainly starting step stair risers with 4-7" radii.
Your plywood quality will play a huge role in this. We run full sheets at a time, with 4-7 risers laid out on them. Some sheets machine very well, some don't. It's not unusual for 25% of the kerfed pieces to separate between the plies. Any reason not to use two pieces of 3/8" bending ply for these?
From the original questioner:
No reason other than I want to use our CNC router and not buy special material. Thank you for the information. It's good to know that I'm close to what you have. I'm using a 1/4" downshear also. I may want to make the kerfs closer together, but 3/8" spacing makes it difficult to nail without chipping out already.
I cut out a piece yesterday 3/4" x 4" x 95-1/2", with 1/4" kerfs, 3/8" apart, and 1/8" left in the kerf. It didn't score the first lamination and it broke before fully formed. I think that the remainder needs to be thinner. So, I'm cutting another today only leaving 3/32" in the bottom of the kerf and see what happens.
From the original questioner:
Well, that did the trick! All it took was cutting through the longitudinal lamination and scoring the cross lamination next to the veneer, and it bends like there's no tomorrow. I might have a problem with the flats telegraphing through, but one problem at a time!
From contributor K:
Why don't you try making plywood ribs and using layers of bending ply to build up your thickness and then veneer it with whatever wood species you need? By the time you are done experimenting with different tooling and materials, depths, spacing, etc., you should have just spent the money and bought the correct pre-kerfed material. It is more cost effective to outsource certain things than waste your valuable time, not only man hours, but machine time also.
The comments below were added after this Forum discussion was archived as a Knowledge Base article (add your comment).
Comment from contributor R:
Kerfing with a skill saw and a thin blade worked well for us in making a teardrop trailer. We were careful to make the kerfs perpendicular by measuring and guiding rather than relying on the table say. Slight errors in squareness of your guide could compound and cause a big error in your bend. We kerfed at 1 1/2" OC for our 48" radius, 2" OC for our 48" radius and sawed approximately 3/4 of the way through 3/4" plywood.