Question
I'm doing a kitchen where the client wants frameless and two lower corner cabinet lazy susans. I've used the Rev-a-Shelf ones before - the ones where you hinge the doors and also the type where the doors are screwed to the pie cutouts on the trays and go around with them. When you're doing frameless, there's a problem with the door bottoms and tops, since they overlay on the box and need to align with the top/bottom edges of their neighbors. They cannot rotate into the opening because the box is in the way. Am I missing something, or is the fixed door lazy susan just not possible with frameless construction where you're going for consistent 2.5mm gaps? Am I better off recommending the hinge option in any case for long term durability? (I've used Blum for this and like it as far as I can tell.) Should I be looking at brands other than Rev-a-Shelf if top quality and weight capacity are primary concerns? The client doesn't want plastic and I know Rev-a-Shelf has wood and chrome wire options.
Forum Responses
(Cabinetmaking Forum)
From contributor M:
I would stay away from the susan with the attached door. I have regretted all 3 of the ones I used 15 years ago. No, you cannot line up your door with that type; besides, the tolerances with frameless are way too close to use them. Use a free swinging type with a 165 hinge on the main door and the cup hinges designed for the matching door.
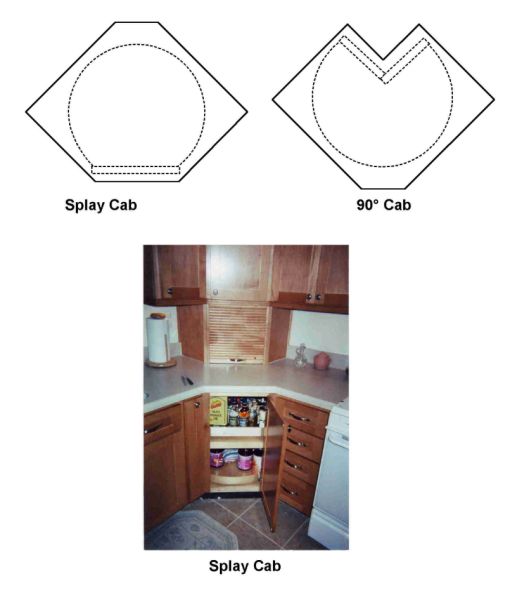
Anyway, you can drop the bottom of the cabinet into the toe kick plus some clearance. The top is a bit harder. I made the subtop under the granite in 5/8" apple ply (that I sanded down from 3/4") so it would not sag with the span of the lazy susan cabinet (still nervous about this) but the hardest part of the job is the perfect alignment needed. I included stiles at the sides of the cabinet so the lazy susan would have room inside to spin. Those stiles have to be perfectly parallel and also not tweaked. The center post must be in perfect alignment with these stiles exactly centered between them. Also, both doors must be exactly the same width. A nightmare of adjustment. I would try to talk a customer out of doing it, but it is cool to have a lazy susan, and useful. We made one with three trash containers.
Top Ten (okay, twelve) benefits:
1. Type of door or cabinet style is no longer an issue.
2. Each susan independently rotates, so less weight to move.
3. Because the susan is on a shelf and rotates in the same footprint, you can also store things to the left and right of it, utilizing the whole cabinet.
4. Because they sit on shelves, no more items falling behind the susan, jamming the rotation.
5. They glide much more smoothly, and with the stop built into the swivel, they return to start position much easier.
6. You can add appliques to dress up the front of the susan, and command more money for little investment. Or add decorative railings, inlays, etc. - things to set you apart.
7. It is the only option that utilizes the whole corner cabinet for storage.
8. Being on a shelf, you can do as we do, and make the middle one height-adjustable, making it more customizable for the customer's contents.
9. They are easy to assemble. Less labor = more money for you.
10. You can command a premium for wood vs. plastic, and make more money.
11. There is no pole in the way, so you can store more items and whatever you want (i.e. - pots and pans, bottles, tupperware, etc.)
12. Being that it is not mounted on a pole, there will be no need for future service calls to adjust it due to house movement (those are fun... especially inset - not!), thereby letting you keep more of the profit.
If you are doing inset cabinets, you'll want to make or buy a 31" susan.
Sorry for the crude drawing of the corner cab... on break and need to get back to work.
