Locking Miter Joints for Drawer Construction
A discussion of complicated and labor-intensive, but interesting, interlocking joinery for drawers. January 9, 2007
Question
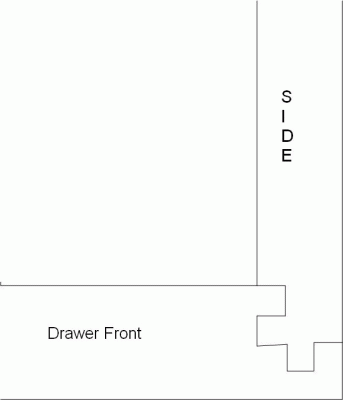
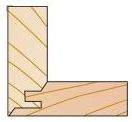
I recently purchased an antique oak Mission style desk. The drawers are joined on all sides with the same type of joint, which resembles a locking rabbet. I would like to include this joint in my work. Does anyone know what kind of joint this is, and what its history is?
Forum Responses
(Furniture Making Forum)
From contributor F:
Looks like a variation of the "lip and tongue" joint. I have not seen that one, but mitered lip and tongue joints are used often for strength and the fact that no end grain shows. Pretty labor intensive joint. Some may call it a tongue and lap.
From contributor W:
I suspect I'm missing something. I've also seen this in antique Arts & Crafts furniture, but not given the joint consideration due to the effort it required to replicate it. Machining the drawer front isn't especially difficult (two cuts and it's done), but machining the drawer side was a three-step process when I tried it.
Given how labor intensive cutting this joint would be, and how unlikely it is that a drawer would be subjected to force pulling the drawer sides out and away from the drawer front, where is the advantage in this over a locking mitre joint, which is fairly simple to machine? Glue surface would appear to be in the same range, and force tending to pull the drawer front away from the drawer sides is resisted very effectively by the locking mitre. Is there more to the story?
From contributor F:
This joint would be much stronger than a lock-miter. However, I see no great advantage to other joints if the drawer is captured between drawer slides. But if the drawer is built to ride in an opening such as a dresser, it would be bulletproof.
From contributor P:
Looks like more work than it is worth. You could do both the sides and the face with two setups each, with the right tooling, but it would take quite a bit of time. Also, with the resulting short grain on the face, it would be very easy to crack it during assembly if it was not machined dead on. Your stock would have to be dead flat as well.
From contributor T:
Variation of rabbet and groove (old Delta series of books). Locking rabbet and groove. Single shaper cutter or molding head, 2 setups each for side and front. Stock thickness is critical! I have an old quarter-sawn white oak Mission style desk with drawer sides nailed to rabbetted drawer fronts. I wouldn't copy that one either :)
From contributor B:
I don't like the short grain on the end of the drawer front and on the end of the drawer side. Because of that, I bet it isn't all that strong. You also have to assemble it by sliding down - makes it hard to glue. Drawer sides and fronts need to be the same height. In the end, I bet dovetails would be easier.
From contributor W:
I've not found this to be a weak joint at all. Glue surface is about twice the faces of the miter alone, engrain of the drawer side captured in the groove in the drawer face part of the joint. Simple to assemble, aligns perfectly if it is machined accurately.
It offers the advantage of wood grain all the way to the corner (as does the historic joint above) and is simple to set up in the router table (with a set of shop made setup blocks). Single step to machine both the drawer fronts and sides from single setup.
I also use this joint to join long grain to long grain for the vertical legs of Morris chairs and other Arts & Crafts furniture that need to have the ray fleck of quartersawn white oak on all four faces and visual mass as well. Makes gluing those up accurately a snap as well.
From the original questioner:
Thank you. I was able to replicate it with one dado setup (front) and 2 router (side). The front was easy, however it took several attempts to get the side right. Once I got the bottom in for a trial fit it seems to be fairly sturdy without any glue. I think I can save a little time with one 3/16 dado setup and two pieces of 3/16th Masonite on the fence.
From contributor J:
I may be showing my ignorance, but how does this joint get assembled without adding a chamfer or radius to one of the tongues?
From contributor K:
They have to slide in from the ends. That could make things a little difficult if you were trying to do a box or drawer with all four corners joined this way. You would have to slide both ends in at the same rate, or otherwise risk snapping some of that little short-grain tab off if you torqued it too much, especially with tight joints and a glue that wanted to grab too soon.