Multiple cut crown molding
Other Versions
Spanish
Handling such installations with accuracy. April 3, 2002
Question
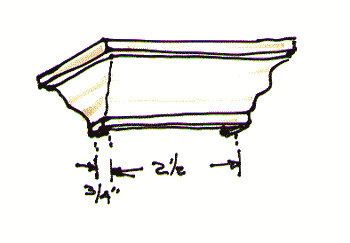
How do you handle installing crown molding where multiple cuts are needed? For example, where the continuous run goes around a piece of 2 1/2 x 3/4 trim. The crown has to stop, come out 3/4, travel 2 1/2, return 3/4, then continue the run. I battle just doing regular miters and getting a tight joint the full length of the miter. How are such small pieces handled with accurate cuts? What is the best order for such cuts - cope first and then cut the 45? How do you fine tune such a small piece of molding safely and timely?
Also, I am using a Dewalt 12" CMS, which I'm having trouble with as far as accuracy. I've toyed with a guillotine cutter, but making miter cuts and then slices (if it works as advertised) seems awful time consuming in the field.
Forum Responses
From contributor C:
If I understand the situation correctly, it looks like this:
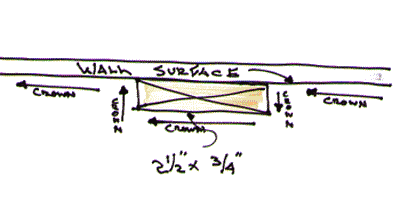
I'd first cut the pieces that wrap around the 2-1/2 X 3/4 trim, and assemble by gluing/nailing on the saw bench (sketch below). Then I'd install this, and fit/cope the other crown pieces to this assembled unit.
As for handling the little pieces, what I typically do is work with a long piece (say 2'), make the first cut, and when making the second cut, stop just short of cutting all the way through. Then I take the piece off the saw, and use a utility knife/handsaw/whatever to cut the little material remaining. Trying to cut all the way through on a small piece can make for some interesting missiles shooting around the site.
From contributor L:
Stopping short is a practice I employ. I don't pin the small ones, just glue and tape. If at all possible, try to cope the longer sections to the tiny ones. In the rare event that I need to cope and miter the same 3/4" piece, I will cope first and if it's a bit off, I will use an angle grinder with a 36 grit sanding disk to adjust it. I use a
DeWalt grinder to scribe everything. Rather than the big
DeWalt saw you refer to, try the non-sliding
DeWalt compound saw. I have two and they are on the money. Note: patience, patience.
From contributor A:
Why does everyone have a desire to cope crown? Cut the miters. A 28ga nailer will not blow up the small pieces. In darker pieces of molding, you will not even need to putty the holes.
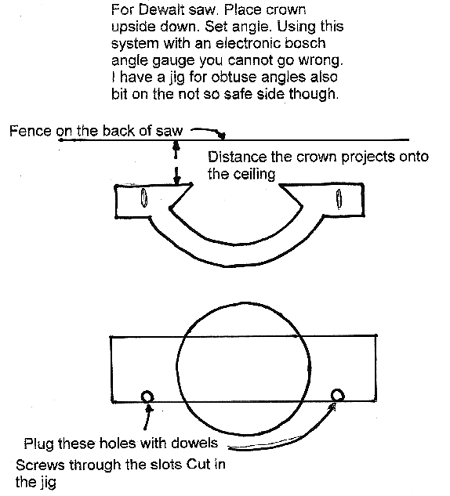
I use a crown stop on my DeWalt that I built. First start by filling the holes on the table with a large dowel tightly fit. Use a piece of 3/4" ply 8"x16" or thereabouts. Lay out the radius of the saw plat form, leaving the outside edges parallel to the fence. The distance the crown is from the wall is the distance the jig is from the fence. Turn the crown upside down and you can cut any angle you want too. Works great and is dead accurate.
I've installed a lot of small 2-1/2" pre-finished crown for an upper cabinet top(s) detail, and agree with the above - most of the time, I just inside miter the joint, and it looks great (the darker the wood, the better).
The problem often associated with using inside miters is that as the crown is drawn up tight during the fastening process, the joint opens up. I've found that using air nailers allows this to be a non-issue for smaller/darker crown, and saves a *lot* of time (compared to coping). Joints have to fit tight (so they don't open as they're fastened), but the fuss factor is nowhere near as high.
From contributor L:
I only use a compound miter cut when it's too big to flip over and chop that puppy up. Coping is a matter of preference on the small stuff. I almost never install small stuff, but personally I would not cope 2.5" stuff. I would have an apprentice put it up. Coping is faster, better and easier on the big stuff - coped corners never open up. I threw my crown stop up a tree. I prefer to draw lines on the bed of the saw and shoot from there.
Something I've found works well: on inside miters, back cut them. This really helps when you have a poor taping job. Got to agree that pre-building poput wraps is the only way to go.
From the original questioner:
I picked up an Accuset pin nailer the other day. Boy, that tool made one heck of a difference. I was able to cross pin all the crown work, and the pins are nearly invisible. Kept the joints super tight while the glue set. It's quite a dangerous tool, as there is no lockout on the nosepiece. You pull the trigger and it fires. I was shooting through red oak into red oak, and had one jam all day, which might have been caused by a screw underneath. Used 3/4" and 1" pins with no problems.
Sounds like you have the molding covered, but I would like to comment on the
Dewalt saws. It is not the saw that gives a bad cut - it is the blade. You can have the saw set up perfect, but if you do not have a good blade you will not get good cuts. This goes for any brand saw. I have both
Dewalt compound miter saws, sliding and non-sliding. I use 12" Forrest Chop Master blades on both saws. The blades give excellent cuts. The only problem is I have never found a local shop that can sharpen the blades as good as Forrest does. I have to UPS them back to Forrest, but they come back as good as new.
From the original questioner:
I have a Freud blade on the saw. It's a thin kerf blade, which I am not too wild about. I think they are more prone to deflection. I have Forrest blades on my table saw, and they are quite impressive. I guess I should put a decent blade on the
Dewalt CMS.
I have a Freud blade on my
Dewalt slider and it works great, 80tooth, heavy blade no deflection. Thin kerf blades just aren't rigid enough to make good miters.
I cope small pieces before I cut them to length, cut the inside miter, pull the measurement cope the inside miter then cut the piece to length. Sometimes you have to find your finished piece in the scrap pile under the saw table, but it's worth the trouble.