Optimizing CNC Joinery for Assembly Productivity
Matching your joinery and assembly methods to your equipment can simplify your operations and boost efficiency. March 12, 2015
Question
I'd like to revisit this as we get closer to setting up our first CNC. I'd been told to cut blind dado's for faster assembly. Not for cabinet joints being strong but simply to speed up assembly and reduce errors since the assembly man will have pre-made notes and slots that everything goes together on. No more time-consuming jibs and checking measurements with the tape measure and sometimes they are put in wrong. We don't have edge boring and so cannot edge bore panels for alignment with confirmats. Then I was told that blind dado's take more time on the machine than it's worth - to have the assembly man use jigs and measuring to place drawer rails, mid-point partitions and fixed shelves and such. What do you guys think?
Forum Responses
(CNC Forum)
From contributor C:
I think you ought to get as much out of the CNC as you can and take off only parts that need the absolute least amount of work to go to assembly as possible. We use dowel construction and bought a used lobo 23 spindle for $1800. That does our horizontal boring for us.
From Contributor D:
Ditto on the used boring machine but I use confirmats. I even drill the 1/8 screw holes in the backs on the CNC. Anything you can do on the CNC is better.
From contributor B:
You also have to consider at what capacity you will be using the machine. If you are running the machine three hours a day taking a little longer to machine if it saves you in assembly is a good deal. I would get a boring machine and rethink your operation.
From contributor S:
I would agree that unless your CNC doesn't have time available use it to do as much as possible. We use CNC for blind dado, hinge and slide holes, 1/8" pilot holes for screws, etc. You will need a system or standard so assemblers know which way the tenon goes if not at the edge of part (i.e. tenon up, tenon left). Otherwise he can put the part in wrong unless you use varied insets on your tenon to make that impossible. We did recently stop using blind dado for back joinery. Favoring plant on 1/2" backs mainly because of better yield due to side panel not being full 24D on Euros.
From contributor B:
We recently got our first nested machine and I thought things through very carefully like you. I would not commit too much until you have the machine and work with it. It will change your thinking (in a good way). They are so accurate that you can do things you would never have considered. I may have missed it what machine and software did you get.
From the original questioner
Weeke Optimat BHP 200. We are running CV now, got their mid-range screen-to-machine.
From contributor M:
Although I use conformant now, blind dados are an excellent and widely used option for casework assembly and CNC. It saves you the horizontal borer, which for a small shop can be a considerable expense. With Cabinet Vision, Cabinet Ware, Mosaic, Microvellum or any other major software package it will be supported. It is a versatile method and people do it in different ways. I would suggest looking into a "skimmed tennon method" where the portion of material that goes into the dado is skimmed from 3/4 to say 5/8 or 11/16. This keeps all of the tennons precise without regard to variations in sheet thickness and provides some open glue area in melamine or p-lam construction. I would also recommend a pair of 5mm holes in each stretcher and a series of 5mm holes on decks and tops to accept a drywall screw, others prefer staples.
A rule of thumb is, small to medium volume, blind dado. No extra equipment, versatile and fairly quick cutting and assembly. Medium volume or highly custom: Confirmat, adds a horizontal borer. Very high volume with ability to stack cut sheets and lots of multiples: beam saw point to point and dowels. No horizontal borer but adds a case clamp. Many other variables to consider here, and no one answer is right for everyone but I think you are right on with blind dados starting out on this CNC road.
From contributor F:
Contributor M is spot on. We have been doing it like this for several years and wouldn't have it any other way. I think we will add the pre-drilled holes in the top stretchers for attaching countertops - great suggestion.
From the original questioner
We were planning on blind dados then had an issue with the bottoms of the uppers where the bottom goes into the ends. We were going to use laid-up panel for the bottom (with a groove on the top of it for the 1/4" back to drop in) and it would blind dado into the bottom of the end. The bottoms of the ends were going to be edgebanded before assembly - so we would have a finished product on the bottom after assembly. We'd only have to PL the finished ends over the staples/confirmats. How do you do a blind dado on the bottom of the ends and have it not mess up the edgebanding? How do you do that joint?
From Contributor W:
The blind dado stops about 3/4 - 1" short of the end.
From the original questioner
I understand it stops short of the front but the bottom of the end piece would have what amounts to a rabbet on it? The rabbet would stop short of the front as noted, but the bottom edge would be the rabbet. This would mess with the edgebanding, correct? The front edge of the end is good but the bottom edge is the issue.
From Contributor W:
On bottoms and tops the dado is .375 and is set up .375 from the bottom of the side (or down .375 for the top) same for the bottom and top parts.
From the original questioner
We'd thought of that but if we do that we are machining both sides for the bottoms and we'd have to flip the bottoms on the CNC because we are also grooving the tops of the bottoms for the back to drop into. Correct? Or how do you do it?
From Contributor W:
Your cabinetry cam program should tell the code which is a top and which is a bottom. How are you producing the file?
From contributor S:
To the original questioner: Yes, if you continue to build that way. We avoid flip ops as much as possible. And have that mindset when deciding construction method. What thickness back do you use?
From the original questioner
I don't know how the program works. I assume it does or could know the difference between the top and bottom of the piece. My concern was to avoid flipping the parts on the machine.
From contributor S:
To the original questioner: After reading your earlier post more closely the bottom (deck) of a wall cabinet (assuming it is aligned with bottom edge of the sides) would need the tenon up. This would require machining of the tenon from the bottom. You could groove the top of the deck (for receiving your 1/4" back) as a flip operation or, probably easier, on a saw. You'll have to weigh the pros and cons of your method. We build a plywood box and decided to go with a 1/2" back which is edgebanded on the bottom like the bottom of our sides. That gave us no flip op, no secondary saw op, no need for mount bars/rails and more interior depth, etc. On jobs that require a more finished bottom we add a finished bottom in the field. The tenon must be set back enough so that the "eye" (sensor) on your edgebander does not detect the tenon. Otherwise it will not trim the banding correctly. We use a 1" setback.
From Contributor W:
My fellows cut the top short, the dado is set in .75-1" and nailers are behind the back. The back slips in from the top. I never had a client complain about the top of a wall cabinet.
From contributor M:
To the original questioner: This is exactly the sort of analysis that you need to do before committing to one method or the other. I would also do a few test cabinets as part of your planning. One bit of advice: don't let things that seem difficult to do at first worry you too much though. Sometimes the software can make them easy when you have a routine. There are a number of ways to solve any problem, all of which come with tradeoffs. I don't see a clear method to use blind tenons with no second ops and single thickness bottoms (unless perhaps you edgeband the bottom of the backs - more tradeoffs). You could allow limited flip ops (not so bad with pop up pins and CV to write the program for you). It�s a little confusing at first, but just like sleep walking after the 100th one. You could use applied finished ends and/or bottom covers for uppers. This uses the same material for the doors and makes for no oddball layups for different material inside and out on a cabinet. Or use a different assembly method. I am sure the people here could come up with ten other choices too. Only you can decide what is best for your particular equipment, software, volume and shop layout.
From contributor C:
To the original questioner: Great questions you are asking. We did the same on building boxes and post laminating the finished ends. I was even building with confirmats and dowels at the time. Well, after some time and trying to get faster for the finished end wall cabinets we went to dowels only with uppers and glue them together. On the bases, we pocket screw the finish ends on. I am also using laminated sheets with white liner on one side and the laminate color on the other side. We also are using finished bottoms on the uppers.
As the volume at our shop increases, we are ready to add an automated doweler and were just approved on the loan yesterday. No we do not have a case clamp yet, we just rotate a lot of bar clamps. On the software side of things, we are building our libraries and constantly add a method of a certain build or materials, and it's working out great. Don't forget the software is based on the hierarchy of materials, their sizes and their thicknesses.
So if say your back is a 1/4" back and you want the dado to be a little bigger, I would tell the software you are using 9/32 as a thickness. If you are using a 3/4 hanging nailer behind it, tell the software it is 13/16 and the cabinet will hit the wall first. There are a lot of idiosyncrasies, so post the questions and we can all benefit. By the way we are making some medical cabinets out of phenolic in the morning that is blind dado construction. Some of the answers of your questions have answered or clarified mine.
From contributor K:
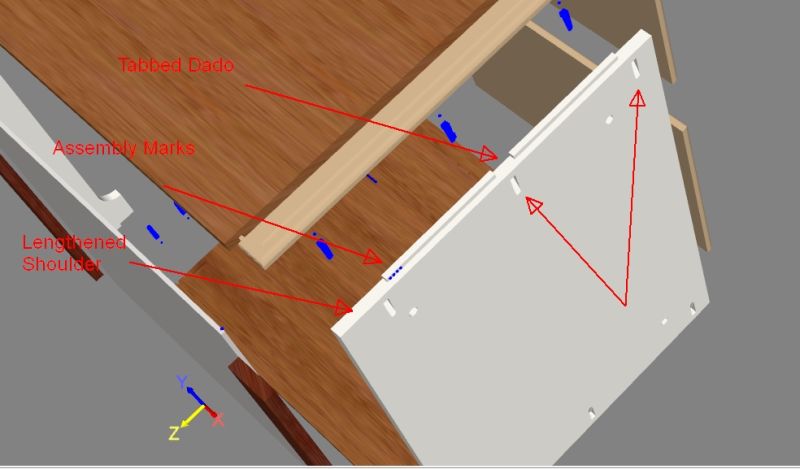
We have been using blind dado construction (actually Thermwood's Lock Dado) for about three years. This is mainly for ease of construction. Thermwood's lock dado is like a blind dado but places tabs in the joint where a KD/RTA fitting or in our case a pocket screw hole can be placed and still have some meat to screw into. With a recent update to eCabinet Systems software all of our Pocket Screw Holes are now cut on the CNC. The Thermwood joints are unique because they place assembly marks on the joints. Anyone can build the cabinet because you simply place the tongue with three dots in the groove with three dots aligning the marks.
You don't need to know what the cabinet looks like or what part you are placing, just follow the dot patterns. Cabinet sorting is also streamlined because the Thermwood control color codes all labels so you don't have to look at the cabinet name or number, you just place all the labels with a red diamond together and all the cabinets with two green dots together and your cabinets are sorted. We also used some tricks to make things fool proof like increasing the back left shoulder on all parts like decks, tops, and fixed shelves so that part cannot be flipped upside down even if an assembler ignores the assembly marks.
Click here for higher quality, full size image