Planing Short, Thin Stock
A woodworker finds out why his planer's manual warns against planing too thin, or planing too-short pieces. It's doable, but risky... August 21, 2006
Question
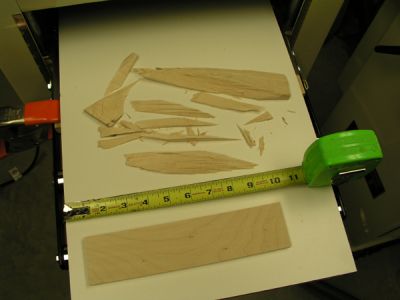
I own a Jet 13� planer molder, model JPM-13CS. The manual states, �Do not plane any pieces of lumber that are shorter than 14� in length or thinner than ��, or serious injury could result,� but it doesn�t tell you why or what the consequences would be if you busted their minimums rule.
Now I�m all about avoiding serious injury, so should I plane a couple pieces of soft maple that now measure 9� x �� down to 9� x ��, or band saw them to near �� thickness and then sand, and sand, and sand, and sand to get them close?
The infeed and outfeed rollers are 6-1/2� apart, so it seems to me like the planer would be able to grab and hold the piece, and it appears that the bed would raise up high enough to plane close to the �� thickness I need without the planer knives contacting metal. Any recommendations?
Forum Responses
(WOODnetWORK Forum)
From contributor L:
I have a Jet 15" and I regularly plane down to 1/4". You can put pieces smaller than 14" if you run them end to end butting one to the other. They are just covering their butts. Just remember, don't go calling Jet when something goes wrong after you ruin something while planing at 1/4". They will just refer you to your manual.
From contributor M:
Just be careful! I was planing some hickory once and I ran two short pieces end to end as we have all done, but the second piece (about 8" long) kicked back out of the planer and hit me in the thumb. It turned purple almost immediately, and for a few minutes, I thought I had broken it. As a result, now even on longer boards, I don't stand directly behind it.
From contributor D:
Since it's maple and short, saw and sand it. You might put a 9" board in and get a 6 and a 3" out, or worse.
From contributor K:
I have a Ridgid 13" that has a minimum thickness of 1/8" and I've planed to that thickness. I've learned through trial and error that if you try to plane a piece that is 3/16" thick to 1/8", it vibrates and breaks inside the planer. But if I plane in 32nd or 64th increments, it's fine. Keeping the blades sharp is helpful. The length is determined on the distance between the feeders. If you put a piece that won't reach the second roller before it passes the first, oooh boy. Again, though, if you run two at the same time, the second one pushes the first through. I always plane my stock while it's long, then cut to size. For some reason, the blades seem to dig in at the end, causing a bump, which, if you leave it long, you can cut off when final dimensioning.
From contributor F:
Here is the key to planing thin material successfully: An auxiliary planer bed board. A bed board will improve things 100 percent and almost eliminate the snipe that occurs when planing thin stock.
With my planer, I can plane to somewhat less than 1/8". Thinner than that and wood tends to blow apart in a planer. Grain direction will also play a big part in successful thin planing. Also, end to end (butting) feeding of your pieces is best when possible.
A flat piece of 3/4" melamine cut to a width and length to fit your planer's bed works well. Size it to include a hook. The hook is a wooden cleat screwed to bottom face of the infeed end of the jig and catches on the front edge of the planer's infeed table so it stays put without the need for clamping.
On the matter of kickback, the only time I have had it occur is while planing two or more boards with a substantial difference in thickness. The thicker board will hold the spring loaded feed rollers up off of a thinner board and allow the knives to push the thin one backwards. I think I only had this happen once in 30 years and I was not injured.
From the original questioner:
Thanks to all who responded! I think I'm going to try the back to back feed method combined with the auxiliary bed.
From contributor L:
One other thing. Use a sacrificial board as your last piece in the planer. Something that is plenty long enough so that it won't cause any problems. This way it will push the last board out without any problems. Start it off at the same thickness as the rest of your boards and when you are finished with the run, you can use it for testing any setups you need to make without using your good stock.
From the original questioner:
Will do, and thanks!
From the original questioner:
Well, live and learn. I guess the JET people really did know what they were talking about when they said no pieces shorter than 14 inches. After resawing my � inch stock to ~3/8 inch thickness, I ran both pieces through the planer end to end. The first piece started tracking crooked and the planer just chewed it to pieces. I guess I should have called this thread "How to use an expensive tool to make kindling." A sanding we will go, a sanding we will go, heigh ho, the dairy-o, a sanding we will go. Or maybe I�ll just use plywood and be done with it.
From contributor L:
I have done 1/4" thickness enough and never had that happen. I don't use an auxiliary table and I can do 9" boards. Maybe your planer/molder is set up different than a standard planer.
From contributor L:
If you put a couple of boards parallel to each other spaced the same width as your pieces and used them as a guide, you wouldn't have the problem with your boards skewing sideways.
From the original questioner:
Special setup? Nah, I don't think so. Infeed and outfeed rubber coated rollers, with a cutter head and three knives in between. I did make a new melamine bed for underneath, and that sucker is really slick. Maybe it contributed to the wayward track. And I did think about adding a couple of runners or guides tonight after the blowout. I'm just getting tired of spending most of the day in the shop, and not making much progress. I did finally get around to making a jig for resawing, which I've been meaning to do, so it wasn't a total loss.
From contributor D:
The best way is like contributor K said - sacrificial length (where kindling should come from). If you need two 9" pieces (finished length), then you should be planing one 20-24" (minimum) piece. Make two 9's later.
Can't even try to argue the wasting wood theory cause it won't hold water. You can always cut it shorter but you can't cut it longer. If you do have snipe, you'll cut the number of sniped ends in half this way. If you need two 12" parts, rough it out as one 24" part. Very simple money making, time and wood saving method. When I rough out lumber, I try to add at least 8" extra, preferably 12". This allows for greater flexibility, eliminating defects caused by machining. And if your rough cut list calls for 3 30" parts and 3 15" parts, for god's sake, make 'em all 30". Cutting to length should be the very last operation when possible. I can't stand to see a project ruined from the start.
From contributor F:
If you can, use a 20" long piece next go round and cross cut it after planing. Also, before you resaw, flatten the board on the jointer if you have one. This will allow you to find the grain direction along with making it flat.
I plane stock to just under 1/8" thick all the time. If you plane with the grain, you should be able to plane 1/4" all day long without it tearing up. It is also important to plane right away after you resaw. If you let the material bow, and then put it into the planer convex face down, it is limber at close to a quarter inch and after the first end passes the first feed roller, it will rock up into the cutter head and be destroyed (especially if it is fairly short).
If the stuff is bowed and quite short, the best you may be able to do is plane the convex face.
And last, yes, if you ran the stuff over an unwaxed MDF bedboard, I think that's why it didn't feed straight. Wax it, use melamine and wax that, or laminate with plastic laminate and wax that.
From contributor J:
What wax in particular do you use when you wax your melamine or laminate for this process? I've never been sure what brand/type of wax to use for this type of thing as I don't want it to ruin any finishes. I guess I've always just used a
Minwax natural polishing wax and then buffed it out really good.
From contributor F:
I use Trewax brand paste floor wax on all tables, fences, jigs, etc. Basically the same as your
Minwax, I am sure. Any paste wax that contains no silicone is fine. Let it set up and buff it out.
I know some people subscribe to special preparations sold for saw tops and such, but for me, this works fine and keeps my parts sliding nicely and a can of wax lasts me a couple three years.
From contributor J:
Same stuff (silicone free paste wax) is good to use on your machined cast iron or cast steel tool surfaces instead of the expensive protectants in a spray bottle that they sell, right?
From contributor D:
Spray stuff goes on easier when the machine is running, though. Machine running = $$$ (sometimes).
From contributor F:
Yeah, contributor J, that's what I am saying. I use paste wax for all steel tool surfaces to ease friction. In most operations, there are multiple things that need to be done. So while the wax is setting up on the saw top, I just do something else for a minute and then come back and buff it out. I usually apply wax to the tablesaw's fence and table, then the planer's bed, then the jointer's bed and fence. When I finish putting wax on the jointer, the wax on the saw is ready to buff. This kind of reminds me of guys you meet in cabinet shops who stand around and wait for contact cement to dry. I tell them to get to work or else go pick up their last paycheck.
From contributor J:
I waxed up my jointer bed last night and buffed it out, as it's been quite a while since I did it. The first board I ran through I just about went flying forward, it slid through so much easier. I'll have to put "wax machined surfaces" on my list of things to do monthly. The smoothness wears off so gradually that I just never bother to notice until I'm fidgeting while some glue dries or some shellac is dissolving.
From contributor L:
Contributor D, I think the newfangled slip agents are overpriced and don't last nearly as long. As contributor F said, his $3 can of wax will last years. Mine is going on 3 years and I have more than a 1/4 can left. And it will last longer on the machine. You can't wait the one minute it takes for the wax to set up?
From contributor F:
I might just have to switch to
Minwax if you only need to apply once a month. I think I wax mine daily when I am face jointing and planing a lot of stock.