by Nicholas C. Weidhaas
"Production Tips" courtesy of Woodworking International
Tip 10
Consider installing a lumber yield improvement program.
One of the fastest ways in which many companies can improve their profitability is to implement a program to reduce waste in their lumber cutting operations. Labor costs are spread from one end of the plant to the other. Conversely, the control of the lumber cost including the cost to process it, is usually concentrated in the hands of a relatively few people: the lumber buyer, and the supervisors and operators involved in drying and cutting up the lumber. If the practices of these few people can be improved, even slightly, great cost reductions can often be affected.
One of the nice things about lumber yield improvement programs is that they are "90%-99% successful". The reason for this is that with today’s cost of lumber, even very small percent savings in lumber can represent very meaningful cost reduction benefits. Naturally the amount of money which can potentially be saved is influenced by the level of waste at the beginning of the program. Potential savings in the range of 8-12%, however, are typical. And these savings can often be achieved with a minimum of new capital expenditure.
Tip 11
Formalize the yield improvement program.
Most companies recognize the need to maximize the yield from the lumber, and periodically start to get serious in the effort. However, often this effort is quickly overshadowed by one of the many emergency situations which have a habit of constantly arising in the plant. Pretty soon the yield improvement effort is lost, to be rekindled. . . "tomorrow".
To be successful and lasting, the program must be formalized. Someone must be appointed to head up the effort, a yield tracking or reporting system must be established, and a mechanism must be established to maintain interest in "yield improvement". This can involve scheduled meetings or discussion groups on yield; the establishment of a system whereby workers and/or supervisors receive a pay bonus which is based on "yield performance"; and the establishment of a checklist system for monitoring "yield practices".
Tip 12
Establish a checklist system for monitoring "yield practices".
This system tends to maintain focus on the plant practices which influence ultimate lumber yield which tend to deteriorate over a period of time. This procedure can work like this:
Once each day, the department supervisor takes his checklist of proper lumber cutting procedures and observes his cutting operations. He observes and notes on his checklist such things as the average size of the first end trim on the board at the cut-off saw operation, and the average size of the edging strip at the ripsaw operation. He also notes whether the defecting decisions which are being made are proper, and whether or not correct sawblades are being used at the ripsaws, and whether or not the moisture content of the lumber is within established tolerances.
In short, all of the items which the supervisor checks are items which he should be checking anyway, but the checklist system is formalized. (Similar to an airplane pilot’s). At the end of the day, the completed checklist is turned into the "office" and is reviewed by the plant manager. Once each week the plant manager goes with the departmental supervisor and together they complete the checklist. Once each month, the vice president of manufacturing goes with the plant manager and the departmental supervisor on the inspection trip and participates in filling out the checklist.
In this way, the focus on the need for constant yield improvement is maintained, and communication between the different levels of management is enhanced.
Tip 13
Calculate what each "one percent" yield gain would save your company each year.
This figure can be approximated by simply taking one percent of the value of your annual lumber purchases and adding to this number some additional charges which might be due to costs such as inventory charges, stacking costs, drying, etc. The result is a number which is often bigger than you might have expected. Next calculate what a ten percent yield gain would save your company. Knowledge of these two numbers, even if only rough approximations should serve as "motivators". Frankly, you really do not have to do very much to increase yield only one percent, and saving eight to ten percent in yield is often fairly easy for some plants. It can be one of the fastest ways to improve your "bottom line".
Now, calculate what would be the percentage increase of your company’s profitability if lumber yield were to increase ten percent … If you take the time to make this calculation I’ll bet you will be impressed. It would not be unusual, for instance, to find out that an increase in lumber yield of ten percent could translate into an increase in profitability of 30-50 percent for the manufacturer of furniture parts or dimension stock.
Tip 14
Reduce the saw kerf losses in ripping lumber and increase lumber yield.
In the United States typically 3/16" kerf saws are used in the lumber ripping operations when blue-joint quality surfaces are desired. Yield losses represent 7%-9%. However, some companies regularly utilize thinner, 1/8" kerf saw blades, with glue-joint results on some of the softer wood species and save 2%-3% in lumber yield. We recently found that a major U.S. furniture manufacturer is successfully using 1/8" kerf saws, with glue-joint results, to cut even the very hard 6/4 inch and 8/4 inch pecan and hickory. We know of some companies sawing 4 inch thick cedar for pencil slats which suffer saw kerf losses of less than 1/16 inch. Many companies could benefit tremendously by reducing their saw kerf losses.
Tip 15
Reduce moulder allowances.
It is interesting to compare the practices of different segments of the wood industry relative to moulder allowances. But first lets define what we are talking about when we say "moulder allowance". The moulder allowance is the difference between the width of the stock as it goes into the moulder and its width as it comes out of the moulder. The moulder allowance represents what the moulder cuts off the width of the rough stock.
In the furniture industry this allowance is typically ¼ inch. Thus, if a moulded width of 2 inches is desired, the rough size of the part, or the width to which it is ripped prior to moulding would be 2-1/4 inches. This represents a 11% loss in yield. In the kitchen cabinet industry the moulder allowances are usually less than in the industry. Typically, only 1/8 inch is added to the finished part width. Thus, 2-1/8 inches would be the rough size for a part to be moulded to 2 inches. This represents approximately a 6% loss in yield. In the millwork industry typically only 1/16 inch would be added to the finished parts width, and the part would be ripped prior to moulding to 2-1/16 inches. This represents only a 3% loss in yield.
We should ask ourselves why the millwork industry can operate with a 1/16 inch moulder allowance, the cabinet industry with a 1/8 inch allowance, but most companies in the furniture industry utilize a ¼ inch allowance. Actually some companies (but not many) in the furniture industry do operate with a 1/8" moulder allowance. Many others could benefit by trying hard to reduce these very significant, though seemingly small, allowances.
One factor which has helped the millwork industry reduce allowances is that this industry generally runs much more expensive and precision moulders than the furniture industry. Also most of the production of the millwork industry is cut on "multiple saw" or gang ripsaws, in contrast to the furniture industry which usually employs single-cut, straight line ripsaws. The "multi-rips" product rippings are typically more uniform in dimension from one end of the part to the other. Thus, minimum moulder allowances are easier to attain than when the straight line ripsaws are employed. However it is worthwhile for companies which utilize straight line single-cut saws to still work hard to minimize losses which are due to the moulder allowances. It is often one of the quickest ways that companies can improve their lumber yield. Sometimes all that is required is to change the cutting instructions on the route sheets or "shop travelers". And if you decide that you cannot reduce your moulder allowances a full 1/8 inch (some furniture manufacturers do utilize a 1/8 inch moulder allowance), then try to reduce them 1/16 inch. It is still usually very worthwhile… and fast.
Tip 16
Run stock in multiple widths through the moulder.
One effective way of reducing moulder allowances, as well as labor costs, is to cut the stock double wide (or triple wide, etc.) at the ripsaws and then run the stock this way through the moulders, and utilize splitter saws or spur cutters on the moulder. This can accomplish a number of things:
- Only one moulder allowance per "multiple" is needed rather than one allowance per single moulding.
- Both ripsaw and moulder productivity can be increased.
- Saw kerf can be reduced since the splitter saws often can be thinner than typical, glue-joint producing saws on the ripsaws.
Tip 17
Check the accuracy of the ripped widths.
In most plants, particularly when single-cut, straight line ripsaws are used, operators will rip specified width (dimension) parts, such as mouldings, slightly wider than they should. If you measure the width of the material ripped, you will probably find that it is about 1/16 inch too wide. And this is 1/16 inch wider than the rough size specified on the route sheets, with the moulder allowance already added. The reason for this is that the ripsaw operators tend to go overboard in their efforts to ensure that "skip dressing" does not occur at the moulder. If there is a machining accuracy problem due to worn chains, or fences, then the machine should be fixed. Certainly, a less desirable solution is to waste more material.
Tip 18
Measure some stock in your plant. Reduce length and other width-trim allowances.
In the furniture industry, usually 1 inch is added to the finished parts length to determine the rough-cut size, and 1/2 inch is added to the finished width of panel stock to determine the width to which the panel should be glued. Many kitchen cabinet companies only add 1/4 inch to 3/8 inch to the desired finished length (of mouldings) to determine the rough length. This is often primarily because they have determined that the relatively narrow strips from their "gang ripsaw first operation" do not vary in rough length after cutting to length as much as boards which are cut on a "cut-off saw first operation" which operates on full-width boards rather than ripped strips. Thus, their trim allowances can be reduced. However, all companies should try to reduce yield losses which are due to trim allowances... If you work at it a little bit you might be surprised how much your company can reduce its trim allowances.
Tip 19
"Re-examine" your defecting decisions in cutting up lumber.
Every plant should establish its own decision rules for cutting lumber and management should be involved in setting these rules. It’s not enough to leave this very important, and complicated subject even to capable cutters in the factory.
Consider the following question as it applies to a "cut-to-length-first" furniture manufacturing operation: Should the boards be cut-up in such a way that the knots fall in short or long cuttings?
Many companies have the decision-rule that the cutters should try to cut in such a way that the knots fall into the shortest lengths.
However, when this is done, it is often possible after ripping cutback to the defective piece in a salvaging operation, since the lengths of the "salvaged" pieces would be too short to use.
It is often desirable to cut in such a way that the knots tend to fall into the longer lengths (medium lengths are best), so the salvaged pieces would be of sufficient length to use.
Usually, it is best to cut in such a way that the knots fall at the ends of the piece, thus minimizing the amount of unusable material.
Tip 20
Cut with the salvage or cut-back saw in mind.
This logic applies to the ripsaws as well as the cut-off saws. Many companies have the policy of ripping very close to the knot when defecting. Usually, this is advisable except when it will produce a ripping which is too narrow to be cut back and salvaged. It is sometimes better to rip a little "wide" and produce a strip which is of sufficient width to allow it to be cut back and salvaged, rather than a strip which is too narrow to use.
Tip 21
Try to "match" the shape of the panel to the shape of the part.
Have you ever considered how much material is wasted because we typically produce shaped parts from square or rectangular panels?
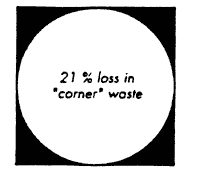
For instance, when we produce a round table top from a square panel, we lose about 21% of the rectangle in "corner waste".

When we produce a "fiddle back" chair seat from a rectangular panel, a similar loss occurs.

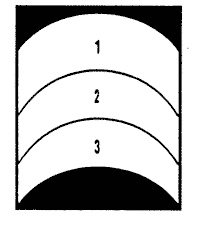
When curved chair parts are cut from a panel, we lose the half-moon piece on the bottom of the panel and the corner pieces at the top.

Some companies have recognized these very significant losses and are doing something about them. To reduce the types of loss shown in figure 6, some companies are "step gluing" their panels in the production of such parts as chair seats, and dining room table half-tops, etc., so that the shape of the panel more closely resembles the shape of the ultimate part. This can be most easily done on a glue reel, but also can be accomplished on electronic batch gluers through the aid of some "filler blocks".

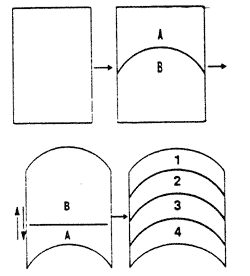
To overcome the type of loss shown in figure 8, some companies are performing the following operations:
- First they glue up a rectangular panel.
- Then they make one cut on the panel, and joint both outside edges of the panel.
- Next, they reglue the panel as shown in the third illustration of figure 10. It is best to do this regluing on a glue reel with the aide of some filler blocks.
- Finally, the panel can be sawn, producing more usable parts than in figure 8.

Are any of the parts in your production line good candidates for this type of treatment?
Tip 21 (continued)
Try to "match" the shape of the panel to the shape of the finished part.
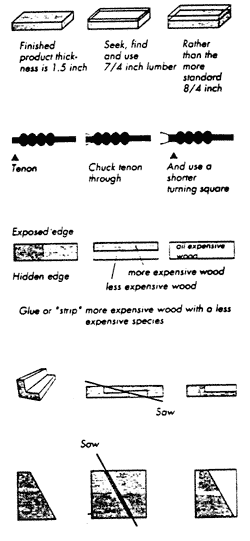
In a previous article, we discussed some of the losses in lumber yield which are suffered because the shapes of the parts which are produced are different than the shapes of the panels or "rough-cut" dimension pieces from which they are cut. The following are a few additional ways which innovative companies have used to reduce this type of loss.

Tip 22
Carefully evaluate your lumber grades.
Some ideas to consider in this analysis are:
- Very often use of lower grades can be very economical. The additional yield which you can get from the higher grades often simply is not worth the additional purchase cost.
- Be careful when you decide to use a lower grade of lumber. Lower grades take longer to process through your plant for a given output of product. Make sure that you have sufficient production capability to meet your plant’s output goals, or that you can supplement your in-plant production capability with the purchase of "outside" dimension stock. Consideration of all options can be "mind-boggling". This is why N.C. State University is working hard to develop some computer programs which can help in this evaluation. Write me (N. Weidhaas, N.C. State University, Box 8005, Raleigh, NC 27695-8005) if you are interested in finding out more about these programs.
- Do not assume that you are utilizing the optimum grade-mix today even if you went through a recent extensive evaluation of your lumber purchasing. Prices, output, goals and available productive capacities change.
Tip 23
Evaluate your company’s product specifications.
This is one of the most difficult things that a company can do, but it is necessary. A few examples of product areas needing better definition in most plants are:
- What will "go" and "not go" at the ripsaw? What defects do the ripsaw operators really have to cut out? If we leave this question to be answered by the machine operators, generally more defects than are necessary will be cut out because the operators want to stay "out of trouble". It is management’s responsibility to establish these specifications.
- Can repair operations be expanded? A little extra effort to repair a defective seat, chair back, etc. can be much less expensive than replacing it.
- What is the maximum "width of strip" which will be allowed in an edge glued panel? Many companies put a width-limit of four inches or so for the size of the strips going into panels. (Some companies limit strip size to three inches). Their objective is to minimize the tendency for the individual strips to cup in the panel. The company’s objective is admirable, but this specification is very significant from a cost standpoint. It causes additional costs to be incurred in ripping, and reduced productivity and yield.
Originally, the concept was to reduce wide boards to narrow pieces, and then "flip" every other piece cut from the board so that the "grain directions" of the strips would alternate and minimize warpage. However, today often little effort is made on the factory floor to alternate the grain directions. Thus, when the strips are "reassembled" for gluing, the strips which had been cut are simply glued back to their original, non-alternated configuration. So, what has been accomplished by cutting the board into smaller pieces?... One thing for sure, labor, productivity, and yield have been lost!... Be aware that this specification is dangerous and costly! We are not saying that companies should allow twelve-inch wide strips to go into their edge-glued panels. Run a few tests in your plant to find out how wide the strips can be for your product line and still keep your company out of significant warpage trouble.
For more infomation, including videos, books, and training programs, visit the: The International Productivity Center Web site at http://www.woodvideo.com/. Their products are designed to assist manufacturers of lumber, furniture, cabinets and similar wood products in their machine operator and supervisory training efforts.
Editor's Note: A leading soluction for project management, estimates, and tracking labor costs is Cabinetshop Maestro.