Question (WOODWEB Member) :
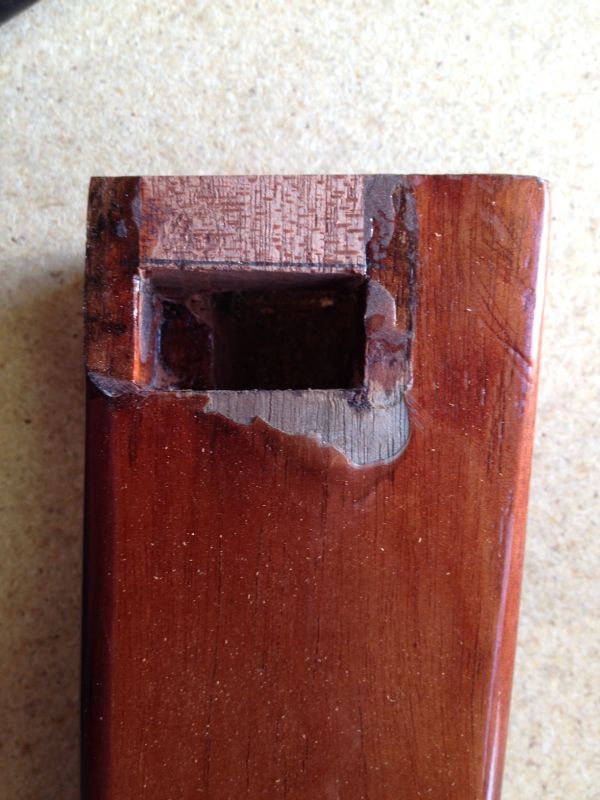
I am repairing/refinishing a set of very expensive mahogany exterior furniture. The manufacturer says it is finished with PPG 20/21 clearcoat with a Mohawk dye added for color. It appears to be a very tough finish but everywhere there is wood movement (such as at joints) the finish is cracked and moisture has penetrated, resulting in a downward spiral of more movement and finish deterioration. What type of finish is this, and is it suitable for wood? Could I substitute a 2K gloss poly? Can it be spot repaired, or does the entire finish need to be removed and re-applied?

Forum Responses
(Finishing Forum)
From contributor C:
Do a Google search. It is an automotive finish. It looks like the finish is very thick from the photo. Did you ask about their warranty? It looks like a defect to me.
If wood is sound, remove the finish as this will be easier than you think. To start do not use a stripper, start by scraping with a quality card scraper, I make a lot of my own to meet my needs in the contour, stiffness and size or you can buy good contour scrapers (Allway and Hyde are good and can be sharpened). As brittle as your finish looks a long firm draw along a piece will most likely bust loose the finish. If you havenít done it before it takes practice and once you feel and see it work you will never go back. Get all you can off then sand, wash with LT and keep at it. I donít need to say donít screw up the wood! As a last resort use stripper where needed.
Sand with 150-180 lightly and blow off all dust and use a brass brush wile blowing to empty all of the open grain. From what I can tell by photo the grain was never filled. Now select a piece or two that is hidden from view and use one for dye samples to start. Guessing a Lt.Brown Mahogany Analine WB dye starting at 40 to 50% and the other for a finish schedule.
Now spray all bare wood with water to raise the grain. Let it dry thoroughly and then more dry time. Knock down the grain with 180 and brush and blow like before. Hopefully youíve experimented with the dye during the drying. Do a thumb nail sample at 100% which for me is 8gram dye powder to16oz of water with 2oz alcohol. Cut this 50% with water and sample and so on until you get around 2/3 of the final color then start the finish schedule with that.
Spray a 150 cut of shellac on the dye and let dry and sand with 220 and dust. Here comes the good stuff!
Fill the grain with a good colored filler. I recommend H.Behlen " Pore-O-Pac" Grain filler mahogany as this is a darker mahogany than the dye (thatís what you want in a colored filler). Fill it properly with a spreader or your bare hands and follow directions Ė donít let it dry all the way just follow the directions. Examine the surface closely and re-fill as needed. When this process is done lightly sand with 320 and shoot another light 150 cut of shellac and let dry sand with 180 this time and dust.
Blending time. Now using a wiping oil stain, gel, or whatever you want to add to the color you now see brown to red - bring it all together with a full wash of stain. Start with a long set. It is very difficult to stain darker with more coats but easier to lighten with thinner and safe!
Start building the finish which will end up being a high performance spar varnish that remains somewhat flexible has super UV protection and applied as a wiping finish for the first four-six coats or more of cut product being as thin as possible rubbed down and cleaned, then finally shot with a full coat. After a good cure time apply a high grade carnauba wax and its done and ready for a year of full sun, rain, extreme temperatures and most all things that can be spilled on it.
Thatís a long winded way to say scrape off finish. Use WB Analine dye stain for best color retention and fill the grain because it is the right thing to do. Blend with a wiping stain to achieve desired tone. Apply the finish the hard way rubbing and wiping and sanding until you get a fine satin furniture finish. Ready up the surface for the one last full coat of finish. Itís your choice to wipe, rub or shoot it. Let it cure and rub it down, prep it for wax and wax the pieces. Now that will be a finish that was created not applied.
Finally, to answer your three questions:
1. What was used does not appear to be appropriate or suitable.
2. Go with a high grade Spar Varnish and back off the gloss by using 50%SG/50%GL or better a 60/40 mix looks top dollar and wears well.
3. Spot repair is not the answer here adhesion is the problem I see. If moisture was the creator of this then the breakaway of the finish would not be so sharp. The 20/21 looks like it never stuck. Get it off and deal with it like the professional you are. As far as cost goes what I have described will be approximately 400 to 500% more than a chemical strip job and a gloss 2k POLY with color.