Repairing a Deep Gouge in Veneer
Expert advice on filling, patching, and blending for a repair job. November 14, 2009
Question
I have to do a deep gouge repair on a piece of veneer. It is a very high end piece. I usually do not do this kind of repair - I mainly do kitchens and spray water-based poly. The topcoat on this is probably, I would guess, a cross linked poly. What is the best way to fill the gouge? Can you guess at the topcoat, which I will need to blend in with the existing (friend says the piece is from a jet)? He also brought me a sample piece to experiment with.
Forum Responses
(Finishing Forum)
From contributor D:
What type of help are you looking for - gouge filling, veneer cut and replace? Do you have any experience repairing any type of finish? Can you identify the type of wood the piece is made of? Do you have the ability to match a high-end finish? Who owns this piece, friend or client? What will happen if you make a mess of this repair - will you be responsible for its replacement or correction? These are a few of the questions that you need to answer before we can properly assist you. Of course, a picture will help also.
From the original questioner:
I do have experience with staining and filling. I usually fill with Famowood, and use a water-base poly topcoat, but with this piece I am going to need to fill and do some faux work. I was wondering what you would fill with and what products you would use to faux in the color. I am pretty sure 2k polys are mostly used for the topcoats in this application. I have some latitude with this project, so liability is not a concern.
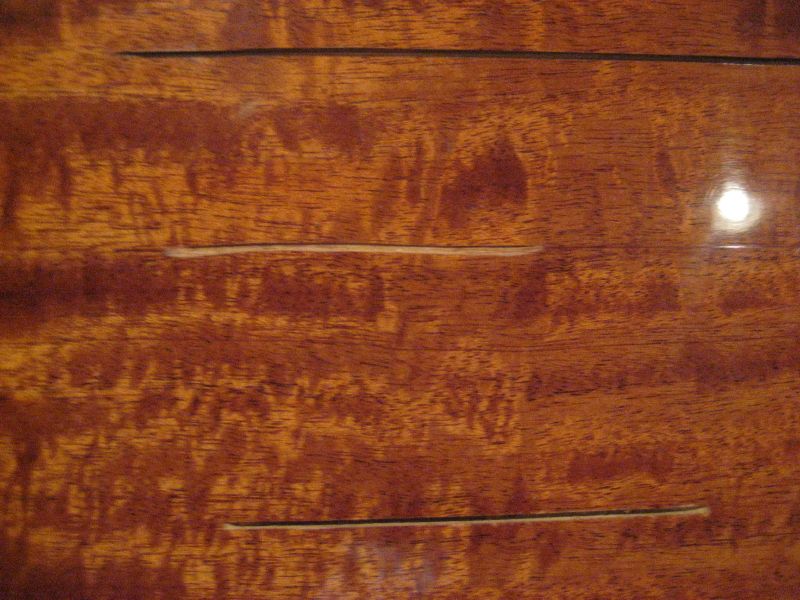
Click here for higher quality, full size image
From contributor D:
A Famowood fill probably will not get you the results you are looking for. It may work, but most likely not. I would probably use a burn-in shellac stick repair with lacquer color matching and graining. After color matching is complete, either spot seal and finish or scuff and do a complete respray of the entire surface. Of course you will need to identify the finish on the piece; guessing may end up causing more trouble down the road.
From contributor G:
Second the shellac stick idea. Are you dealing with 3 gouges here? How deep are they? There is nothing for scale in your picture. Also - is this piece in a high-visibility area - like at eye-level?
From contributor O:
The finish is most likely polyester, if it is on an airplane! Look at what Mohawk has to offer for filling the long gauges... They have a lot of different materials to select from. Lastly, make sure what type of finish is currently on your wood veneer.
From contributor R:
I do this kind of high-gloss repair for a living (pianos), so welcome to my world. I strongly urge you not to use burn-in sticks with this finish. It is certainly a hard catalyzed finish of some sort, and whether it is polyester (very likely) or cat lacquer or conversion varnish, the problem will be the same - creating a color blended fill that will have equal durability, depth, and sheen. Burn-in sticks can give you the depth, but nothing else. That's what makes this type of coating so doggone difficult to restore. I suggest that the filling and coloring be done together, in layers, after the semi-solid color is in place via the filler. Easiest availability for the best in polyester materials, go to alliedpiano.com.
You can mix powdered stains from any source (they are chemically inert) to tint some of the resin to create the base color/initial filler. It's this color that you will build on, so take the time to get it right. Leave a bit of translucency to it so the color thins out well at the edges. Be sure to prep sand the edges of the gouges with 400 grit dry 3M gold or Norton Champaign, and extend the sanding patch out 1/4" all around onto the flat surface. What you are doing is putting a chamfer on the edges to ease the transition from the original surface to the repair, and securing a good physical bond. Wipe the sanded areas with acetone to remove all dust or contaminates. This is important because these finishes cannot be bonded to chemically. I recommend some dyes for color matching - the powders alone are too muddy for this kind of work. But here is the thing to keep in mind - keep the fill and the subsequent layers of color lower than the surrounding surface until it suits you, then put the final clear build on.
1) Let each layer gel (the batch remnants in your mixing cup are firm, but still sticky on top) before adding the next layer or color step.
2) Thin each resin step with a little bit of acetone so that buildup is less.
3) When it looks right, that's when you put on the final clear resin step, giving it the ultimate depth.
These are the highlights of a job like this, with many steps that you'll have to fill in from your own experience. This is a big undertaking, and maybe this goes way beyond what you wanted to try. But the people at Allied Piano will help you.
From contributor S:
I'll second what contributor R writes, especially on prepping the damaged areas, but I'll also suggest some methods of skipping some steps. You can start with your coloring using Mohawk's Blendal Sticks (they're like oil pastels but have a unique beeswax formula). You may find that just brushing in some thinned dewaxed shellac brings you the coloring that you need. Then, use the Blendal Sticks lightly enough to kick the color. You want to avoid the scarred look when done, but you also want to avoid a light line mark when done. It's a tightrope of coloring/toning that you want to balance on.
Next, after you feel that your coloring is good, lay down a brushed on coat of thinned Zinsser SealCoat shellac. This is your barrier coat. It's also your tie coat. On top of this you can dope in (brush in) your topcoat.
You'll need to wet sand your damaged area flush. Block sand. You need the flatness of the block to avoid sanding out your new fill. You'll need to polish. Finish off with a cotton buffing wheel and polishing rouge for a swirl-free finish mirror gloss.
From the original questioner:
Thanks for the responses. Konig looks as though they have a nice line of products.
From contributor S:
Konig does have nice products. Which ones are applicable here? Rex Lithe can be used. It's like a clear version of Bondo. Then there's the polyester lacquer. They also have a traditional burn-in stick. None of their wax sticks are suitable because you have a finish with too much gloss for them.
If the gouges aren't too wide, you could also use thin CA glue (not thinned CA glue, but the thin, low-viscosity variety) for your fill. Don't use the activator. Let it harden on its own. Then, level and polish. Will you get an undetectable repair with CA glue? No. You can get a very good repair and use the 6 x 6 rule... from 6" you can see it and from 6' it looks real good.
From contributor R:
Good alternatives. If I may add one more thought to the final steps: be mindful of the thickness of that original clear coat. Use as little of the sub-800 grits as you can. Get to the 1000/1200/1500/2000 grits right away, but use them all. This makes the final machine buffing a breeze.
AI enhanced answer (added Jan 22, 2025):To repair a deep gouge in wood veneer:
1.
Clean the Area: Use a soft cloth to remove any debris or dust from the gouge.
2.
Assess the Damage: If the veneer is loose or lifting, apply some wood glue with a small brush or toothpick under the veneer, then press it down and clamp or tape it until dry.
3.
Fill the Gouge:
- For small gouges, use a wood filler that matches the veneer color. Apply with a putty knife, slightly overfill, then let it dry.
- For deeper gouges, consider using a two-part epoxy wood filler for better durability. Mix according to instructions, apply, and let it cure.
4.
Sanding: Once the filler is dry, sand it down with progressively finer grits of sandpaper (start with 120, then 220, and finish with 320 or 400) until it's flush with the surface.
5.
Staining: If the filler doesn't match the veneer color, apply a wood stain to blend it in. Test on a hidden area first.
6.
Seal: Finish with a clear varnish or lacquer to match the existing finish, ensuring the repair blends seamlessly.
Remember, patience is key; allow each step to dry thoroughly before proceeding to the next.