Question
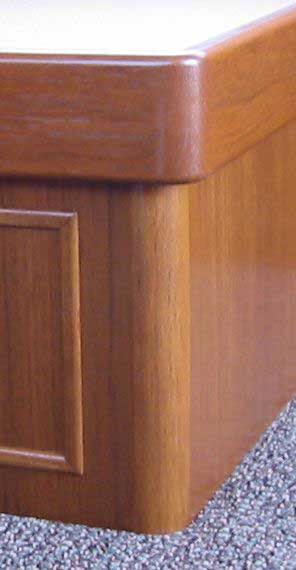
I have a PC 690 router and need to do a 1-1/4" radius on mitered birch fascia panels of a desk I'm building. I'm guessing it would be nearly insane (if not incredibly dangerous, both to myself and the piece) to try to attack the raw corner directly with this bit. Should I start with a smaller radius and build up? Or should I try to cut off the corner first by some means? Doe anyone have any recommendations?
Forum Responses
(Architectural Woodworking Forum)
From contributor E:
That is an enormous bit to put in a 690. It won't pass through the stock base, so you'll have to make one. It�s also going to have a lot of torque (I assume you're free handing this).
First off, use a bigger router. Second, if at all possible, do it on a router table. If you must freehand it, take small passes and work your way up to the full cut. Start shallow, make a pass, lower the bit some, make another pass, and etc. Also, be aware that the ends of your piece are going to want to blow out as you exit the cut. Be safe, and if you can, find a different way to do it.
So, short of purchasing a new (and expensive) router which I won't need for anything else - what are my other options? Should I just try to glue a machined rounded piece in the corner instead? (I think it would be ugly). It's only two 5" long corner joints I need to cut down (crosscut).
I would suggest that you go low-tech. Trace the intended arc onto a small piece of cardboard and cut that out. Then use it as an indexing jig. Trace the arc onto both ends of the desk top and use a block plane to nibble down near the line. Fair the curve with a patternmaker's rasp, Shinto rasp, or whatever, then sandpaper. Use that cardboard curve as an indexing check jig and slide it down your curve to check for high and low spots.
I purchased a Lutron cord dimmer that I'll use as a variable speed device. After looking to the router base, I'm thinking I'll just remove the base plate entirely and tape something like Teflon onto it so that the frame slides nicely across the wood surface. Maybe I can fabricate some sort of guide across the base so that lateral play, and hence eating into the piece won't be a possibility.
The slow down switch is excellent advice as is the larger base. Custom bases are easy to make. You can also find stock bases with large diameter holes readily available at any wood working supplier and most non big box tool suppliers for the PC 690.
If you feel more comfortable cutting out the waste with hand tools then by all means do so. I would be lost without my hand planes. I keep my block plane in the leather hammer loop on my nail bags and reach for it constantly. For what you are doing I think the router would produce more consistent results in a lot less time.
Anyway, it seemed to me that any slight inconsistencies would be hidden by the sanding passes. The only real mishap was a miter-fastening brad that I shot through at an unfortunate angle - it went a bit too deep and got revealed by my planning - efforts to punch it back with a brad punch just gave me a nice fat hole! Should I pack it with sawdust and glue?
I was only using a 1" radius roundover, but I'll tell you, when I fired that baby up, it was like standing in front of a DC3! It was very scary business. I used light passes by dropping the bit and a very steady hand and foot placement. It worked out nicely, but my nerves were vibrating for some time after.
The bit you are talking about is 50% larger. That would be even more intimidating. All due respect to Justin, but I would never try that by climb-cutting with the bit at full depth. If there was any grab, you could be in a very bad place in a very short time. Keeping the bearing in contact and dropping the bit a little at a time gives you a much more stable and safe operation in my opinion.
Progressively lowering a router into a cut does allow you to control the router with the bearing always in contact with the material and lends itself well to the use of a plunge router like the 3612. I often use this method as well but tailored my response to your current tooling and my most frequent practices.
If you know the risks and where problems can occur you are better able to anticipate them and account for them with your technique. The climb cut only wastes away a small amount of material. Most of it is removed with forward passes.
I have done this with radius bits up to 1" and feel comfortable with the process. I find it faster and easier to just set the router depth once and be done with it and the risks manageable with technique, planning, and experience.
If the climb cut makes you nervous then just waste the material away with slow shallow cuts following the feed direction of the bit. When cutting in either direction a clear view of the bit is a must with this technique. Also clamp the material securely to a bench or horse. Try a cut like this first with smaller diameter bit. If it works for you add it to you bag of tricks.
Anyway - I actually have a plunge base I could have used for the 690. But it would be only slightly faster than incrementally setting the depth on the normal base, I suppose. I agree with the safety comments. Time and again - it's been clear to me that being freaked out by an operation has, most of the time, resulted in bad work and/or danger.
Comment from contributor S:
I regularly round over with a 7/8" and I always climb-cut. Always cut with the router coming towards you - it's much easier to control. I'm not sure how easy it might be on the bigger bit but it's worth a try. I always leave my bit at full depth and take light passes until I reach the finish cut (2-3 passes on the 7/8" bit). Unlike on a router table where the fixed router can grab and throw the piece when climb-cutting with such a big cutter, a hand held router usually climbs its way out of the cut. It's very easy to control.