Running Small Raised Panels on the Shaper
Advice on accessories, methods, and jigs to safely machine small pieces on a powerful shaper. March 26, 2010
Question
I’m looking for ways to safely run some small panels on the shaper. I have a three wing cutter, with a 3/4 " bore on a delta heavy duty shaper. The work calls for 3 1/2" X 6 1/2" raised panels. Between the hole in the table for the cutter, and the fact that removing the wood leaves so little to ride on, it just feels unsafe. I do not have a power feeder. Any suggestions?
Forum Responses
(Cabinetmaking Forum)
From contributor A:
Start with an 11" x 6 1/2" panel. Raise all four edges. Rip the panel into (3) 3 1/2" x 6 1/2" panels and raise the remaining edges. Lots of finger boards help. I prefer to use rub collar bearings for raised panels. You should cut some disposable fence that will provide support to the entire piece.
From the original questioner:
That sounds good, but I don't see the advantages. Granted, the end grain will be set, but running the narrow pieces (to raise the sides) still leaves little to ride on. I am using a dedicated fence, open only enough for the cutter, and the panel tongue rides on the fence. Also I thought about feather boards, but the hole in the table is so large.
From contributor J:
Get or make yourself an insert for the hole to make it smaller. Our Felder has three concentric interlocking rings for different size cutters. Get a feeder while you are at it. You will kick yourself for not doing it sooner. It makes the scariest machine in the shop a whole lot easier and safer to use.
From contributor T:
Raise your cutter up 3/4 and screw your small panel to a larger piece of ply or particle, run your panel, unscrew, rotate 180, screw down, run, unscrew. We usually can run two edges without the larger pc under, but if you can't, just keep turning and screwing down. You get small holes in the back, but it's better than no fingers!
From the original questioner:
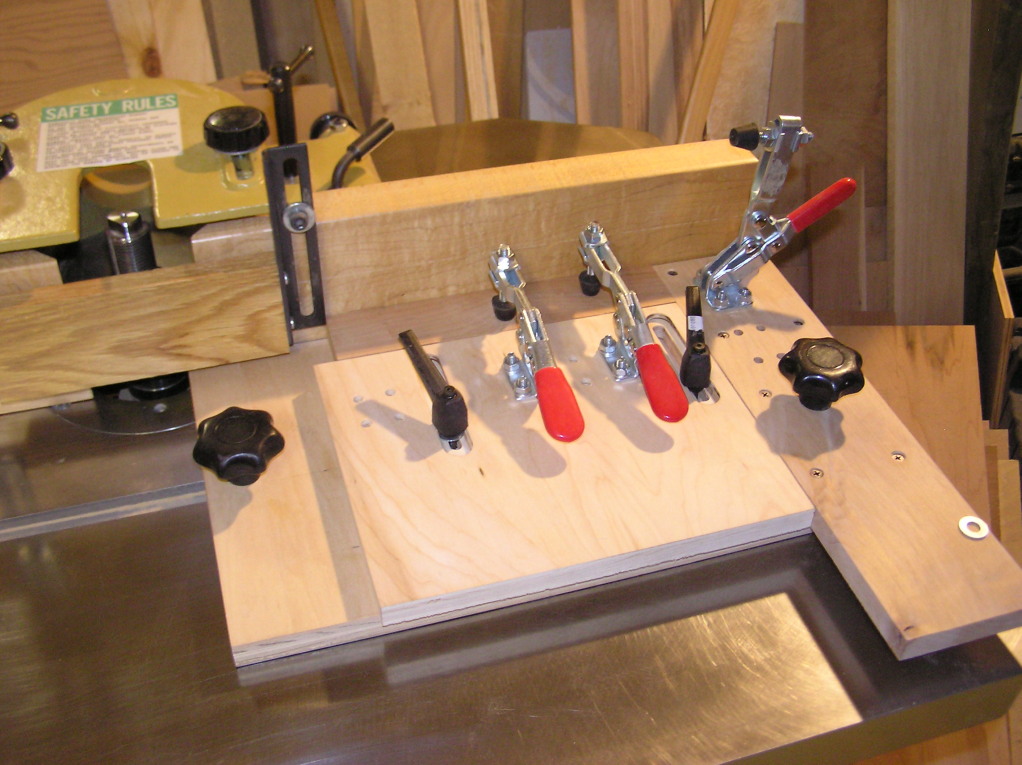
It sounds like you are running the work between the table and the cutter. I always was taught to have the cutter below the work, so it is not trapped there, right? I am interested in the sled with toggle clamp idea. Can this be run in the same manner, with the cutter below the work ?
From contributor L:
You could also use a (melamine bd.) sub table with a filler fastened to the sub table to support the panel as it exits the cutter. This also takes care of any big gap you may have around the cutter. Put a cleat on the bottom of the sub table that fits into the miter slot and blocks below the sub table to keep it from sliding in the miter slot (sub table slightly longer than shaper.) Always run cutter below the work! Buy a four wheel (allows two wheels on each side of cutter) feeder as soon as you can – a lot safer!
From contributor C:
I second the toggle clamp and sled. What are the dimentions of the actual raised portion of the panel? If that gets too small, wedges/supports would have to be put on sled to support panel when clamped, assuming the bit is cutting out the bottom.
From contributor B:
Buy a panel crafter. Clamp small parts tight, floats on air and your fingers are away from the cutters.
From contributor Z:
Panelcrafters are super (we have a couple) but they won't hold very small parts. After my partner shortened his pinky finger by about 1/4" and just skinned the next one I made up the sled with toggle clamps shown in the picture. It may be more complicated than you need but so far it's done everything we need for teeny-tiny parts that the Panelcrafter can't handle. If you remove the two clamp sled you can use it to run cope cuts, put the sled back on for either stick cuts or small panels.

Click here for higher quality, full size image
