Question
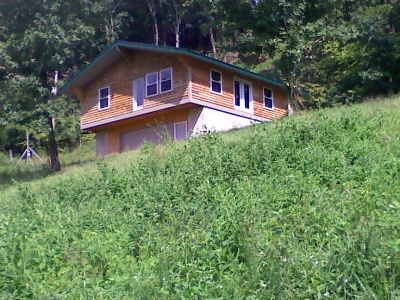
This cabin is sided with 5/8" x 8" sassafras I cut and air dried. The gable ends are the scrap and curved boards cut to 14" and corners 45 degree nipped for the shakes. My understanding from the older farmers is sassafras lasted forever if it was up off the ground, and is lightweight and strong, used for wagon beds, stock racks, gates, etc.
All this has 2" overlap and is applied over Tyvek house wrap. Screwed at studs just above the underboard so it can float, and a couple screws at top edge to stay in position. I used this technique with nails on poplar 12 years ago, and no board splits.
Forum Responses
(Sawing and Drying Forum)
From contributor T:
Looks good. What was the MC when you applied it?
The barn I did 12 years ago was with green fresh sawn poplar and has no issues, except needs another coat of repellent and the owner says no - she loves the graying. The way I lapped and anchored the barn, poplar will last 75-100 years - nothing to hold water.
I've learned two major rules: siding has to move/float, and keep the water shed to the outside and away from building.
Once I decided the height the first run started, I chalked a line for the top edge of starter board, then made a guide mark every 6" up the wall every 3-4 studs and marked/leveled centerlines up each stud for nail/screw references. I also ripped and installed a 2" strip along the bottom edge so the first board would tilt the same as the rest. All my base, corners, windows and door trims were covered with vinyl clad aluminum prior to siding install. I left 1/8-3/16" gap where the siding butts the trim and filled with a color matched caulking (Solarseal 900, extremely durable and paintable).
Anchoring: I used a coated finish/deck screw (with a small head) installed at each end by the top edge and every third stud in between (locks board in place), then installed lower screws 1/2" above the underboard so the wood could move/float without destroying edges.
The siding butt joints (this can be a whole thread of proper technique discussion, but this is the way I chose this time): with the siding being close to final shrinkage, I chose to use a caulk (Solarseal 900) that I thought would be acceptable in color, similar to the wood tone, and I spread a bead on each side of the butt and put ends together. This would ooze caulk out some, but do not remove until 24 hours of curing, and then with a razor knife. The argument is this joint will move/spread in time, but I felt it sealed the end of the wood best.
Sealing: All manufacturers have different suggestions. I personally like a repellent type of stain/sealer. It allows the wood to breathe better. I'm not into hard finishes because I've seen too many flake, peel, blister and just unbond from the wood movement. Supposedly there's been great improvement with these products, but time will tell.
Also several companies offer a borate type termite/bug spray. I do suggest using one. Even though the poplar and the sassafras aren't as prone to them, it's always good for the other bugs and woods that are involved.