Scarf Joinery on a CNC Router
CNC pros show how they machine scarf joints for continuous pieces like stair stringers and yacht hull planking. December 27, 2008
Question
I have to make several long skirt boards for a staircase project and need to scarf them together. Has anyone tried this on a CNC?
Forum Responses
(CNC Forum)
From contributor O:
Yes, I have. I scarf plywood sheets together all the time. I use a 1 1/2 inch diameter ball tool to do the angle. I also put a registration step at the top and bottom of the scarf for line up.
From the original questioner:
Any chance you have a picture of the bit or maybe a drawing of how you handle this? I tried it today ramping a 3/4 straight cutter about 12 inches. Worked well but not perfect!
From contributor B:
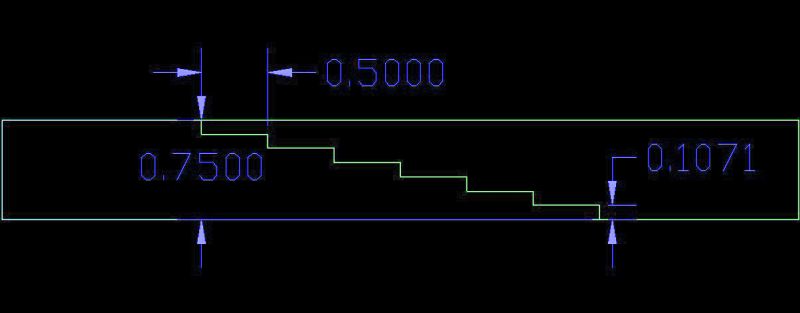
The image represents a "step scarf," easy to make with a CNC and very useful for joining material together. Just machine one side, turn the material to be joined over, and machine the opposite side, and glue the joint. The steps make a great index, and the joint will flex, if needed. If you need more flex, just put in more steps, with thinner risers, making the scarf longer or wider, depending on your perspective.

Click here for higher quality, full size image
Small note: I generally see scarf joints used with boats, that's why I mention flex. With thick materials, the joint will be generally as stiff as the material itself.
From the original questioner:
Never would have thought of that! Can't wait to try it in the morning. Many thanks!
From contributor O:
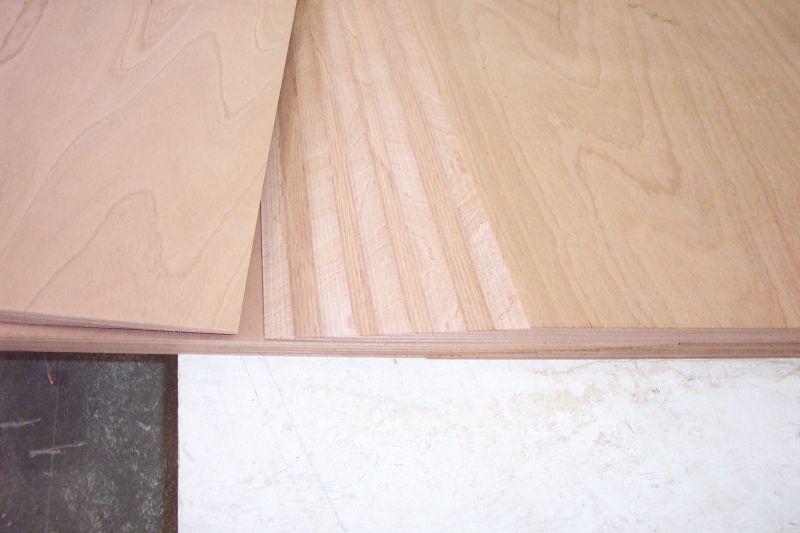
Here is a ramped scarf joint. The stepped scarf is not good enough for boats, as they turned down my first attempt, as I made it with steps. They claim "not enough flex" on that type.

Click here for higher quality, full size image
From contributor B:
If you spread the scarf over a larger area, with a scope of between 7:1 to 12:1, it will flex like a normal scarf joint.
From contributor O:
The scarf shown above is a 12 to 1. It's 12 in. wide on 1 in. thick material (Sapele) and runs for the length of the sheet 8 feet. When the boat engineers told me to make a ramp or angled scarf and that my steps would not work, I couldn't argue because I know nothing of the stresses involved in the boat, which is a 90 foot yawl costing 12 million and is due to be launched this fall. We just started getting into the boat industry and I find them to be very picky. I guess it's just because they know what they want and are willing to pay for it.
From contributor M:
Contributor B, very slick - I like that step joint a lot. I have done it with ball mills as contributor O in the past, but will try the steps next time for sure, so I have both bullets in my gun.
From contributor B:
Yes, they can be picky. Again, I've had no issues with the guys I've dealt with. Actually, several have asked to change to the step scarf. What I find in the boat industry is some companies just will not change, period. Always tough to combine tradition and technology. The boat industry is where the stone age meets the space age. 12 million? Now that's a ship, not a boat.
From contributor O:
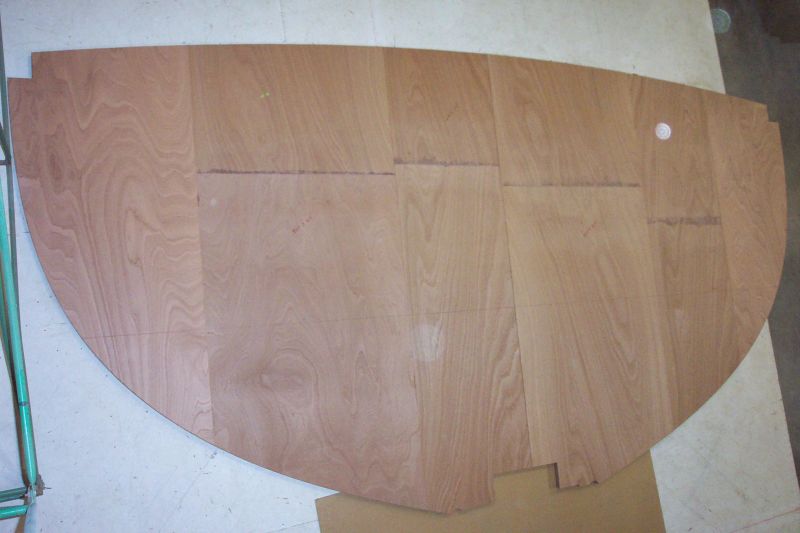
Here is one of the bulkheads all assembled on the floor. It measures 22 feet wide and over 12 feet tall, all 10 sheets scarfed together to make one sheet 1" thick. This is one side of a double wall amidships. So yeah, it is a big boat - has a 110 ft. carbon-fiber mast. Was a lot of work for the CNC to do all the walls in this one boat.

Click here for higher quality, full size image
From contributor K:
How did you go about clamping those joints? Also, how in the world did you handle/transport such a large piece?
From contributor O:
Being that most all the sheets had to be scarfed on the ends as well as the sides, I decided to do the ends first because our machine can take up to 5 ft. X 14 ft. sheets. So this gave me several sheets that were 4 X 12. Then I cut out the shape on the CNC and scarfed the 8 ft. sides. The sheets then were trucked to the shipyard and assembled on the floor. They laid down plywood on the floor, covered it with a plastic tarp, then attached a straight edge to the floor, then laid each sheet down, gluing it on the scarf area and screwing them right to the floor. The next day they take out the screws and attach clamps to the top of the bulkhead and hoist it up and into position, then attach it to framing inside the boat. (This is done while the boat is upside down and the hull is not in place yet.) It was very interesting how they handled the parts I did for them. Dissecting their drawing and figuring out which side to scarf and coming up with the file names, etc. was my biggest task. But it worked out fine and they were very happy.
From contributor S:
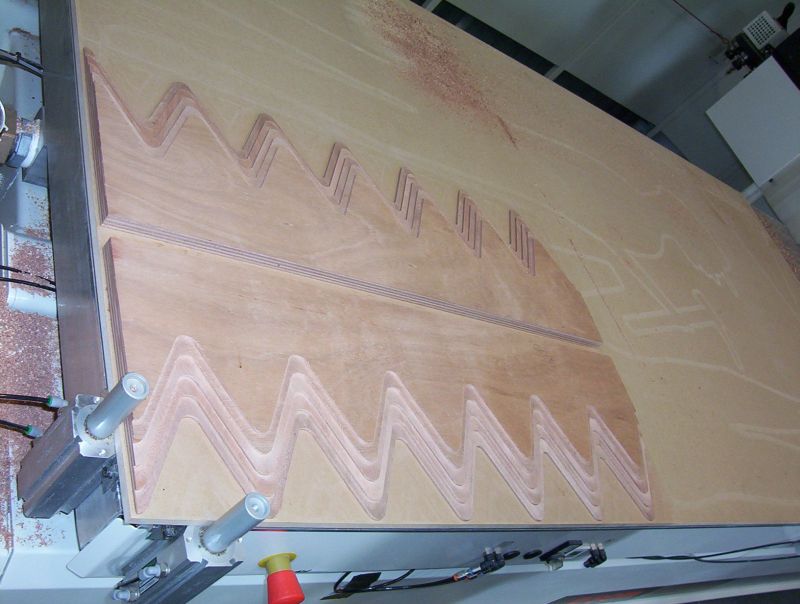
We cut all of the parts using stepped scarf joints for an entire passenger catamaran ferry. Bulkheads, hull planking, decking and super structures. The joint itself was just as flexible as the ply that was being used and failed after the ply did. We just changed the number of steps depending on the thickness of ply being used. The biggest difference between our joint and the ones described above is that ours takes the shape of a Sine wave, which will use more of the sheet up, but dramatically increases the glue area and flexibility of the joint.

Click here for higher quality, full size image
From contributor O:
That's very interesting. But what I find even more interesting than your scarf joint is the outline of a guy with a pickax on your spoilboard. I cut some deer that locked together the other day and were freestanding. Man, we do know how to have fun, don't we?
From contributor S:
Ha ha... Well, you are observant. They were freaky looking things (I didn't draw them, just programmed them). He was one of a series that we did for a work party we had just after we purchased the machine. The idea being that CNCs create workers and don't replace them. For that year's X-mas party, I drew up a freestanding bull since the party had a western theme. They were to be used as lasso targets for the drinking games. Was great fun, especially as it was muddy as hell. We have moved onto much more outrageous things now.


