Scribing Wood Mantels to Stone or Brick

The pros demonstrate how to make that mantel look like it was "made to fit." February 8, 2008

Question
I have a potential customer that would like a shelf mantle installed. I have built a few, but this one is on a rough surface. The surround is floor to ceiling stacked stone/brick. They are cut to about 4" high and length varies. Their sides are very rough, with about 1/2" variation on the surface, like chiseled stone, and the mortar joint is about 1" back from the face. They are mortared in place like brick, with level rows.

My concern is that it isn't practical to scribe the wood to such a rough surface, and I wouldn't want to leave large gaps all the way around. I don't know how deep the stone is to know if it is even practical to knock a section out and then have it reinstalled and cut to fit around the mantle.

Any suggestions on how to tackle this one?

Forum Responses
(Architectural Woodworking Forum)
From contributor D:
We've done just that quite a bit. It is very labor intensive, so charge accordingly. You have to build the mantel as a box. The shelf goes on top of that and overhangs, then crown, etc.

To make grinding easier, make a mockup of the box including shelf out of 1/4" MDF. Go on site and grind. Then you can grind in your shop to get it real close, and fine fit on site. Also when you build your mantel, you could cut the parts that are going to be against the rock at a 45, less material to grind away. The install will probably be more than the mantel.


From contributor W:
Educate the customer that gaps on a mantel on stone are normal, and then you can scribe and fit with a jigsaw or rotozip to get the mantel reasonably close and level.


From the original questioner:
Contributor D, I normally assemble the box and shelf, then apply the crown in the shop and finish it as a unit for install. Are you saying you would do it the same way with a mockup, grind the MDF mockup to conform to the wall, and then use it as a template to grind the finished product? Also, for similar scribing work, I have used my Bosch angle grinder. Is that what you use?

For the install I normally slap a board or built-up piece on the wall, slide the mantle over it and shoot a couple finish nails into the top. I would expect that this will be a very lengthy install for such a simple piece.


From contributor D:
Yes, yes, yes and yes. The mockup box needs to be the dimension of your structure box and shelf included. Not dimensionally thick like the real one. Just the same overall dimensions. Not including the crown. That is easy enough to do onsite. For grinding we have used angle grinder, rotozip, 'Lil Blue (small old Makita trim saw). Did it once in a light rain and got it to "good enough" when I got shocked once too many.


From contributor W:
You guys must be dealing with some awfully rich customers. Our estimated install time on stone is 3/4 hour.


From contributor D:
Is that with grinding it to the irregularities in the stone?


From the original questioner:
I am considering contributor D's grinding method, but on the finished product, since the home is 45 miles from mine. Contributor W, how do you scribe to stone surfaces?


From contributor D:
45 miles? C'mon - that's nothing. Our range is up to 75 miles one way, with some customers as far as 150. Yes, we charge them for the mileage.


From Gary Katz, forum technical advisor:
I scribe mantels to stone, brick, you name it, without making mockups or 1/4 inch templates, and without doing it in the shop. Just allow the additional material for the scribe, then figure on doing the scribe in two or three steps. If the mortar joints are deep, or the stone is highly irregular, I make the first scribe about 3/4 of the depth, then cut the next one pretty close to right on.

I use a jig saw with a Collins coping foot to cut the scribes. Sometimes if the pilaster is wide, I can cut from underneath. There's usually enough room inside the hollow mantel and pilasters to move the jigsaw around. If not, I cut from above, but I don't like to. Cutting from the top means using a finer blade to prevent tear out on stain grade work, so it's slower going. Takes about 20-30 minutes to scribe a pilaster leg to a brick surround, about the same for the shelf. I used to use a grinder some time ago, but got tired of the noise and the dust, and the grinder never cut as delicately as the jigsaw does.

Here's the scribe after the second step. It still needs a little more work to get tight to the brick face. A couple are a little bit over cut... Oh well, a little caulking on this paint grade pilaster won't matter.


Click here for higher quality, full size image

Here's the cutting part...


Click here for higher quality, full size image

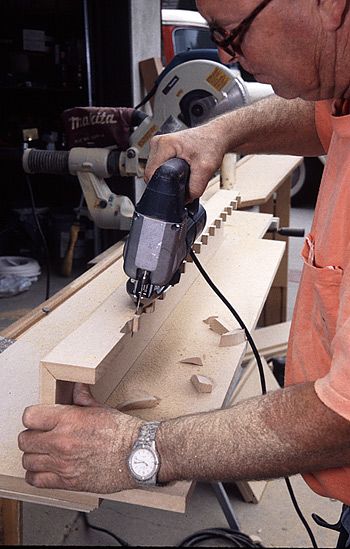
Here's the scribing part...


Click here for higher quality, full size image


From contributor W:
A mantel surround with pilasters is a lot more work than a mantel shelf. However, I let customers know before the sale that gaps on stone and brick is part of the rustic character of the product. If they want it scribed tight so it looks like it is imbedded in the stone, it's a lot of work and a lot of money. Usually customers agree with the rustic look idea when they get the price of a tight scribe.

We usually level a fastening block on the stone wall and then place the hollow mantel over the fastening block, level, and then scribe to fit. We use a jig saw with a blade that cuts on the downstroke, as well as a rotozip. If it's a finished product, make sure to use wide masking tape before you scribe it or fit it so as not to scratch the finish.

In my opinion, the key is customer education. The customer needs to know it is not going to be a tight fit. It will be level and notched around the larger protrusions of stone. If they want a tight fit, they are better off filling the gap with mortar, at least then it will match the mortar fit to the wall and ceiling. If they insist on a tight fit, they need to either pay the price or go someplace else, and quite frankly you might be better off if they went someplace else. If you charge them an arm and leg, they will want their money's worth and complain like hell at every gap, no matter how small.


From contributor D:
Gary, your scribe pictures and explanation are great. For a leg with only half on the brick. It's not as easy with a boxed out shelf. On the shelf it becomes a three dimensional issue and therefore takes more time. No?

Contributor W, we give our customers a choice on scribing to rock and brick.
1) No scribe, you can fill it with mortar (quoted).
2) 1/2", no gap greater than 1/2" (quoted).
3) Tight 1/4", all gaps under 1/4" (by the hour).


From the original questioner:
Thanks for the great pictures and explanation, Gary. I hadn't seen that coping foot before. Do you have a source you can share?


From Gary Katz, forum technical advisor:
The coping foot is made by David Collins at collinstool.com. It has a lot of uses other than just coping base, chair and crown. It's great for cutting scribe lines because you hold the saw beneath the work piece and follow the line with no tear out, kind of like using a scroll saw.


From contributor S:
Scribing to brick with MDF is one thing, but with a plank, you will have all of those little protruding short grain line sections. If you bump one, and break it, that would have to be painful. Have you done that with hardwood?